Simplest method to Implement 2 Way Authentication using SSL – Example With Source Code Available
Every web application needs to be protected. There could be different solutions to choose from depending upon your requirement and feasibility. Some may choose basic form-based authentication or some may go all the way to Oauth2. In this article, we will see how we can implement 2 Way Authentication using SSL.
In 2 Way Authentication or mutual authentication, the Server and Client does a digital handshake, where the Server needs to present a certificate to authenticate itself to the Client and vice-versa. Once this handshake is successful then only further communication is allowed.
We will see step by step how to generate a self-signed certificate and configure that to our application and tomcat server. The image will give you brief idea on what I meant by above.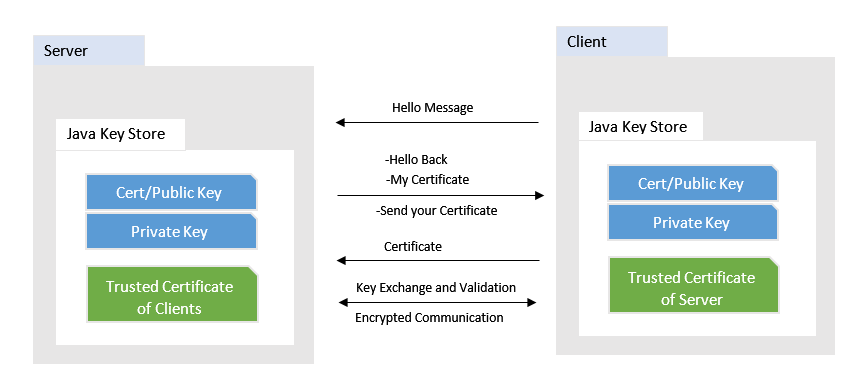
Software used in this sample
- Java 1.8
- Spring Boot 1.5.2.RELEASE
- Tomcat 8.5
We will use Java Key Store utility to generate and store our self signed certificates.
Create Self Signed Certificate for Server and Client
As we are using Keytool, please check in your environment this command or utility is available.
Create a JKS file for Server with below command on your shell or command prompt. Please make sure to change the information like company, location, etc as per your need
|
1 2 3 4 |
keytool -genkey -alias MyServer -keyalg RSA -validity 1825 -keystore "MyServer.jks" -storetype JKS -dname "CN=myserver.com,OU=My Company Name,O=My Organization,L=My Location,ST=My State, C=My Country Short Code" -keypass password -storepass password |
Now we need a certificate file that can be distributed as a public certificate to clients. Run below command to extract that certificate. It will ask for the password which you have supplied above while creating JKS
|
1 |
keytool -exportcert -alias MyServer -keystore MyServer.jks -file MyServer.cer |
Similar steps need to be followed for Client JKS file and Client Public Certificate
|
1 2 3 |
keytool -genkey -alias MyClient -keyalg RSA -validity 1825 -keystore MyClient.jks -storetype JKS -dname "CN=client.com,OU=Client Company,O=Client,L=CLient Location,ST=Client State,C=Client Country Short Code" -keypass password -storepass password |
For Client Certificate
|
1 |
keytool -exportcert -alias MyClient -keystore MyClient.jks -file MyClientPublic.cer |
Now we have all the keystores and public certificates. In order for 2 Way Authentication to work, we need to make sure that the Server recognizes the client’s public certificate and the Client is aware of the Server certificate.
|
1 2 3 4 5 |
--Add Server certificate to client truststore keytool -importcert -alias MyServer -keystore MyClient.jks -file MyServer.cer --Add client certificate to server truststore keytool -importcert -alias MyClient -keystore MyServer.jks -file MyClientPublic.cer |
At this point we have all our JKS and Certificates ready. We will configure these to our Tomcat 8.5
Configure Tomcat for SSL
As we need mutual authenticate we need to configure tomcat to request for a certificate from all the clients who want to communicate. This can be done by adding or updating the existing connector in tomcats server.xml. Please make sure you keep a backup of existing settings and files.
Copy the MyServer.jks to appropriate directory and configure the connector as below
|
1 2 3 4 5 6 7 8 9 10 11 12 |
<Connector port="8443" clientAuth="true" protocol="org.apache.coyote.http11.Http11NioProtocol" SSLEnabled="true" maxThreads="150" scheme="https" secure="true" keystoreFile="C:\core-jks\MyServer.jks" keystorePass="password" truststoreFile="C:\core-jks\MyServer.jks" truststorePass="password" sslProtocol="TLSv1.2" /> |
Restart Tomcat so the above changes will come into effect.
Configure Server and Client App for 2 Way Authentication
Server App
For Server application, we will have only a simple Rest Controller, that will be available at /hello resource.
|
1 2 3 4 5 6 7 |
@RestController public class TestController { @RequestMapping("/hello") public String hello() { return "Hello World!! You are seeing this only because I TRUST YOU!!!"; } } |
The Server App will be hosted on the tomcat which we configure in above.
Client App
The client app is also a Simple Spring Boot Application, which does a rest call to server resource as hosted above.
|
1 2 3 4 5 6 7 8 9 10 11 12 13 |
@Component public class HttpClient implements CommandLineRunner { @Autowired private RestTemplate template; @Override public void run(String... args) throws Exception { ResponseEntity<String> response = template.getForEntity("https://localhost:8443/ssl-server-0.0.1-SNAPSHOT/hello", String.class); System.out.println(response.getBody()); } } |
Apart from this we need to specify the client JKS as system properties. That can be done as below
|
1 2 3 4 5 6 7 8 9 10 11 12 13 14 15 16 17 18 19 20 21 22 23 24 25 26 27 28 29 30 31 32 33 34 35 36 |
@SpringBootApplication public class SslClientApplication { static { System.setProperty("javax.net.debug", "all"); System.setProperty("jdk.tls.client.protocols", "TLSv1.2"); System.setProperty("https.protocols", "TLSv1.2"); System.setProperty("javax.net.ssl.trustStore", "c://core-jks//MyClient.jks"); System.setProperty("javax.net.ssl.trustStorePassword", "password"); System.setProperty("javax.net.ssl.keyStore", "c://core-jks//MyClient.jks"); System.setProperty("javax.net.ssl.keyStorePassword", "password"); javax.net.ssl.HttpsURLConnection.setDefaultHostnameVerifier( new javax.net.ssl.HostnameVerifier() { public boolean verify(String hostname, javax.net.ssl.SSLSession sslSession) { if (hostname.equals("localhost")) { return true; } return false; } }); } @Bean public RestTemplate template() throws Exception{ RestTemplate template = new RestTemplate(); return template; } public static void main(String[] args) { SpringApplication.run(SslClientApplication.class, args); } } |
You can see that I have specified all debugging for SSL. So you will see how the server and client do a digital handshake. To load the server resource I have added a simple Spring Boot command line runner as.
|
1 2 3 4 5 6 7 8 9 10 11 12 13 |
@Component public class HttpClient implements CommandLineRunner { @Autowired private RestTemplate template; @Override public void run(String... args) throws Exception { ResponseEntity<String> response = template.getForEntity("https://localhost:8443/ssl-server-0.0.1-SNAPSHOT/hello", String.class); System.out.println(response.getBody()); } } |
Results
Regarding the results, if you try and load the URL in browser it will fail.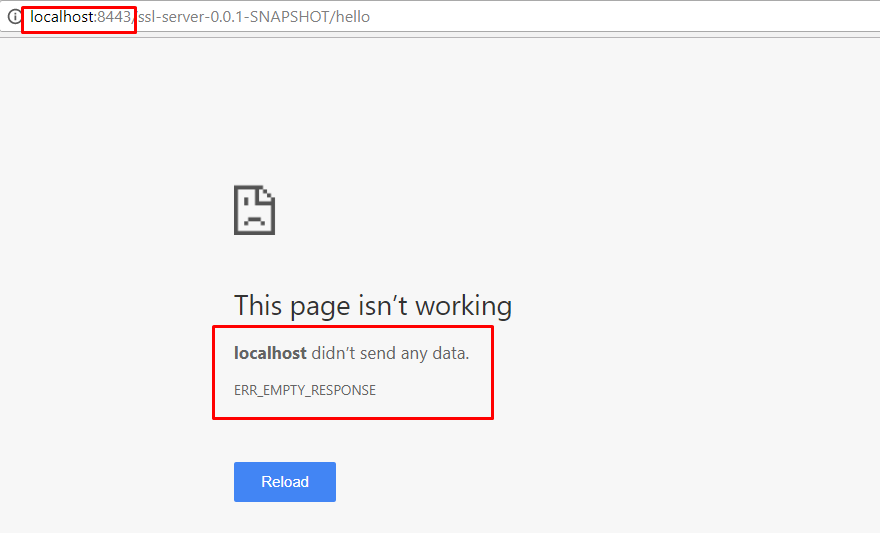
On the other hand, If I run the client where I am passing certificate details, I get the correct response.

You can see that I am getting the correct response. The response is sent only after the digital handshake is successful. The server and client exchange information that will be visible on the console.
Conclusion
You have successfully implemented the 2 Way Authentication using SSL certificates. Please feel free to get back to me if you have any questions. You can download the code from our repository mentioned below.
Download From Git


Hi Pavan,
I have two distinct projects both on tomcat. Here, when I add a self-signed server certificate in the server.xml it works fine.
But I am trying to configure 2 Way Authentication with the below configuration.
Server.xml (Server)
System Properties set in the eclipse as below (Client):
-Djavax.net.debug=all
-Djavax.net.ssl.trustStore=/Users/imran.inamdar/work/Local/SPClient.jks
-Djavax.net.ssl.trustStorePassword=storeit
-Djavax.net.ssl.keyStore=/Users/imran.inamdar/work/Local/SPClient.jks
-Djavax.net.ssl.keyStorePassword=storeit
Error on Tomcat Console on Eclipse (Client):
javax.net.ssl|DEBUG|2A|http-nio-9090-exec-3|2021-08-06 11:10:43.240 IST|Alert.java:238|Received alert message (
“Alert”: {
“level” : “fatal”,
“description”: “bad_certificate”
}
)
javax.net.ssl|ERROR|2A|http-nio-9090-exec-3|2021-08-06 11:10:43.242 IST|TransportContext.java:361|Fatal (BAD_CERTIFICATE): Received fatal alert: bad_certificate (
“throwable” : {
javax.net.ssl.SSLHandshakeException: Received fatal alert: bad_certificate
Error on Tomcat Console on Eclipse (Server):
javax.net.ssl|DEBUG|22|https-jsse-nio-7443-exec-5|2021-08-06 11:10:43.228 IST|CertificateMessage.java:1177|Consuming client Certificate handshake message (
“Certificate”: {
“certificate_request_context”: “”,
“certificate_list”: [
]
}
)
javax.net.ssl|ERROR|22|https-jsse-nio-7443-exec-5|2021-08-06 11:10:43.231 IST|TransportContext.java:361|Fatal (BAD_CERTIFICATE): Empty client certificate chain (
“throwable” : {
javax.net.ssl.SSLHandshakeException: Empty client certificate chain
at java.base/sun.security.ssl.Alert.createSSLException(Alert.java:131)
at java.base/sun.security.ssl.Alert.createSSLException(Alert.java:117)
at java.base/sun.security.ssl.TransportContext.fatal(TransportContext.java:356)
at java.base/sun.security.ssl.TransportContext.fatal(TransportContext.java:312)
at java.base/sun.security.ssl.TransportContext.fatal(TransportContext.java:303)
I got the same exception using cacerts and using OpenSSL too.
looks very simple. but may you explain why the keystore and truststore are set to the same shown in your config:
like on Tomcat:
keystoreFile=”C:\core-jks\MyServer.jks”
…
truststoreFile=”C:\core-jks\MyServer.jks”
and on client:
System.setProperty(“javax.net.ssl.trustStore”, “c://core-jks//MyClient.jks”);
….
System.setProperty(“javax.net.ssl.keyStore”, “c://core-jks//MyClient.jks”);
shouldn’t the trust store be the “cacerts”?
Thanks.
hi Pavan,
Where we need to configure connector, is it already configured in code or do we need to do explicitely?
Can i use Sprint Boot for this code to run?
Getting this error.
2020-10-02 13:07:50.261 ERROR 18348 — [ main] o.s.boot.SpringApplication : Application startup failed
java.lang.IllegalStateException: Failed to execute CommandLineRunner
at org.springframework.boot.SpringApplication.callRunner(SpringApplication.java:779) [spring-boot-1.5.2.RELEASE.jar:1.5.2.RELEASE]
at org.springframework.boot.SpringApplication.callRunners(SpringApplication.java:760) [spring-boo
Hi Pavan:
I am getting the following error:
java.lang.IllegalStateException: Failed to execute CommandLineRunner
at org.springframework.boot.SpringApplication.callRunner(SpringApplication.java:779) [spring-boot-1.5.2.RELEASE.jar:1.5.2.RELEASE]
at org.springframework.boot.SpringApplication.callRunners(SpringApplication.java:760) [spring-boot-1.5.2.RELEASE.jar:1.5.2.RELEASE]
at org.springframework.boot.SpringApplication.afterRefresh(SpringApplication.java:747) [spring-boot-1.5.2.RELEASE.jar:1.5.2.RELEASE]
at org.springframework.boot.SpringApplication.run(SpringApplication.java:315) [spring-boot-1.5.2.RELEASE.jar:1.5.2.RELEASE]
at org.springframework.boot.SpringApplication.run(SpringApplication.java:1162) [spring-boot-1.5.2.RELEASE.jar:1.5.2.RELEASE]
at org.springframework.boot.SpringApplication.run(SpringApplication.java:1151) [spring-boot-1.5.2.RELEASE.jar:1.5.2.RELEASE]
at com.opencodez.SslClientApplication.main(SslClientApplication.java:41) [classes/:na]
Caused by: org.springframework.web.client.ResourceAccessException: I/O error on GET request for “https://localhost:8443/ssl-server-0.0.1-SNAPSHOT/hello”: Connection refused: connect; nested exception is java.net.ConnectException: Connection refused: connect
at org.springframework.web.client.RestTemplate.doExecute(RestTemplate.java:666) ~[spring-web-4.3.7.RELEASE.jar:4.3.7.RELEASE]
at org.springframework.web.client.RestTemplate.execute(RestTemplate.java:613) ~[spring-web-4.3.7.RELEASE.jar:4.3.7.RELEASE]
at org.springframework.web.client.RestTemplate.getForEntity(RestTemplate.java:312) ~[spring-web-4.3.7.RELEASE.jar:4.3.7.RELEASE]
at com.opencodez.HttpClient.run(HttpClient.java:24) ~[classes/:na]
at org.springframework.boot.SpringApplication.callRunner(SpringApplication.java:776) [spring-boot-1.5.2.RELEASE.jar:1.5.2.RELEASE]
… 6 common frames omitted
Caused by: java.net.ConnectException: Connection refused: connect
at java.net.DualStackPlainSocketImpl.connect0(Native Method) ~[na:1.8.0_121]
at java.net.DualStackPlainSocketImpl.socketConnect(DualStackPlainSocketImpl.java:79) ~[na:1.8.0_121]
at java.net.AbstractPlainSocketImpl.doConnect(AbstractPlainSocketImpl.java:350) ~[na:1.8.0_121]
at java.net.AbstractPlainSocketImpl.connectToAddress(AbstractPlainSocketImpl.java:206) ~[na:1.8.0_121]
at java.net.AbstractPlainSocketImpl.connect(AbstractPlainSocketImpl.java:188) ~[na:1.8.0_121]
at java.net.PlainSocketImpl.connect(PlainSocketImpl.java:172) ~[na:1.8.0_121]
at java.net.SocksSocketImpl.connect(SocksSocketImpl.java:392) ~[na:1.8.0_121]
at java.net.Socket.connect(Socket.java:589) ~[na:1.8.0_121]
at sun.security.ssl.SSLSocketImpl.connect(SSLSocketImpl.java:668) ~[na:1.8.0_121]
at sun.security.ssl.BaseSSLSocketImpl.connect(BaseSSLSocketImpl.java:173) ~[na:1.8.0_121]
at sun.net.NetworkClient.doConnect(NetworkClient.java:180) ~[na:1.8.0_121]
at sun.net.www.http.HttpClient.openServer(HttpClient.java:432) ~[na:1.8.0_121]
at sun.net.www.http.HttpClient.openServer(HttpClient.java:527) ~[na:1.8.0_121]
at sun.net.www.protocol.https.HttpsClient.(HttpsClient.java:264) ~[na:1.8.0_121]
at sun.net.www.protocol.https.HttpsClient.New(HttpsClient.java:367) ~[na:1.8.0_121]
at sun.net.www.protocol.https.AbstractDelegateHttpsURLConnection.getNewHttpClient(AbstractDelegateHttpsURLConnection.java:191) ~[na:1.8.0_121]
at sun.net.www.protocol.http.HttpURLConnection.plainConnect0(HttpURLConnection.java:1138) ~[na:1.8.0_121]
at sun.net.www.protocol.http.HttpURLConnection.plainConnect(HttpURLConnection.java:1032) ~[na:1.8.0_121]
at sun.net.www.protocol.https.AbstractDelegateHttpsURLConnection.connect(AbstractDelegateHttpsURLConnection.java:177) ~[na:1.8.0_121]
at sun.net.www.protocol.https.HttpsURLConnectionImpl.connect(HttpsURLConnectionImpl.java:153) ~[na:1.8.0_121]
at org.springframework.http.client.SimpleBufferingClientHttpRequest.executeInternal(SimpleBufferingClientHttpRequest.java:78) ~[spring-web-4.3.7.RELEASE.jar:4.3.7.RELEASE]
at org.springframework.http.client.AbstractBufferingClientHttpRequest.executeInternal(AbstractBufferingClientHttpRequest.java:48) ~[spring-web-4.3.7.RELEASE.jar:4.3.7.RELEASE]
at org.springframework.http.client.AbstractClientHttpRequest.execute(AbstractClientHttpRequest.java:53) ~[spring-web-4.3.7.RELEASE.jar:4.3.7.RELEASE]
at org.springframework.web.client.RestTemplate.doExecute(RestTemplate.java:652) ~[spring-web-4.3.7.RELEASE.jar:4.3.7.RELEASE]
… 10 common frames omitted
2020-09-14 09:13:05.873 INFO 14088 — [ main] ationConfigEmbeddedWebApplicationContext : Closing org.springframework.boot.context.embedded.AnnotationConfigEmbeddedWebApplicationContext@54a7079e: startup date [Mon Sep 14 09:10:41 EDT 2020]; root of context hierarchy
2020-09-14 09:13:05.874 INFO 14088 — [ main] o.s.j.e.a.AnnotationMBeanExporter : Unregistering JMX-exposed beans on shutdown
These are my steps:
step 1:
server certificate:
keytool -genkey -alias MyServer -keyalg RSA -validity 1825 -keystore “MyServer.jks” -storetype JKS -dname “CN=myserver.com,OU=MyCompany Name,O=My Organization,L=My Location,ST=My State,C=My Country Short Code”
step 2:
keytool -exportcert -alias MyServer -keystore MyServer.jks -file MyServer.cer
step 3:
client certificate:
keytool -genkey -alias MyClient -keyalg RSA -validity 1825 -keystore MyClient.jks -storetype JKS
-dname “CN=client.com,OU=Client Company,O=Client,L=CLient Location,ST=Client State,C=Client Country Short Code”
step 4:
keytool -exportcert -alias MyClient -keystore MyClient.jks -file MyClientPublic.cer
step 5:
–Add Server certificate to client truststore
C:\JDK-1.8.0.x64\jre\lib\security>keytool -importcert -alias MyServer -keystore MyClient.jks -file MyServer.cer
step 6:
–Add client certificate to server truststore
C:\JDK-1.8.0.x64\jre\lib\security>keytool -importcert -alias MyClient -keystore MyServer.jks -file MyClientPublic.cer
step 7:
https://localhost:8443/ssl-server-0.0.1-SNAPSHOT/hello
I am able to run the server but when I run the client I get the following error:
Caused by: org.springframework.web.client.ResourceAccessException: I/O error on GET request for “https://localhost:8443/ssl-server-0.0.1-SNAPSHOT/hello”: Connection refused: connect; nested exception is java.net.ConnectException: Connection refused: connect
at org.springframework.web.client.RestTemplate.doExecute(RestTemplate.java:666) ~[spring-web-4.3.7.RELEASE.jar:4.3.7.RELEASE]
at org.springframework.web.client.RestTemplate.execute(RestTemplate.java:613) ~[spring-web-4.3.7.RELEASE.jar:4.3.7.RELEASE]
at org.springframework.web.client.RestTemplate.getForEntity(RestTemplate.java:312) ~[spring-web-4.3.7.RELEASE.jar:4.3.7.RELEASE]
at com.opencodez.HttpClient.run(HttpClient.java:24) ~[classes/:na]
at org.springframework.boot.SpringApplication.callRunner(SpringApplication.java:776) [spring-boot-1.5.2.RELEASE.jar:1.5.2.RELEASE]
… 6 common frames omitted
Caused by: java.net.ConnectException: Connection refused: connect
at java.net.DualStackPlainSocketImpl.connect0(Native Method) ~[na:1.8.0_121]
at java.net.DualStackPlainSocketImpl.socketConnect(DualStackPlainSocketImpl.java:79) ~[na:1.8.0_121]
at java.net.AbstractPlainSocketImpl.doConnect(AbstractPlainSocketImpl.java:350) ~[na:1.8.0_121]
at java.net.AbstractPlainSocketImpl.connectToAddress(AbstractPlainSocketImpl.java:206) ~[na:1.8.0_121]
at java.net.AbstractPlainSocketImpl.connect(AbstractPlainSocketImpl.java:188) ~[na:1.8.0_121]
at java.net.PlainSocketImpl.connect(PlainSocketImpl.java:172) ~[na:1.8.0_121]
at java.net.SocksSocketImpl.connect(SocksSocketImpl.java:392) ~[na:1.8.0_121]
I changed the password to “changeit” instead of “password” and I changed SslClientApplication.java in client project to:
System.setProperty(“javax.net.debug”, “all”);
System.setProperty(“jdk.tls.client.protocols”, “TLSv1.2”);
System.setProperty(“https.protocols”, “TLSv1.2”);
System.setProperty(“javax.net.ssl.trustStore”, “c://core-jks//MyClient.jks”);
System.setProperty(“javax.net.ssl.trustStorePassword”, “changeit”);
System.setProperty(“javax.net.ssl.keyStore”, “c://core-jks//MyClient.jks”);
System.setProperty(“javax.net.ssl.keyStorePassword”, “changeit”);
Here are my certificate steps:
step 1:
server certificate:
keytool -genkey -alias MyServer -keyalg RSA -validity 1825 -keystore “MyServer.jks” -storetype JKS -dname “CN=myserver.com,OU=MyCompany Name,O=My Organization,L=My Location,ST=My State,C=My Country Short Code”
step 2:
keytool -exportcert -alias MyServer -keystore MyServer.jks -file MyServer.cer
step 3:
client certificate:
keytool -genkey -alias MyClient -keyalg RSA -validity 1825 -keystore MyClient.jks -storetype JKS
-dname “CN=client.com,OU=Client Company,O=Client,L=CLient Location,ST=Client State,C=Client Country Short Code”
step 4:
keytool -exportcert -alias MyClient -keystore MyClient.jks -file MyClientPublic.cer
step 5:
–Add Server certificate to client truststore
C:\JDK-1.8.0.x64\jre\lib\security>keytool -importcert -alias MyServer -keystore MyClient.jks -file MyServer.cer
step 6:
–Add client certificate to server truststore
C:\JDK-1.8.0.x64\jre\lib\security>keytool -importcert -alias MyClient -keystore MyServer.jks -file MyClientPublic.cer
2020-05-22 14:57:50.110 INFO 4144 — [nio-8443-exec-1] o.apache.coyote.http11.Http11Processor : Error parsing HTTP request header
Note: further occurrences of HTTP request parsing errors will be logged at DEBUG level.
java.lang.IllegalArgumentException: Invalid character found in method name [0x160x030x030x000xcf0x010x000x000xcb0x030x03^0xc70x9b0x16o0x150xea_0x8f0x9a0x9dRP0x8a0xc5c0xfb30x8c0x06z0x910xdb0x99’0xd4w0xfb0xb2S0xb50xc70x000x00d0xc0$0xc0(0x00=0xc0&0xc0*0x00k0x00j0xc00x0a0xc00x140x0050xc00x050xc00x0f0x0090x0080xc0#0xc0’0x000x000x0a0x000x160x000x140x000x170x000x180x000x190x000x090x000x0a0x000x0b0x000x0c0x000x0d0x000x0e0x000x160x000x0b0x000x020x010x000x000x0d0x000x160x000x140x060x030x060x010x050x030x050x010x040x030x040x010x040x020x020x030x020x010x020x020x000x170x00…]. HTTP method names must be tokens
at org.apache.coyote.http11.Http11InputBuffer.parseRequestLine(Http11InputBuffer.java:418) ~[tomcat-embed-core-9.0.35.jar:9.0.35]
at org.apache.coyote.http11.Http11Processor.service(Http11Processor.java:260) ~[tomcat-embed-core-9.0.35.jar:9.0.35]
at org.apache.coyote.AbstractProcessorLight.process(AbstractProcessorLight.java:65) [tomcat-embed-core-9.0.35.jar:9.0.35]
at org.apache.coyote.AbstractProtocol$ConnectionHandler.process(AbstractProtocol.java:868) [tomcat-embed-core-9.0.35.jar:9.0.35]
at org.apache.tomcat.util.net.NioEndpoint$SocketProcessor.doRun(NioEndpoint.java:1590) [tomcat-embed-core-9.0.35.jar:9.0.35]
at org.apache.tomcat.util.net.SocketProcessorBase.run(SocketProcessorBase.java:49) [tomcat-embed-core-9.0.35.jar:9.0.35]
at java.util.concurrent.ThreadPoolExecutor.runWorker(ThreadPoolExecutor.java:1149) [na:1.8.0_161]
at java.util.concurrent.ThreadPoolExecutor$Worker.run(ThreadPoolExecutor.java:624) [na:1.8.0_161]
at org.apache.tomcat.util.threads.TaskThread$WrappingRunnable.run(TaskThread.java:61) [tomcat-embed-core-9.0.35.jar:9.0.35]
at java.lang.Thread.run(Thread.java:748) [na:1.8.0_161]
[Raw read]: length = 5
0000: 48 54 54 50 2F HTTP/
main, handling exception: javax.net.ssl.SSLException: Unrecognized SSL message, plaintext connection?
main, SEND TLSv1.2 ALERT: fatal, description = unexpected_message
main, WRITE: TLSv1.2 Alert, length = 2
[Raw write]: length = 7
0000: 15 03 03 00 02 02 0A …….
main, called closeSocket()
2020-05-22 14:57:50.185 INFO 4144 — [ main] ConditionEvaluationReportLoggingListener :
Error starting ApplicationContext. To display the conditions report re-run your application with ‘debug’ enabled.
2020-05-22 14:57:50.190 ERROR 4144 — [ main] o.s.boot.SpringApplication : Application run failed
java.lang.IllegalStateException: Failed to execute CommandLineRunner
at org.springframework.boot.SpringApplication.callRunner(SpringApplication.java:798) [spring-boot-2.3.0.RELEASE.jar:2.3.0.RELEASE]
at org.springframework.boot.SpringApplication.callRunners(SpringApplication.java:779) [spring-boot-2.3.0.RELEASE.jar:2.3.0.RELEASE]
at org.springframework.boot.SpringApplication.run(SpringApplication.java:322) [spring-boot-2.3.0.RELEASE.jar:2.3.0.RELEASE]
at org.springframework.boot.SpringApplication.run(SpringApplication.java:1237) [spring-boot-2.3.0.RELEASE.jar:2.3.0.RELEASE]
at org.springframework.boot.SpringApplication.run(SpringApplication.java:1226) [spring-boot-2.3.0.RELEASE.jar:2.3.0.RELEASE]
at com.xoriant.sslclient.SslClientApplication.main(SslClientApplication.java:15) [classes/:na]
Caused by: org.springframework.web.client.ResourceAccessException: I/O error on GET request for “https://localhost:8443/ssl-server-0.0.1-SNAPSHOT/hello”: Unrecognized SSL message, plaintext connection?; nested exception is javax.net.ssl.SSLException: Unrecognized SSL message, plaintext connection?
at org.springframework.web.client.RestTemplate.doExecute(RestTemplate.java:748) ~[spring-web-5.2.6.RELEASE.jar:5.2.6.RELEASE]
at org.springframework.web.client.RestTemplate.execute(RestTemplate.java:674) ~[spring-web-5.2.6.RELEASE.jar:5.2.6.RELEASE]
at org.springframework.web.client.RestTemplate.getForEntity(RestTemplate.java:342) ~[spring-web-5.2.6.RELEASE.jar:5.2.6.RELEASE]
at com.xoriant.sslclient.SslClientApplication$HttpClient.run(SslClientApplication.java:54) ~[classes/:na]
at org.springframework.boot.SpringApplication.callRunner(SpringApplication.java:795) [spring-boot-2.3.0.RELEASE.jar:2.3.0.RELEASE]
… 5 common frames omitted
Caused by: javax.net.ssl.SSLException: Unrecognized SSL message, plaintext connection?
at sun.security.ssl.InputRecord.handleUnknownRecord(InputRecord.java:710) ~[na:1.8.0_161]
at sun.security.ssl.InputRecord.read(InputRecord.java:527) ~[na:1.8.0_161]
at sun.security.ssl.SSLSocketImpl.readRecord(SSLSocketImpl.java:983) ~[na:1.8.0_161]
at sun.security.ssl.SSLSocketImpl.performInitialHandshake(SSLSocketImpl.java:1385) ~[na:1.8.0_161]
at sun.security.ssl.SSLSocketImpl.startHandshake(SSLSocketImpl.java:1413) ~[na:1.8.0_161]
at sun.security.ssl.SSLSocketImpl.startHandshake(SSLSocketImpl.java:1397) ~[na:1.8.0_161]
at sun.net.www.protocol.https.HttpsClient.afterConnect(HttpsClient.java:559) ~[na:1.8.0_161]
at sun.net.www.protocol.https.AbstractDelegateHttpsURLConnection.connect(AbstractDelegateHttpsURLConnection.java:185) ~[na:1.8.0_161]
at sun.net.www.protocol.https.HttpsURLConnectionImpl.connect(HttpsURLConnectionImpl.java:162) ~[na:1.8.0_161]
at org.springframework.http.client.SimpleBufferingClientHttpRequest.executeInternal(SimpleBufferingClientHttpRequest.java:76) ~[spring-web-5.2.6.RELEASE.jar:5.2.6.RELEASE]
at org.springframework.http.client.AbstractBufferingClientHttpRequest.executeInternal(AbstractBufferingClientHttpRequest.java:48) ~[spring-web-5.2.6.RELEASE.jar:5.2.6.RELEASE]
at org.springframework.http.client.AbstractClientHttpRequest.execute(AbstractClientHttpRequest.java:53) ~[spring-web-5.2.6.RELEASE.jar:5.2.6.RELEASE]
at org.springframework.web.client.RestTemplate.doExecute(RestTemplate.java:739) ~[spring-web-5.2.6.RELEASE.jar:5.2.6.RELEASE]
… 9 common frames omitted
2020-05-22 14:57:50.550 INFO 4144 — [ main] o.s.s.concurrent.ThreadPoolTaskExecutor : Shutting down ExecutorService ‘applicationTaskExecutor’
I am getting this error while running client side file. Can you please help me this out?
Can you explain the same example for php?
I have ssl certificate from sectigo,
Now what will be the further steps for achieving the same.
Currently, I have,
1. access to c panel account,
2. ssl certificate signed by sectigo(Comodo),
3. Public key of ssl certificate as well as RSA Private Key,
4. Client certificate public key of client with whom we are working for API Integration (HDFC Public key Certificate),
5. shared hosting server from bigrock.
Hi,
I have a scenario.
App1 app2 app3
I hv 3applications.
From application1 to application2 using rsa algorithm and certificate one request will be sent. App2 validates certificate and encrypted request sent to app3.
App2 to app3 aes algorithm and diff certificate used for ssl.
Means app2 acts as server to app1.
App2 is client to app3.
How to do this do u hv any idea?
Pls guide me.
It will be a great help.
We need to develop this it using spring boot.
Super br oIts really simple, Thanks and keep doing
Glad you found it useful.
Thanks of valuable post. I have the jks file for server consists of ca,private key and certificate for server, can you please provide steps the generate the singed jks for client and server, it would be great help
Thanks Pavan , it works
I am not able to get the response due to this exception:
java.lang.IllegalStateException: Failed to execute CommandLineRunner
at org.springframework.boot.SpringApplication.callRunner(SpringApplication.java:816) [spring-boot-2.1.4.RELEASE.jar:2.1.4.RELEASE]
at org.springframework.boot.SpringApplication.callRunners(SpringApplication.java:797) [spring-boot-2.1.4.RELEASE.jar:2.1.4.RELEASE]
at org.springframework.boot.SpringApplication.run(SpringApplication.java:324) [spring-boot-2.1.4.RELEASE.jar:2.1.4.RELEASE]
at org.springframework.boot.SpringApplication.run(SpringApplication.java:1260) [spring-boot-2.1.4.RELEASE.jar:2.1.4.RELEASE]
at org.springframework.boot.SpringApplication.run(SpringApplication.java:1248) [spring-boot-2.1.4.RELEASE.jar:2.1.4.RELEASE]
at com.example.demo.DemoSslSpringbootApplication.main(DemoSslSpringbootApplication.java:47) [classes/:na]
Caused by: org.springframework.web.client.HttpClientErrorException$NotFound: 404 null
at org.springframework.web.client.HttpClientErrorException.create(HttpClientErrorException.java:85) ~[spring-web-5.1.6.RELEASE.jar:5.1.6.RELEASE]
at org.springframework.web.client.DefaultResponseErrorHandler.handleError(DefaultResponseErrorHandler.java:122) ~[spring-web-5.1.6.RELEASE.jar:5.1.6.RELEASE]
at org.springframework.web.client.DefaultResponseErrorHandler.handleError(DefaultResponseErrorHandler.java:102) ~[spring-web-5.1.6.RELEASE.jar:5.1.6.RELEASE]
at org.springframework.web.client.ResponseErrorHandler.handleError(ResponseErrorHandler.java:63) ~[spring-web-5.1.6.RELEASE.jar:5.1.6.RELEASE]
at org.springframework.web.client.RestTemplate.handleResponse(RestTemplate.java:778) ~[spring-web-5.1.6.RELEASE.jar:5.1.6.RELEASE]
at org.springframework.web.client.RestTemplate.doExecute(RestTemplate.java:736) ~[spring-web-5.1.6.RELEASE.jar:5.1.6.RELEASE]
at org.springframework.web.client.RestTemplate.execute(RestTemplate.java:670) ~[spring-web-5.1.6.RELEASE.jar:5.1.6.RELEASE]
at org.springframework.web.client.RestTemplate.getForEntity(RestTemplate.java:338) ~[spring-web-5.1.6.RELEASE.jar:5.1.6.RELEASE]
at com.example.demo.HttpClient.run(HttpClient.java:18) ~[classes/:na]
at org.springframework.boot.SpringApplication.callRunner(SpringApplication.java:813) [spring-boot-2.1.4.RELEASE.jar:2.1.4.RELEASE]
… 5 common frames omitted
Are you using example code as is? or done any changes?
same error occur how to solve
ava.lang.IllegalStateException: Failed to execute CommandLineRunner
at org.springframework.boot.SpringApplication.callRunner(SpringApplication.java:779)
at org.springframework.boot.SpringApplication.callRunners(SpringApplication.java:760)
at org.springframework.boot.SpringApplication.afterRefresh(SpringApplication.java:747)
at org.springframework.boot.SpringApplication.run(SpringApplication.java:315)
at org.springframework.boot.SpringApplication.run(SpringApplication.java:1162)
at org.springframework.boot.SpringApplication.run(SpringApplication.java:1151)
at com.opencodez.SslClientApplication.main(SslClientApplication.java:52)
Caused by: org.springframework.web.client.HttpClientErrorException: 404 null
at org.springframework.web.client.DefaultResponseErrorHandler.handleError(DefaultResponseErrorHandler.java:91)
at org.springframework.web.client.RestTemplate.handleResponse(RestTemplate.java:700)
at org.springframework.web.client.RestTemplate.doExecute(RestTemplate.java:653)
at org.springframework.web.client.RestTemplate.execute(RestTemplate.java:613)
at org.springframework.web.client.RestTemplate.getForEntity(RestTemplate.java:312)
at com.opencodez.HttpClient.run(HttpClient.java:24)
at org.springframework.boot.SpringApplication.callRunner(SpringApplication.java:776)
… 6 more
I already have a certificate which is in .pks format. How to change it in .cert and what steps need to be followed?
Hi Akanksha,
Do you mena JKS file? If yes then you can look in to the keytool that is available with Java. Oracle Keytool
Hi Pavan,
I want to implement SSL for Spring mvc project.Your example uses spring boot .could you please let me know what all changes i have to make to run using spring mvc.
Thanks
Ankit
Hi Ankit,
I dont have MVC example handy, but the concepts would be same. Did you try and facing any issues?
Thanks a lot for this post. It really helped me.
Hello, thank you for this guide.
Could you explain this part of the code please :
“public boolean verify(String hostname,
javax.net.ssl.SSLSession sslSession) {
if (hostname.equals(“localhost”)) {
return true;
}
return false;
}
});
}”
Will these JKS and certs will hold good for client as a browser and server as my application. I’ve imported the PublicClient.cert into my browser. But I’m getting the following Error:
This site can’t provide a secure connection
localhost didn’t accept your login certificate, or one may not have been provided.
Try contacting the system admin.
ERR_BAD_SSL_CLIENT_AUTH_CERT
Any suggestions would be greatly appreciable.
Hi Subhani,
These JKS and certificate or self-signed. so they are good only for your demonstration or POC purpose.
If you plan to use it on any of your live projects, you need to get genuine certificates signed by Trusted CA
It works perfectly for me. Thanks for the article.
Thanks Wan !
Glad you found it useful !
Keep Visiting ! Keep Learning !
Thanks, nice tip
I am following all the steps and commands in the tutorial but I am getting the below error while running the client:
Caused by: java.lang.IllegalStateException: Failed to execute CommandLineRunner
Caused by: org.springframework.web.client.ResourceAccessException: I/O error on GET request for “https://localhost:8443/SSLServer-0.0.1-SNAPSHOT/hello”: Certificate for doesn’t match any of the subject alternative names: []; nested exception is javax.net.ssl.SSLPeerUnverifiedException: Certificate for doesn’t match any of the subject alternative names: []
Caused by: javax.net.ssl.SSLPeerUnverifiedException: Certificate for doesn’t match any of the subject alternative names: []
Am i missing any configuration?
Hi Sambit,
Ideally, it should work. The same example is still working for me.
From the error, it seems it’s not recognizing the server alias. You can try and add SAN (Subject Alternative Name) for localhost. You can use command like
keytool -genkey -alias MyServer -keyalg RSA -validity 1825 -keystore "MyServer.jks" -storetype JKS -dname "CN=myserver.com,OU=My Company Name,O=My Organization,L=My Location,ST=My State, C=My Country Short Code" -ext san=dns:localhost,dns:LOCALHOST -keypass password -storepass password# to export cert
keytool -exportcert -alias MyServer -keystore MyServer.jks -file MyServer.cer
Let me know if this works for you
Now I am facing the following exception.
Env:-
JDK 1.8
Tomcat 9
%% Invalidated: [Session-1, TLS_ECDHE_RSA_WITH_AES_256_CBC_SHA384]
main, called closeSocket()
main, handling exception: javax.net.ssl.SSLHandshakeException: Received fatal alert: handshake_failure
2018-05-06 12:06:07.243 INFO 21724 — [ main] ConditionEvaluationReportLoggingListener :
Error starting ApplicationContext. To display the conditions report re-run your application with ‘debug’ enabled.
2018-05-06 12:06:07.255 ERROR 21724 — [ main] o.s.boot.SpringApplication : Application run failed
java.lang.IllegalStateException: Failed to execute CommandLineRunner
at org.springframework.boot.SpringApplication.callRunner(SpringApplication.java:800) [spring-boot-2.0.1.RELEASE.jar:2.0.1.RELEASE]
at org.springframework.boot.SpringApplication.callRunners(SpringApplication.java:781) [spring-boot-2.0.1.RELEASE.jar:2.0.1.RELEASE]
at org.springframework.boot.SpringApplication.run(SpringApplication.java:335) [spring-boot-2.0.1.RELEASE.jar:2.0.1.RELEASE]
at org.springframework.boot.SpringApplication.run(SpringApplication.java:1255) [spring-boot-2.0.1.RELEASE.jar:2.0.1.RELEASE]
at org.springframework.boot.SpringApplication.run(SpringApplication.java:1243) [spring-boot-2.0.1.RELEASE.jar:2.0.1.RELEASE]
at com.poc.clientSSL.SslClientApplication.main(SslClientApplication.java:47) [classes/:na]
Caused by: org.springframework.web.client.ResourceAccessException: I/O error on GET request for “https://localhost:8443/SSLServer-0.0.1-SNAPSHOT/hello”: Received fatal alert: handshake_failure; nested exception is javax.net.ssl.SSLHandshakeException: Received fatal alert: handshake_failure
at org.springframework.web.client.RestTemplate.doExecute(RestTemplate.java:741) ~[spring-web-5.0.5.RELEASE.jar:5.0.5.RELEASE]
at org.springframework.web.client.RestTemplate.execute(RestTemplate.java:684) ~[spring-web-5.0.5.RELEASE.jar:5.0.5.RELEASE]
at org.springframework.web.client.RestTemplate.getForEntity(RestTemplate.java:359) ~[spring-web-5.0.5.RELEASE.jar:5.0.5.RELEASE]
at com.poc.clientSSL.HttpClient.run(HttpClient.java:78) ~[classes/:na]
at org.springframework.boot.SpringApplication.callRunner(SpringApplication.java:797) [spring-boot-2.0.1.RELEASE.jar:2.0.1.RELEASE]
… 5 common frames omitted
Caused by: javax.net.ssl.SSLHandshakeException: Received fatal alert: handshake_failure
at sun.security.ssl.Alerts.getSSLException(Alerts.java:192) ~[na:1.8.0_131]
at sun.security.ssl.Alerts.getSSLException(Alerts.java:154) ~[na:1.8.0_131]
at sun.security.ssl.SSLSocketImpl.recvAlert(SSLSocketImpl.java:2023) ~[na:1.8.0_131]
at sun.security.ssl.SSLSocketImpl.readRecord(SSLSocketImpl.java:1125) ~[na:1.8.0_131]
at sun.security.ssl.SSLSocketImpl.performInitialHandshake(SSLSocketImpl.java:1375) ~[na:1.8.0_131]
at sun.security.ssl.SSLSocketImpl.startHandshake(SSLSocketImpl.java:1403) ~[na:1.8.0_131]
at sun.security.ssl.SSLSocketImpl.startHandshake(SSLSocketImpl.java:1387) ~[na:1.8.0_131]
at org.apache.http.conn.ssl.SSLConnectionSocketFactory.createLayeredSocket(SSLConnectionSocketFactory.java:396) ~[httpclient-4.5.5.jar:4.5.5]
at org.apache.http.conn.ssl.SSLConnectionSocketFactory.connectSocket(SSLConnectionSocketFactory.java:355) ~[httpclient-4.5.5.jar:4.5.5]
at org.apache.http.impl.conn.DefaultHttpClientConnectionOperator.connect(DefaultHttpClientConnectionOperator.java:142) ~[httpclient-4.5.5.jar:4.5.5]
at org.apache.http.impl.conn.PoolingHttpClientConnectionManager.connect(PoolingHttpClientConnectionManager.java:373) ~[httpclient-4.5.5.jar:4.5.5]
at org.apache.http.impl.execchain.MainClientExec.establishRoute(MainClientExec.java:381) ~[httpclient-4.5.5.jar:4.5.5]
at org.apache.http.impl.execchain.MainClientExec.execute(MainClientExec.java:237) ~[httpclient-4.5.5.jar:4.5.5]
at org.apache.http.impl.execchain.ProtocolExec.execute(ProtocolExec.java:185) ~[httpclient-4.5.5.jar:4.5.5]
at org.apache.http.impl.execchain.RetryExec.execute(RetryExec.java:89) ~[httpclient-4.5.5.jar:4.5.5]
at org.apache.http.impl.execchain.RedirectExec.execute(RedirectExec.java:111) ~[httpclient-4.5.5.jar:4.5.5]
at org.apache.http.impl.client.InternalHttpClient.doExecute(InternalHttpClient.java:185) ~[httpclient-4.5.5.jar:4.5.5]
at org.apache.http.impl.client.CloseableHttpClient.execute(CloseableHttpClient.java:83) ~[httpclient-4.5.5.jar:4.5.5]
at org.apache.http.impl.client.CloseableHttpClient.execute(CloseableHttpClient.java:56) ~[httpclient-4.5.5.jar:4.5.5]
at org.springframework.http.client.HttpComponentsClientHttpRequest.executeInternal(HttpComponentsClientHttpRequest.java:87) ~[spring-web-5.0.5.RELEASE.jar:5.0.5.RELEASE]
at org.springframework.http.client.AbstractBufferingClientHttpRequest.executeInternal(AbstractBufferingClientHttpRequest.java:48) ~[spring-web-5.0.5.RELEASE.jar:5.0.5.RELEASE]
at org.springframework.http.client.AbstractClientHttpRequest.execute(AbstractClientHttpRequest.java:53) ~[spring-web-5.0.5.RELEASE.jar:5.0.5.RELEASE]
at org.springframework.web.client.RestTemplate.doExecute(RestTemplate.java:727) ~[spring-web-5.0.5.RELEASE.jar:5.0.5.RELEASE]
… 9 common frames omitted
After adding SAN i am getting the below error:
main, RECV TLSv1.2 ALERT: fatal, handshake_failure
%% Invalidated: [Session-1, TLS_ECDHE_RSA_WITH_AES_256_CBC_SHA384]
main, called closeSocket()
main, handling exception: javax.net.ssl.SSLHandshakeException: Received fatal alert: handshake_failure
2018-05-06 12:30:53.698 INFO 18848 — [ main] ConditionEvaluationReportLoggingListener :
its not working for me getting sslhandshake exception
Hi Vishnu,
Did you generate certificate with exact commands? Share your code if possible pavan.solapure[at]gmail.com
Hi Pavan, it is really simple & good explanation on how to set Mutual SSL authentication. I followed all the steps mentioned in article, ran into following exception.
Env:-
JDK 1.8
Tomcat 8.5
restartedMain, WRITE: TLSv1.2 Handshake, length = 134
[Raw write]: length = 139
0000: 16 03 03 00 86 10 00 00 82 00 80 49 2B 37 87 02 ………..I+7..
0010: 8E AF 7F 5B F2 76 37 AB CD 0E 81 BD 37 38 E4 B9 …[.v7…..78..
0020: 2F 5D D7 AA 9E 32 5A AE C1 66 9F 97 CB 39 28 7B /]…2Z..f…9(.
0030: 3D 45 60 27 BB 98 3A C4 72 23 14 FC B0 E7 92 3F =E`’..:.r#…..?
0040: 29 9B 2A 57 55 90 2E 4E A5 14 A2 B7 9C D2 E2 C4 ).*WU..N……..
0050: 7E AB FF C5 B9 77 3B 9F B1 5B D6 EE 08 10 3C 40 …..w;..[….<@
0060: 4A 01 D1 9E 4A 4B C0 86 93 49 A8 4C 84 C7 2C CB J…JK…I.L..,.
0070: 64 44 86 4E 62 4C 96 5B 0F 6E A0 78 6F 7A 7B 08 dD.NbL.[.n.xoz..
0080: AF 21 8C E4 8B 85 3C BB 5C 8A CF .!….<.\..
restartedMain, handling exception: javax.net.ssl.SSLHandshakeException: Could not generate secret
%% Invalidated: [Session-1, TLS_DHE_RSA_WITH_AES_128_CBC_SHA256]
restartedMain, SEND TLSv1.2 ALERT: fatal, description = handshake_failure
restartedMain, WRITE: TLSv1.2 Alert, length = 2
[Raw write]: length = 7
0000: 15 03 03 00 02 02 28 ……(
restartedMain, called closeSocket()
Caused by: javax.net.ssl.SSLHandshakeException: Could not generate secret
at sun.security.ssl.DHCrypt.getAgreedSecret(Unknown Source) ~[na:1.8.0_131]
at sun.security.ssl.ClientHandshaker.serverHelloDone(Unknown Source) ~[na:1.8.0_131]
at sun.security.ssl.ClientHandshaker.processMessage(Unknown Source) ~[na:1.8.0_131]
at sun.security.ssl.Handshaker.processLoop(Unknown Source) ~[na:1.8.0_131]
at sun.security.ssl.Handshaker.process_record(Unknown Source) ~[na:1.8.0_131]
at sun.security.ssl.SSLSocketImpl.readRecord(Unknown Source) ~[na:1.8.0_131]
at sun.security.ssl.SSLSocketImpl.performInitialHandshake(Unknown Source) ~[na:1.8.0_131]
at sun.security.ssl.SSLSocketImpl.startHandshake(Unknown Source) ~[na:1.8.0_131]
at sun.security.ssl.SSLSocketImpl.startHandshake(Unknown Source) ~[na:1.8.0_131]
at sun.net.www.protocol.https.HttpsClient.afterConnect(Unknown Source) ~[na:1.8.0_131]
at sun.net.www.protocol.https.AbstractDelegateHttpsURLConnection.connect(Unknown Source) ~[na:1.8.0_131]
at sun.net.www.protocol.https.HttpsURLConnectionImpl.connect(Unknown Source) ~[na:1.8.0_131]
at org.springframework.http.client.SimpleBufferingClientHttpRequest.executeInternal(SimpleBufferingClientHttpRequest.java:78) ~[spring-web-4.3.10.RELEASE.jar:4.3.10.RELEASE]
at org.springframework.http.client.AbstractBufferingClientHttpRequest.executeInternal(AbstractBufferingClientHttpRequest.java:48) ~[spring-web-4.3.10.RELEASE.jar:4.3.10.RELEASE]
at org.springframework.http.client.AbstractClientHttpRequest.execute(AbstractClientHttpRequest.java:53) ~[spring-web-4.3.10.RELEASE.jar:4.3.10.RELEASE]
at org.springframework.web.client.RestTemplate.doExecute(RestTemplate.java:652) ~[spring-web-4.3.10.RELEASE.jar:4.3.10.RELEASE]
… 15 common frames omitted
Caused by: java.security.NoSuchAlgorithmException: Algorithm DiffieHellman not available
at javax.crypto.KeyAgreement.getInstance(KeyAgreement.java:184) ~[na:1.8.0_121]
at sun.security.ssl.JsseJce.getKeyAgreement(Unknown Source) ~[na:1.8.0_131]
… 31 common frames omitted
How to get file from client to server? I want to display the cer file information at the server when the client sends.
Exception :
————-
main, handling exception: java.net.SocketException: Software caused connection abort: recv failed
main, SEND TLSv1 ALERT: fatal, description = unexpected_message
Padded plaintext before ENCRYPTION: len = 22
0000: 02 0A 91 A1 FD A8 B0 D3 9C 04 4D 7F 84 1C 98 57 ……….M….W
0010: 7D C8 03 82 1D 5B …..[
main, WRITE: TLSv1 Alert, length = 22
main, Exception sending alert: java.net.SocketException: Software caused connection abort: socket write error
main, called closeSocket()
main, called close()
main, called closeInternal(true)
Caused by: java.net.SocketException: Software caused connection abort: recv failed
at java.net.SocketInputStream.socketRead0(Native Method)
at java.net.SocketInputStream.read(Unknown Source)
at com.sun.net.ssl.internal.ssl.InputRecord.readFully(Unknown Source)
at com.sun.net.ssl.internal.ssl.InputRecord.read(Unknown Source)
at com.sun.net.ssl.internal.ssl.SSLSocketImpl.readRecord(Unknown Source)
at com.sun.net.ssl.internal.ssl.SSLSocketImpl.performInitialHandshake(Unknown Source)
at com.sun.net.ssl.internal.ssl.SSLSocketImpl.startHandshake(Unknown Source)
at com.sun.net.ssl.internal.ssl.SSLSocketImpl.startHandshake(Unknown Source)
at sun.net.www.protocol.https.HttpsClient.afterConnect(Unknown Source)
at sun.net.www.protocol.https.AbstractDelegateHttpsURLConnection.connect(Unknown Source)
at sun.net.www.protocol.http.HttpURLConnection.getOutputStream(Unknown Source)
at sun.net.www.protocol.https.HttpsURLConnectionImpl.getOutputStream(Unknown Source)
at org.apache.cxf.transport.http.HTTPConduit$WrappedOutputStream.handleHeadersTrustCaching(HTTPConduit.java:2002)
at org.apache.cxf.transport.http.HTTPConduit$WrappedOutputStream.onFirstWrite(HTTPConduit.java:1954)
at org.apache.cxf.io.AbstractWrappedOutputStream.write(AbstractWrappedOutputStream.java:42)
at org.apache.cxf.io.AbstractThresholdOutputStream.write(AbstractThresholdOutputStream.java:69)
at org.apache.cxf.transport.http.HTTPConduit$WrappedOutputStream.close(HTTPConduit.java:2022)
… 11 more
Really nice explanation worth reading. But I’m experiencing an exception during SSL handshake.
Exception trace :
—————–
Hi Raguram,
Did you follow all the steps and commands as is?
Nicely put..all code works fine…
Thanks
Appreciate!
The ‘Download from GIT’ link doesn’t work, just links back to this page…
Thanks for letting us know Eoin.
Its fixed now.