What is Docker – Complete Docker Tutorial for Beginners
What is Docker ? Why Docker-based applications are gaining popularity rapidly?
Docker Platform is used for running an application in any platform easily. If you have developed your application on one OS, it may or may not run on a different OS. Docker was introduced to eliminate this problem. It uses a package holder called container to hold the application with its dependencies. The developer can develop an application in a container and distribute it on any other machine without worrying about any build failure.
What is Docker?
Docker is a Open Source Virtualization tool designed to make it easier to create, deploy, and run applications with the help of containers. Containers allow to package an application with all of the parts it needs, such as libraries, servers, and other dependencies, and ship it all out as one package. It helps the developers to focus on writing the code, not about the build environment. Docker makes sure that the application will run on any other Linux or Windows machine regardless of any customized settings that machine might have.
Docker offers an extra layer of abstraction and automation for virtualization on Windows and Linux. It is quick and can reduce the time to market for any application. Docker containers are very useful for Java Application Developments.
Docker Components
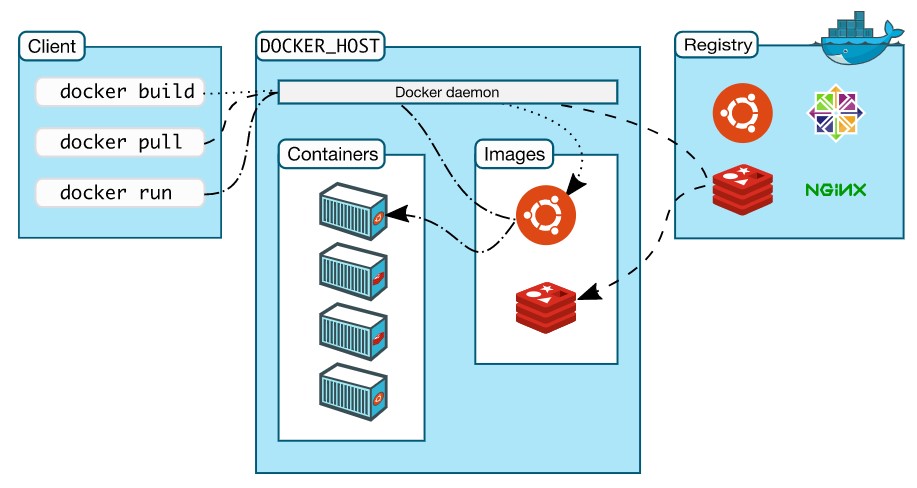
Image Source – https://docs.docker.com
Below are the main components that forms complete Docker Architecture.
- Docker Daemon – Listens to Docker API requests and manages Docker objects etc. To better manager Docker Service these daemons can communicate with other daemon services.
- Client – The Docker Client is the primary interface for most of the users to connect to Docker. The client sends commands to dockerd daemon, and then further steps are performed. A single client can communicate with multiple daemons.
- Images – It is a read-only template with necessary instructions used to create containers. Compared to other virtual machine technologies, Docker images are small and fast.
- Containers – Container is a runnable instance of an Image. You can use Docker API or CLI to create, start, stop, move, or delete a container. By default a container is isolated from other containers but it has option to configure and control this and can be connected to other containers.
- Registry – It mainly stores Docker images. Registry can either be public or private. Docker Hub and Docker Cloud are public registries that anyone can use.
- Services – The scalability of containers is managed by Services. The Services work together as Swarm and enables multi-host, multi-container deployment. You can define the desired state, such as the number of replicas of the service that must be available at any given time using services.
In this tutorial, we will check how to build a simple Spring Boot application on a Docker container. Docker is for Linux based operating system. If you are running windows, you can use virtualbox to run any Linux OS inside Windows or Docker Desktop. Docker desktop is available for Windows and Mac to create container application.
Docker vs. Virtual Machines
As we begin to understand Docker, one must wonder how its different than Virtual Machine? Why use new tech instead of relying on proven Virtual Environments?
The Docker container always runs on top of the host operating system. The containers dont have Operating Systems. Containers are containing the binaries, libraries, and the application itself. This makes the Docker Container very lightweight.
On the other hand, Virtual Machines have their own Operating System and resources. Due to this Virtual Machines are like independent Computers and are heavy on resources and costs.
Why Use Docker Platform
- Fast – As mentioned above Docker is lightweight and fast. This makes sure your application is up and running quickly.
- Platform independent – You can install your application on any operating system.
- Easy Configuration – Docker comes with very easy and maintainable configuration. You can also share the configuration with other Docker or Operating Systems.
- Great Community Support – Most important, the Docker has great community support. Also you can find lots of pre-built docker images, configurations that can be readily used as per your needs. You can search such images here.
Create your Spring Boot application :
Before moving to Docker, let’s create our Spring Boot App first. Go to start.spring.io and create one sample application. In this example, we are using one Gradle project. But you can also use Maven if you want.
Download the application zipped file, extract it and open it in your favourite code editor. We are using ‘IntelliJ-IDEA’ for our application.
We are going to create one simple REST API in this example. Open your build.gradle file and add the following dependency inside the dependencies tab :
implementation “org.springframework.boot:spring-boot-starter-web”
For a Maven project, you need to change the ‘pom.xml’ file. You can refer this guide to learn how to do that.
It will add all libraries required to implement a REST service in a Spring Boot application.
Create one new package ‘rest’ inside the main package and create one new file called DockerApp.java :
DockerApp.java
|
1 2 3 4 5 6 7 8 9 10 11 12 13 14 15 16 17 18 19 20 21 22 23 |
package com.example.demo.rest; import org.springframework.web.bind.annotation.GetMapping; import org.springframework.web.bind.annotation.RequestMapping; import org.springframework.web.bind.annotation.RestController; @RestController @RequestMapping("/rest/docker/hello") public class DockerApp { @GetMapping public String hello(){ return "Hello.."; } } |
The ‘package’ statement may be different for your application.
As you can see here, it will return a ‘Hello..” message if we make one Get request to the “/rest/docker/hello” endpoint.
Our next step is to build this application and put it in a container in Docker.
Or you can refer a Simple Web Starter Template App
Docker Platform Setup :
I am not going into details with the setup process of Docker as it is different for different operating systems. You can go through the official guide and follow the steps to install it on your system. For Linux, you can install it either by downloading a binary or by using the terminal. Install it and verify the installation before moving to the next step.
Create a basic Dockerfile of the Spring Boot Application :
Once the docker setup is done, you can move to the next step to create a Docker container.
- First of all, you need to create the ‘JAR’ file of the Spring Boot application. If you are following this guide and you have used ‘Spring Initializr’ to create the basic app, you can use ‘./gradlew build’ or ‘./mvnw install’ to create that ‘JAR’ file for a gradle and maven project respectively.
- The ‘JAR’ file created on the above step need to be added to a docker container. Create one file ‘Dockerfile’ at the top of your project and add the following
FROM openjdk:8-jdk-alpine
VOLUME /tmp
|
1 2 3 4 5 |
COPY build/libs/*.jar app.jar EXPOSE 8080 ENTRYPOINT ["java","-jar","/app.jar"] |
FROM: Each Dockerfile starts with this statement. It pulls an image from a public directory and initializes the starting build environment. We are pulling openjdk:8-jdk-alpine image as our application is a Java application and it requires a JDK to build. You can browse the dockerhub to see other images listed.
It creates a mount point with the name provided
COPY: The docker will copy the jar files to the container. This step is different for a maven and gradle project. In gradle project, jar file is created inside the ‘build/libs’ folder.
EXPOSE: We are informing Docker on which port the application is listed. When the container will boot, it will use this port.
ENTRYPOINT: This will execute when the container will start.
That’s it. You can now build your docker container and run it.
Building the Container
You can build an image simply using the below command :
docker build -f Dockerfile -t docker-spring-boot-example
You may need to use ‘sudo’ for the build.
After the build, run it like below :
docker run -it -p 8080:8080 docker-spring-boot-example
If the running is successful, you can visit ‘http://localhost:8080/rest/docker/hello‘ on a web browser to get the ‘Hello..’ message.
If you want to make any changes to the image, just change your code, create your JAR file and create the docker image file in the same way with the same name. It will replace the new docker container with the old one.
Basic Docker commands :
- Check docker version:
You can use the below command to check the current docker version running on your system:docker –version - Search and download images:
You can search and download a docker image from the registry server. You can also deploy an image if you think that it may be useful for others. Use the below command to search for an image:docker search [name]For example, we can search for ‘ubuntu’ like below :
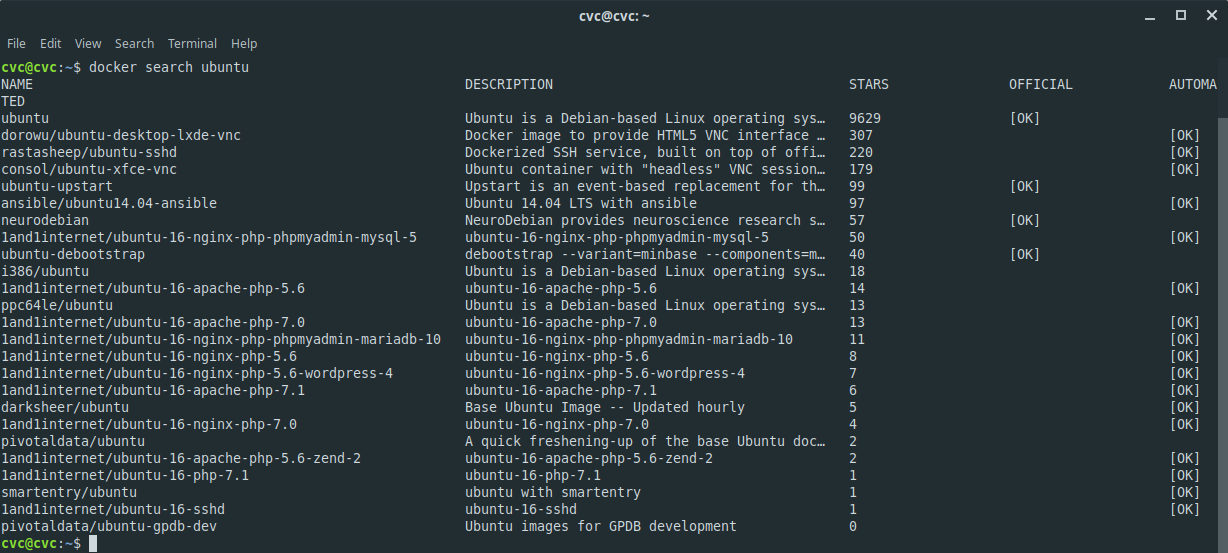 As you can see, we get a few other information like stars, official or not, description etc. with the final list.For downloading an image, you can use the ‘pull’ command like below:
docker pull [name]Using this command, you can download the latest version of a specific version of an image. We can use either ‘docker pull ubuntu’ or ‘docker pull ubuntu:14:02′ to download the latest version and the ’14:02’ version respectively. - List all images:
Use the below command to list down all images in your system:docker imagesIt will show you all your downloaded and locally created images. - Run a docker container:
We have used this command before in this tutorial.docker run -p 8080:8080 [container-name] - List all running containers:
Use the below command to list all runningdocker ps - Stop, restart, delete containers:
docker provides ‘stop’, ‘restart’, ‘kill’, and ‘rm’ commands to stop, restart, kill and remove a container.docker stop [container]You can use the container name or its id with any of these commands. - Removing a container image:
Use ‘docker rmi’ command to remove an image. It will remove the image completely from your machine. - Distribute a docker image:
You can convert a docker image to a ‘.tar’ file and distribute it to other systems. Use the below command to create a ‘tar’ file from a container:docker export container -o new_container.tarwhere ‘container’ is the name of the docker container. It will create one ‘new_container.tar’ file.
On a different machine, you can load this ‘.tar’ file like below:docker import new_container.tarYou can always upload an image to a registry server. But this approach is useful for in-house development.Docker provides a lot of other commands and each command may include different options. Follow this official guide to learn more about other commands.
Docker Alternatives:
CoreOSRtk:
rtk or pronounced as ‘rocket’ was introduced by CoreOS in 2014. It was first officially released in 2016. It has a fairly huge open source community.
Linux VServer:
Opensourced (GitHub link) and released in 2008.
OpenVZ:
It uses container-based virtualization to run multiple virtual environments and servers in a single Linux system. OpenVZ is not a good choice for a single application as it uses the whole system.
Windows Container:
Microsoft has introduced windows container in 2016. Check this guide to learn more about it.
Few more other container systems:
- Hyper-V container
- Java containers
- Unikernels
- LXD
- containerd
- Mesos containerizer
Conclusion
There are different other container systems available as you have seen above but Docker platform is much more popular than any other container systems. Its technology stack is much more mature than any others. Open container project or open container initiative was introduced in 2015 as an initiative to promote an open standard for Linux containers. It was launched by Docker, CoreOS and other popular container industry leaders. Open source container technology has improved significantly over the last few years and we can expect a lot more in the upcoming years.


Hey, I know this post is quite old already but I found it quite interesting.
Couple of errors if ound:
* missing VOLUME before that:
“It creates a mount point with the name provided”
* “docker -version” is incorrect, it is docker -v or docker –version
I missed dahs also,
docker –version