Speed up your WordPress Site – No Coding Required – Part 2
In part 1 Speed up your WordPress Site we showed you how to speed up your site mainly from a front end point of view. That is, by reducing the size of the page as a whole by optimizing images and removing ‘page bloat’. But there is more than can be done on the server side of the equation. In this post we will talk about checking certain server side settings and, depending on the particular site, moving hosts.
Once a request is sent from your browser to the server which hosts your files, certain settings can be taken advantage of to make sure that this is done in the most minimal time possible saving precious load time for the user.
Step 1: Run diagnostics with gtmetrix.com
Just like in Part 1 we are going to use the ‘waterfall’ and ‘page speed’ tabs of the gtmetrix.com analysis to determine a few settings and therefore the next steps to speed up our site.
Page caching:
Servers can cache a recent HTML version of the page and serve this which is faster than asking the site to run through all of its PHP and MYSQL logic to do so. We can check if your server is doing this by looking at the waterfall analysis.
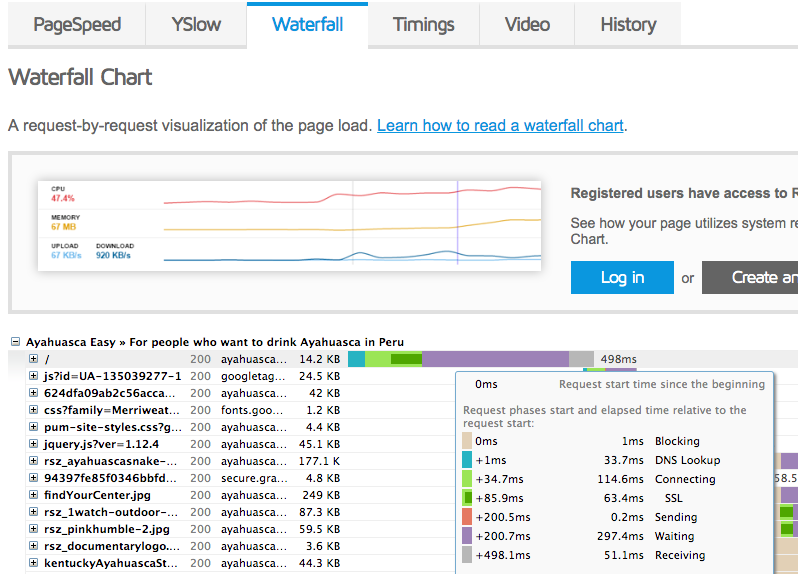
In the waterfall of the gtmetrix.com analysis look at the very first bar and hover your mouse over the purple part of it. This will reveal some information to us about how long we waited for the server to start sending the HTML to our browser. See the above image for what this looks like. See the number to the left of ‘Waiting”. This is how long the server took to respond.
If your server is caching a page it shouldn’t be more than 200 ms or so. If it is longer than this then you have two options. Either ask your hosting company to see if they can implement caching or move hosting providers. Wait till the end to decide whether or not to do this as there are other factors to consider as well.
GZIP Compression:
Over in the ‘Page Speed’ tab of the gtmetrix.com analysis, you may or may not have an area named ‘Enable GZIP Compression’ at the top and highlighted red. If it is red then your server is not using it. Again, you can either ask your hosting company to enable it or move hosts. Below we have an image of a site which already has GZIP enabled and working and as such it is shown as green.

PHP Version:
PHP 7 is a backend language used in all WordPress sites but it gets updated every few years. Recently PHP7 came out (about a year or so ago) and it is much faster than the 5.X version which preceded it. Where is PHP6 you ask? They skipped it is the short answer so if you aren’t on PHP7 you will most likely see PHP version 5.X.
To check if you have it go to the ‘Install New Plugin’ area of the CMS and search for a new plugin called ‘WP ServerInfo’. If you have difficulty finding it, it’s this one here.
This will allow us to check the PHP version. We won’t keep this plugin for long we just need to check the PHP version so after you have done so you can uninstall it again. But for now, keep following these instructions.
Go to the ‘Dashboard’ and then ‘WP ServerInfo’ and the version should be 7.X.
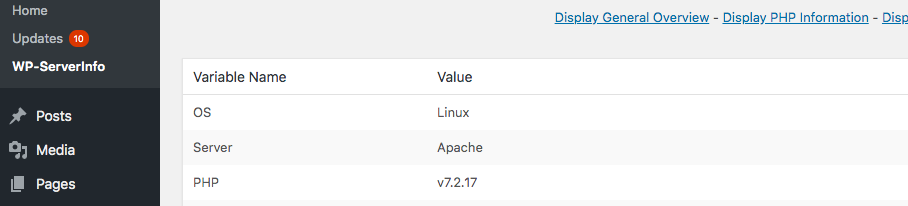
If it isn’t 7.X then you could ask your host to upgrade your server to PHP7 or if you have decided to move hosts then this can also be fixed by doing that as well.
How to migrate your WordPress installation to a new host:
If you do end up moving your site to a new host then you will need to set up an account with them before moving. I recommend WP Engine as it’s specifically set up to host WordPress sites but there are a lot of other options as well, like BlueHost. Just make sure it has PHP7, GZIP compression and caching as we discussed above. The later is a lot less expensive but you can decide for yourself which is more appropriate. Here are a few other things to keep in mind when choosing a new host,
- Most of the time hosts offer very similar benefits but have a look out for some of the extras which may make or break the deal. For example, check if the host will also do an SSL certificate and an email address (or a few) for you as included in the price. If they don’t mention it then it probably isn’t included.
- Whichever you go for, once you’re signed up, you will be given a login which will give you access to add a new WordPress installation. Don’t worry we will migrate all of your old sites posts and information over to the new site in the following steps so that your new installation has all of your old site’s info and content.
You can add a new WordPress installation to your new host either via the ‘cPanel’ or via a ‘one-click’ install of a WordPress site which most hosts offer for WordPress.
How do we physically move the site content over to the new installation?
We will use this plugin, All in one WP Migration which makes our lives a lot easier when migrating WordPress sites.
Once your new host account is set up, stop for a second and go back to your old WordPress installation on your old host. You need both to be up for a short time so don’t get rid of the old host account yet.
The process of migrating is pretty simple but it can be confusing for first timers so read this over again if you aren’t clear.
- In your old WordPress Installation go to the Plugins area and install the WP All in One Migration Plugin and export the site according to the plugins instructions. See the video for full details below but more or less this will allow you to create a ZIP file which holds all the content for your site.
- You will then need to go to your new WordPress installation and install the Plugin again. This time, of course, it is technically in a new site.
- You will then use the plugin to upload the ZIP file form step 1 above into the new site.
- In this way, you will migrate all of your old content, plugins, and themes into the new installation. Video instructions on how to export and subsequently import your old site into your new one are here. Direct from the plugin builders.
Connecting your new hosting account to your old URL:
At this point, the URL for your site is not taking users to the new site that we just created and imported data into. To do that we need to,
- Note the DNS Server Names of your new host. If you don’t know how to find these then your new host will be able to help you find them. It will be different for each hosting company so we can’t give you a generic answer here. You need to check with your particular company.
- Once you get these you need to log in to the account where you bought your URL from. Sometimes this is the same as your original hosting company but this isn’t always the case. It’s possible you need to log in a different account.
- Which account that is with which company is only known to you. Check your email account as most domain name providers will have sent you an email with this information in it.
- Once you have this you need to log in to this account and change the DNS Server Names which the URL points to the that of the new host. Again, if you don’t know how to do this then the company you have an account with will have details on how to achieve this.
Final speed test:
Once you have either enabled or upgraded to GZIP Compression, Caching and PHP7 do another speed test with gtmetrix.com and see how far you have come. You should now have a very fast site, perhaps even below 1 MB. In which case you have done your users a very great device as they will now not be left waiting, even when they have a poor connection. That will have a direct result over time on your conversion rates, bounce rates and SEO in general as Google and other search engines are measuring Speed and its related statistics directly in order to rank your site.
Please leave a comment or questions and let us know how did you find our article on Speed up your WordPress Site