Steps to develop Spring Batch jobs using Spring Boot with example
Spring Batch is a lightweight batch framework which can be used by enterprise systems to develop robust batch applications for the daily operations. In this article, we will see a simple Spring Batch example.
Software used
- Spring Boot 2.0.4.RELEASE
- Spring Batch
- Java 8
- Maven
- Eclipse

Source – https://docs.spring.io/spring-batch/trunk/reference/html/domain.html
Any Spring Batch job has 2 main components, Job, and Steps. A job may have multiple steps. Each step has a compulsory reader and writer routines and an optional processor unit.
Step
A Step is a fundamental unit of any Job. It is a domain object that encapsulates an independent, sequential phase of a batch job. A Step defines necessary information to define and control the actual batch processing.
Item Reader
ItemReader is an abstract representation of how data is provided as input to a Step. When the inputs are exhausted, the ItemReader returns null.
Item Processor
ItemProcessor represents the business processing of an item. The data read by ItemReader can be passed on to ItemProcessor. In this unit, the data is transformed and sent for writing. If, while processing the item, it becomes invalid for further processing, you can return null. The nulls are not written by ItemWriter.
Item Writer
ItemWriter is the output of a Step. The writer writes one batch or chunk of items at a time to the target system. ItemWriter has no knowledge of the input it will receive next, only the item that was passed in its current invocation.
POM – Main Dependencies
|
1 2 3 4 5 6 7 8 9 10 11 12 13 14 15 16 17 18 |
<dependency> <groupId>org.springframework.boot</groupId> <artifactId>spring-boot-starter-batch</artifactId> </dependency> <dependency> <groupId>org.springframework.boot</groupId> <artifactId>spring-boot-starter-data-jpa</artifactId> </dependency> <dependency> <groupId>com.h2database</groupId> <artifactId>h2</artifactId> <scope>runtime</scope> </dependency> <dependency> <groupId>org.springframework.boot</groupId> <artifactId>spring-boot-devtools</artifactId> <optional>true</optional> </dependency> |
For our example, we are going to use the H2 Database with an in-memory mode. Below are few properties we need to mention so that our H2 database is accessible over the web.
|
1 2 3 4 5 6 7 8 |
# Enabling H2 Console spring.h2.console.enabled=true # Datasource spring.datasource.url=jdbc:h2:mem:testdb spring.datasource.username=sa spring.datasource.password= spring.datasource.driver-class-name=org.h2.Driver |
Data
In our code, we will read a csv file with below data
|
1 2 3 4 |
1,John Wick,101,134 2,Neo,102,445 3,Jack Bauer,103,344 4,Pavan Solapure,101,-34 |
Corresponding entity is
|
1 2 3 4 5 6 7 8 9 10 11 12 13 14 15 16 17 18 19 20 |
import java.math.BigDecimal; import javax.persistence.Entity; import javax.persistence.Id; import lombok.Data; @Data @Entity public class Users { @Id private Long userId; private String name; private String dept; private BigDecimal account; } |
We are using Project Lombok for our domain object.
Reader
|
1 2 3 4 5 6 7 8 9 10 11 12 13 14 15 16 17 18 19 20 21 22 |
public class Reader extends FlatFileItemReader<Users> { public Reader(Resource resource) { super(); setResource(resource); DelimitedLineTokenizer lineTokenizer = new DelimitedLineTokenizer(); lineTokenizer.setNames(new String[] { "userid", "name", "dept", "amount" }); lineTokenizer.setDelimiter(","); lineTokenizer.setStrict(false); BeanWrapperFieldSetMapper<Users> fieldSetMapper = new BeanWrapperFieldSetMapper<>(); fieldSetMapper.setTargetType(Users.class); DefaultLineMapper<Users> defaultLineMapper = new DefaultLineMapper<>(); defaultLineMapper.setLineTokenizer(lineTokenizer); defaultLineMapper.setFieldSetMapper(fieldSetMapper); setLineMapper(defaultLineMapper); } } |
Our Reader is a FlatFileItemReader, which expects a csv file Resource as an input. To read data from file, we have to define a tokenizer. After that, we have to map the read tokens to our entity or domain object using BeanWrapperFieldMapper.
Writer
|
1 2 3 4 5 6 7 8 9 10 11 12 13 |
@Component public class Writer implements ItemWriter<Users>{ @Autowired private UsersRepository repo; @Override @Transactional public void write(List<? extends Users> users) throws Exception { repo.saveAll(users); } } |
The writer routine is straightforward. It saves all the user data to our in-memory database.
Processor
|
1 2 3 4 5 6 7 8 9 10 11 12 13 14 15 16 |
@Component public class Processor implements ItemProcessor<Users, Users> { @Autowired private UsersRepository userRepo; @Override public Users process(Users user) throws Exception { Optional<Users> userFromDb = userRepo.findById(user.getUserId()); if(userFromDb.isPresent()) { user.setAccount(user.getAccount().add(userFromDb.get().getAccount())); } return user; } } |
Processor checks if data is present in the table if it is present then it adds the amount else new row is inserted.
The Job
|
1 2 3 4 5 6 7 8 9 10 11 12 13 14 15 16 17 18 19 20 21 22 23 24 25 26 27 28 29 30 31 32 33 34 35 36 37 38 39 40 41 42 43 44 45 |
@Component public class AccountKeeperJob extends JobExecutionListenerSupport { @Autowired JobBuilderFactory jobBuilderFactory; @Autowired StepBuilderFactory stepBuilderFactory; @Value("${input.file}") Resource resource; @Autowired Processor processor; @Autowired Writer writer; @Bean(name = "accountJob") public Job accountKeeperJob() { Step step = stepBuilderFactory.get("step-1") .<Users, Users> chunk(1) .reader(new Reader(resource)) .processor(processor) .writer(writer) .build(); Job job = jobBuilderFactory.get("accounting-job") .incrementer(new RunIdIncrementer()) .listener(this) .start(step) .build(); return job; } @Override public void afterJob(JobExecution jobExecution) { if (jobExecution.getStatus() == BatchStatus.COMPLETED) { System.out.println("BATCH JOB COMPLETED SUCCESSFULLY"); } } } |
When we annotate our main application with @EnableBatchProcessing Spring Boot makes it sure that all the required beans are available for you. To create a Spring Batch Job you need JobBuilderFactory and StepBuilderFactory
You can see how we have provided the Reader, Writer, and Processo to our Step. Then this Step is added to our Job instance.
Invoking the Job
By default, Spring runs all the job as soon as it has started its context. If you want to disable that you can define below the property
|
1 |
spring.batch.job.enabled=false |
As we want to run the job manually, we will define a controller and we will call the job when that end point is loaded.
|
1 2 3 4 5 6 7 8 9 10 11 12 13 14 15 16 17 18 19 20 21 |
@RestController public class JobInvokerController { @Autowired JobLauncher jobLauncher; @Autowired @Qualifier("accountJob") Job accountKeeperJob; @RequestMapping("/run-batch-job") public String handle() throws Exception { JobParameters jobParameters = new JobParametersBuilder() .addString("source", "Spring Boot") .toJobParameters(); jobLauncher.run(accountKeeperJob, jobParameters); return "Batch job has been invoked"; } } |
Results
When the application is first started you can check the H2 console using link http://localhost:8080/h2-console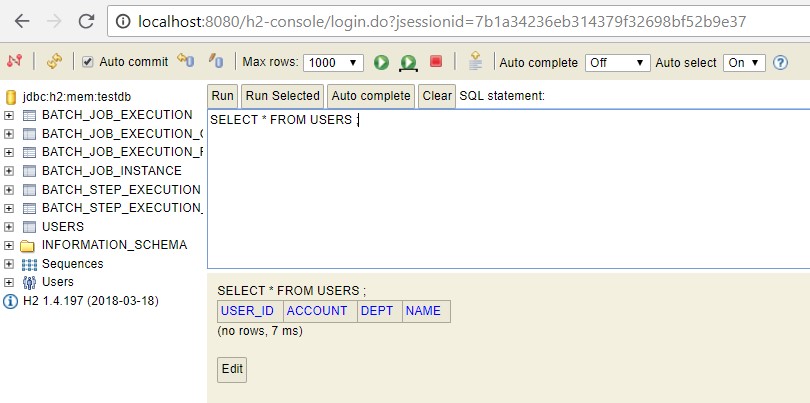
But once you invoke the job using the rest endpoint, the user table is updated and you will see data in it.
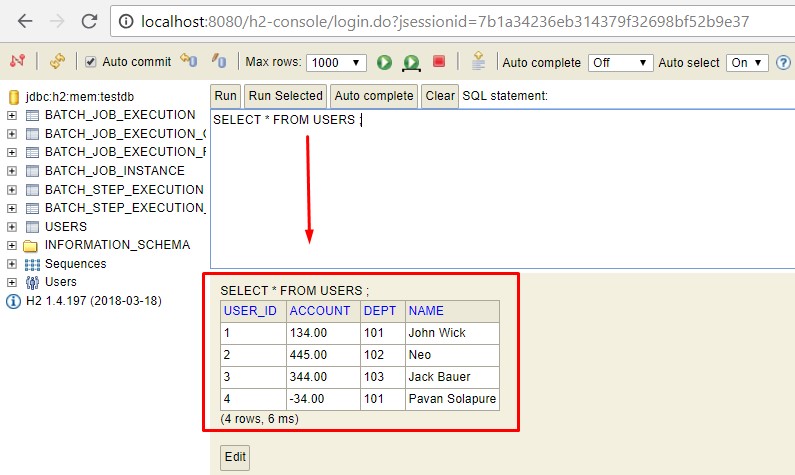
Thus our job has completed successfully.
Conclusion
In this article, we have seen briefly how we can develop Spring Batch Jobs to take care of daily operations that involve some data processing or number crunching.
I will update this article as we go to integrate the jobs with some scheduling techniques.
You can download the complete code from git repository.
Download Code


Log is correct but i dont see the database created
one of the best
Thank u. Hope you found it useful.
Keep Visiting. Keep Learning.
Awesome!
Thank you to spending time on us to teach this valuable topic.
Please can you explain flow of this code i mean
First=>Controller will be called.
Second=>jobLauncher.run(accountKeeperJob, jobParameters);
Here what is use of accountKeeperJob, jobParameters specially jobParameters value is not used anywhere.
And then flow after calling jobLauncher.run(accountKeeperJob, jobParameters);
Good one with simple explanation.
Great tutorial !!
Thanks, glad you found it useful
Awesome!
I’m trying to do exactly opposite by using same tools you used.
By any chance do you have working example.
I need to read data from database & write into flat file.