API Testing with Java Using Rest Assured – Sample Code Provided
Overview
Nowadays, software applications are becoming more complex at the same time more open for interactions. All thanks to APIs and it’s the ease of using with any kind of platform like mobile, web etc… If you’re super new to APIs, I suggest watching this YouTube video.
API Testing with Java Using Rest Assured:
In this article, our main focus will be on how to automate API testing with Java. For this, we will be using the most used library called Rest Assured. It is also an API specifically designed to automate our REST APIs.
1. Setup
So, the tools and software we required are as below:
- Eclipse as our IDE
- Java 8
- TestNG testing framework
- Maven for build automation
Here, I assume that you already have TestNG and Maven installed in Eclipse IDE.
1.1 Setting up Eclipse & Creating Maven Project
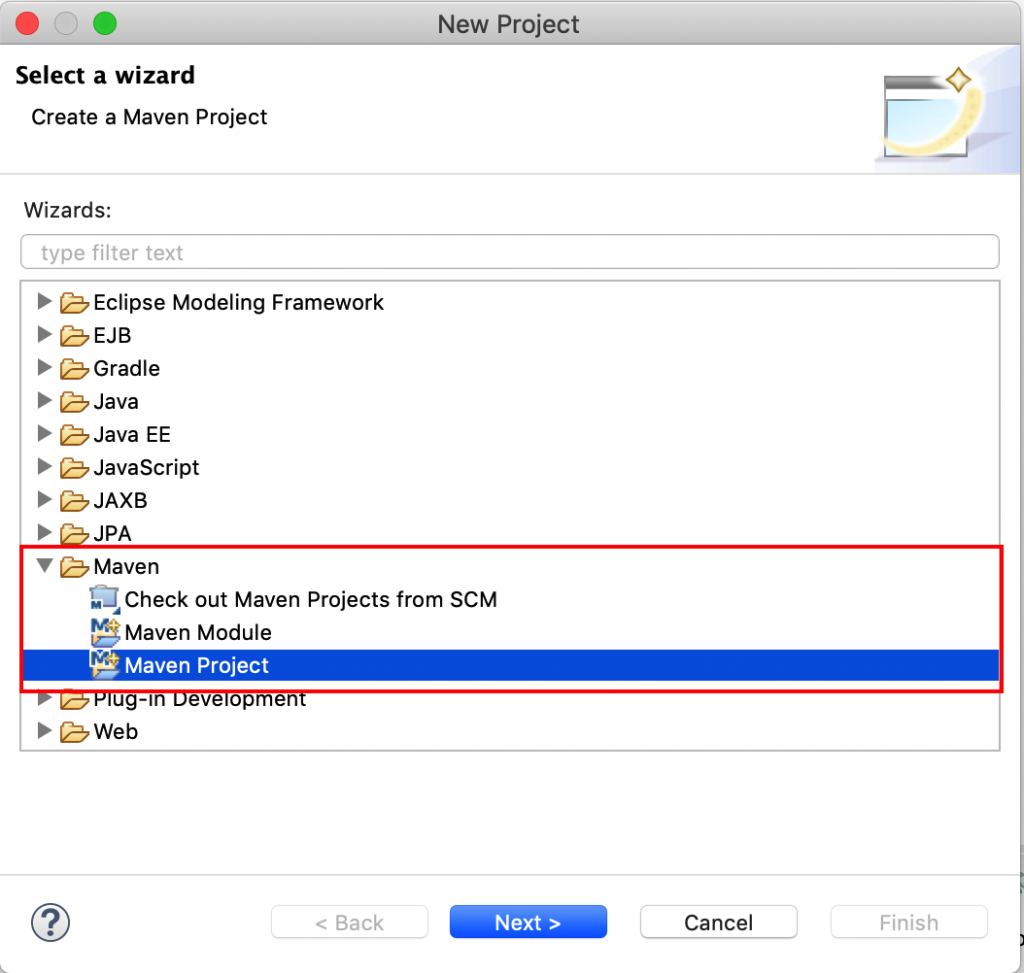
Once the project is set up, go to pom.xml file and add the required dependencies. We will download these dependencies from Maven official website.
1.2 Adding POM dependencies
|
1 2 3 4 5 6 7 8 9 10 11 12 13 14 15 16 17 18 19 |
<dependency> <groupId>io.rest-assured</groupId> <artifactId>rest-assured</artifactId> <version>4.1.1</version> <scope>test</scope> </dependency> <dependency> <groupId>org.testng</groupId> <artifactId>testng</artifactId> <version>7.0.0</version> <scope>test</scope> </dependency> <dependency> <groupId>com.googlecode.json-simple</groupId> <artifactId>json-simple</artifactId> <version>1.1.1</version> </dependency> |
2. Simple API Testing with Java example
Let’s understand a basic structure of JSON response you might get and how we validate using java rest-assured library. Consider below is the JSON response we got from a server at http://localhost:8080/data?id=4
|
1 2 3 4 5 6 7 8 |
{ "data":{ "id":"4", "name":"Niswa", "job":"Software Engineer", "location":"New York" } } |
Once you have something like this, REST assured comes handy to validate. Let’s see a simple test for validating the above response.
|
1 2 3 4 5 6 7 8 |
@Test public void validateDataOnResponse() { when(). get("/data?id=4"). then(). statusCode(200).assertThat() .body("data.name", equalTo("Niswa")); } |
From the above snippet, we have function validateDataOnResponse() which calls the API endpoint /data?id=4 and we get a response back in JSON format. We have then verified the statusCode as 200 and asserted that the body of JSON contains a name as “Niswa”.
Read: Build A Simple API using NodeJS
3. Tests for GET, POST, PUT, DELETE Methods
For all the below tests, we will use hosted APIs on reqres. This is one of my favorite hosted REST-API service available out there for free and without any sign or key.
3.1 GET method test example
We will create a single file for all the tests. Although, it is not recommended, but for us just to get started, It’s okay :). Now, in our first test, we will make a GET call and verify the statusCode to be 200.
Create a class name ApiMethodTests.java
|
1 2 3 4 5 6 7 8 9 10 11 12 13 14 15 16 17 18 19 20 21 22 23 24 |
import org.testng.annotations.Test; import io.restassured.RestAssured; import io.restassured.http.Method; import io.restassured.response.Response; import io.restassured.specification.RequestSpecification; public class ApiMethodsTests { @Test void getUserDetailsTest() { //The base URI to be used RestAssured.baseURI = "https://reqres.in/api/users/"; //Define the specification of request. Server is specified by baseURI above. RequestSpecification httpRequest = RestAssured.given(); //Makes calls to the server using Method type. Response response = httpRequest.request(Method.GET, "2"); //Checks the Status Code int statusCode = response.getStatusCode(); Assert.assertEquals(statusCode, 200); } } |
3.2 POST method test example
In the same class, we will create a new test function and try to verify if the POST call is working and verify if a new user is created by asserting the statusCode as 201.
|
1 2 3 4 5 6 7 8 9 10 11 12 13 14 15 16 17 18 19 20 |
@Test void updateUserDetailsTest() { RestAssured.baseURI = "https://reqres.in/api/users/"; RequestSpecification httpRequest = RestAssured.given(); JSONObject updateData = new JSONObject(); updateData.put("name", "Aarna"); httpRequest.header("Content-Type", "application/json"); httpRequest.body(updateData.toJSONString()); Response response = httpRequest.request(Method.PUT, "4"); statusCode = response.getStatusCode(); Assert.assertEquals(statusCode, 200); JsonPath newData = response.jsonPath(); String name = newData.get("name"); Assert.assertEquals(name, "Aarna"); } |
3.3 PUT method test example
This method is used to update the existing data. For example, you made a spelling mistake and now you want to correct, you’ll use PUT method. So. Let’s see how we can automate and do API testing with java for this kind of APIs.
|
1 2 3 4 5 6 7 8 9 10 11 12 13 14 15 16 17 18 19 20 21 22 23 |
@Test void updateUserDetailsTest() { RestAssured.baseURI = "https://reqres.in/api/users/"; RequestSpecification httpRequest = RestAssured.given(); //Passing the data to be updated JSONObject updateData = new JSONObject(); updateData.put("name", "Aarna"); httpRequest.header("Content-Type", "application/json"); httpRequest.body(updateData.toJSONString()); Response response = httpRequest.request(Method.PUT, "4"); statusCode = response.getStatusCode(); Assert.assertEquals(statusCode, 200); //Checking in response if data is updated JsonPath newData = response.jsonPath(); String name = newData.get("name"); Assert.assertEquals(name, "Aarna"); } |
3.4 DELETE method test example
In this example, we will delete an existing user and verify the status code. Note that the endpoint I am using the code sends back statusCode as 204 which is No Content and used as one of the valid codes for DELETE method.
|
1 2 3 4 5 6 7 8 9 10 |
@Test void deleteUserTest() { RestAssured.baseURI = "https://reqres.in/api/users/"; RequestSpecification httpRequest = RestAssured.given(); Response response = httpRequest.request(Method.DELETE, "4"); statusCode = response.getStatusCode(); Assert.assertEquals(statusCode, 204); } |
4. Bonus: API testing with Java for APIs which required Authorization
Nowadays, we have always seen that we require some type of authentication to access/use the API. This is important from a security standpoint and there are many different types of Authorization available like Basic Auth, Digest or OAuth etc. I will not go in detail about it, you can read more about it here.
Below you can see I tried to call this API without using Basic Auth and you can see the error and statusCode as 401 Unauthorized.
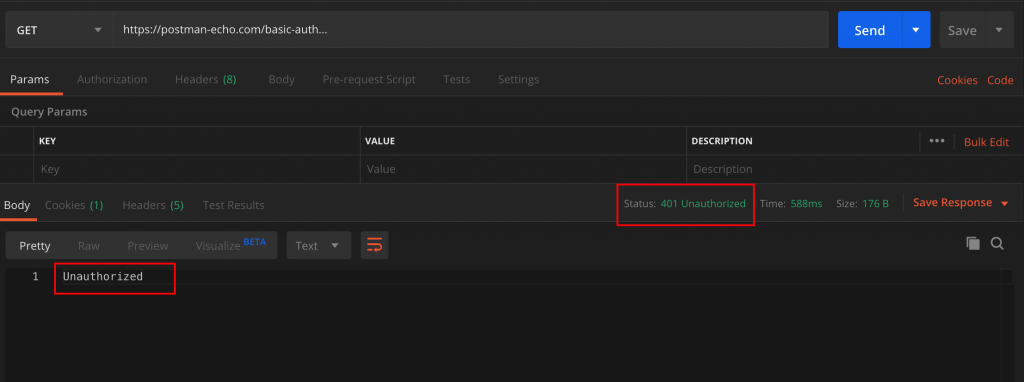
In this test, we will use the endpoint as – https://postman-echo.com/basic-auth and try to do GET call passing our Basic Auth credentials which this API accepts.
|
1 2 3 4 5 6 7 8 9 10 11 12 13 14 15 16 17 18 19 20 21 22 23 24 25 26 |
@Test void checkAuthorizationTest() { RestAssured.baseURI = "https://postman-echo.com/basic-auth"; RequestSpecification httpRequest = RestAssured.given(); Response response = httpRequest.request(Method.GET, "/"); //Expecting unauthorized status 401 statusCode = response.getStatusCode(); Assert.assertEquals(statusCode, 401); //Passing the Basic Auth username and password httpRequest.auth().preemptive().basic("postman", "password"); //Expecting our Auth works and verifying status code Response responseWithAuth = httpRequest.request(Method.GET, "/"); statusCode = responseWithAuth.getStatusCode(); Assert.assertEquals(statusCode, 200); //Verifying the response body of this API JsonPath jsonValidator = responseWithAuth.jsonPath(); Boolean authentication = jsonValidator.get("authenticated"); Assert.assertTrue(authentication); } } |
Conclusion
So, above are all code sample for API testing with Java and we used rest assured library to do the same. Of course, there might be many other options as well. So, let me know in the comment section do you use something else interesting or need more help with REST assured, I will be more than happy to do so 🙂
DOWNLOAD CODERelated Posts
-
 How to use RPT for Performance Testing of Web Application – Part II-Test Scheduling
-
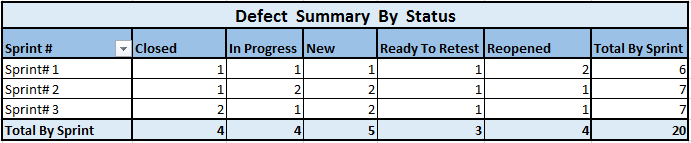 4 Steps To Draft Effective Defect Report – Sample Defect Status Report in Excel to download
-
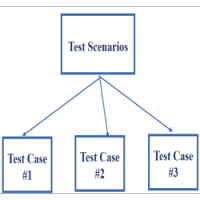 What is Test Scenario? Template with Examples,Difference Between Test Scenario and Test Case
-
How to use RPT for Performance Testing of Web Application – Part I
Can u recheck your Post call. YOu h
Can u recheck your Post call. You have posted the code for PUT as the POST call