Simple way to Build Message Driven Application using Kafka and Spring Boot
In this article, we will create a simple Message Driven Application using Apache Kafka and Spring Boot. We have already seen how we connect to Kafka using plain java clients. In this tutorial, we will see Spring Boot Kafka capability and how it makes your life easier.
Softwares used:
- Spring Boot 1.5.9.RELEASE
- Apache Kafka
- Jquery SSE
- Java 7
- Maven
- Eclipse
For the demonstration purpose, we will use the web starter project which has support for Spring Boot and Thymeleaf.
Read How quickly you can create your web project with super configuration.
Maven Dependency
Spring has very strong support for Kafka. We will add that dependency to our pom file. Below are the main notable dependencies that our application is going use.
|
1 2 3 4 5 6 7 8 9 10 11 12 13 14 15 16 17 18 19 20 21 22 23 24 25 |
<dependency> <groupId>org.springframework.kafka</groupId> <artifactId>spring-kafka</artifactId> </dependency> <dependency> <groupId>org.springframework.boot</groupId> <artifactId>spring-boot-starter-thymeleaf</artifactId> </dependency> <dependency> <groupId>org.springframework.boot</groupId> <artifactId>spring-boot-starter-web</artifactId> </dependency> <!--WebJars --> <dependency> <groupId>org.webjars</groupId> <artifactId>bootstrap</artifactId> <version>3.3.6</version> </dependency> <dependency> <groupId>org.webjars</groupId> <artifactId>jquery</artifactId> <version>2.1.4</version> </dependency> <!--/WebJars --> |
To simulate real-life scenario for our message driven application, we will assume that messages will be published to Kafka topic from external system or source. We will use the command line utility that ships with Kafka.
Consumer Configuration
We need to configure ConsumerFactory and a KafkaListenerContainerFactory to consume messages off Kafka topic. After that, we can use @KafkaListener annotation on any method to turn that to our message receiver.
Note: We also need @EnableKafka annotation in the configuration class. This will enable Spring to detect all our methods that are annotated with @KafkaListener.
|
1 2 3 4 5 6 7 8 9 10 11 12 13 14 15 16 17 18 19 20 21 22 23 24 25 26 27 28 29 30 31 32 33 34 35 36 37 38 39 40 41 42 43 44 45 46 47 48 49 50 51 |
@Configuration @EnableKafka public class KafkaConfig { @Autowired private Environment env; @Bean public ConsumerFactory<String, String> consumerFactory() { Map<String, Object> props = new HashMap<>(); props.put(ConsumerConfig.BOOTSTRAP_SERVERS_CONFIG, env.getProperty(Constants.KAFKA_BOOTSTRAP_SERVERS)); props.put(ConsumerConfig.GROUP_ID_CONFIG, env.getProperty(Constants.KAFKA_GROUP_ID)); props.put(ConsumerConfig.KEY_DESERIALIZER_CLASS_CONFIG, env.getProperty(Constants.KAFKA_KEY_DESERIALIZER)); props.put(ConsumerConfig.VALUE_DESERIALIZER_CLASS_CONFIG, env.getProperty(Constants.KAFKA_VALUE_DESERIALIZER)); props.put(ConsumerConfig.ENABLE_AUTO_COMMIT_CONFIG, env.getProperty(Constants.KAFKA_ENABLE_AUTO_COMMIT)); props.put(ConsumerConfig.AUTO_COMMIT_INTERVAL_MS_CONFIG, env.getProperty(Constants.KAFKA_AUTO_COMMIT_INTERVAL_MS)); return new DefaultKafkaConsumerFactory<>(props); } @Bean public ConcurrentKafkaListenerContainerFactory<String, String> kafkaListenerContainerFactory() { ConcurrentKafkaListenerContainerFactory<String, String> factory = new ConcurrentKafkaListenerContainerFactory<>(); factory.setConsumerFactory(consumerFactory()); return factory; } @Bean public KafkaTemplate<String, String> kafkaTemplate() { return new KafkaTemplate<>(producerFactory()); } @Bean public ProducerFactory<String, String> producerFactory() { Map<String, Object> configProps = new HashMap<>(); configProps.put(ProducerConfig.BOOTSTRAP_SERVERS_CONFIG, env.getProperty(Constants.KAFKA_BOOTSTRAP_SERVERS)); configProps.put(ProducerConfig.ACKS_CONFIG, env.getProperty(Constants.KAFKA_ACKS)); configProps.put(ProducerConfig.RETRIES_CONFIG, env.getProperty(Constants.KAFKA_RETRIES)); configProps.put(ProducerConfig.BATCH_SIZE_CONFIG, env.getProperty(Constants.KAFKA_BATCH_SIZE)); configProps.put(ProducerConfig.LINGER_MS_CONFIG, env.getProperty(Constants.KAFKA_LINGER_MS)); configProps.put(ProducerConfig.BUFFER_MEMORY_CONFIG, env.getProperty(Constants.KAFKA_BUFFER_MEMORY)); configProps.put(ProducerConfig.KEY_SERIALIZER_CLASS_CONFIG, env.getProperty(Constants.KAFKA_KEY_SERIALIZER)); configProps.put(ProducerConfig.VALUE_SERIALIZER_CLASS_CONFIG, env.getProperty(Constants.KAFKA_VALUE_SERIALIZER)); return new DefaultKafkaProducerFactory<>(configProps); } } |
The properties for consumer factory can be found in out application properties file.
|
1 2 3 4 5 6 7 8 9 10 11 12 13 |
kafka.bootstrap.servers=localhost:9092 kafka.acks=all kafka.retries=0 kafka.batch.size=16384 kafka.linger.ms=1 kafka.buffer.memory=33554432 kafka.key.serializer=org.apache.kafka.common.serialization.StringSerializer kafka.value.serializer=org.apache.kafka.common.serialization.StringSerializer kafka.key.deserializer=org.apache.kafka.common.serialization.StringDeserializer kafka.value.deserializer=org.apache.kafka.common.serialization.StringDeserializer group.id=grp-opencodez enable.auto.commit=true auto.commit.interval.ms=1000 |
Kafka Listener Config
Below is our code for the listener. The method listen is annotated with @KafkaListener. This method will be invoked when a message is posted on topic name opencodez.
|
1 2 3 4 5 6 7 8 9 10 11 12 13 14 15 16 17 18 19 20 21 22 |
@Configuration @EnableKafka public class KafkaListenerConfig { @Autowired private MessageController messageController; @KafkaListener(topics = "opencodez", group = "grp-opencodez") public void listen(String message) { System.out.println("Received Messasge: " + message); SseEmitter latestEm = messageController.getLatestEmitter(); try { latestEm.send(message); } catch (IOException e) { latestEm.completeWithError(e); } } } |
Okay, now you must have observed that I have some code related to controller and SseEmitter. Whats it doing there?
Well, if we simply wanted to show the message on console then it would not have been necessary. But we are doing an end to end application, where I want to see the message sent to Kafka topic to be available on frontend UI.
Server-Sent Events
For our example, we want to push messages to frontend as soon as we get it on our topic. So we need to establish a one-way communication from server to the client. Server-sent events are just perfect for that and Spring has inbuilt support for that in the form of SseEmitter.
Let us define our message controller, which will be mapped to one of the URLs in our application. As soon as the user hits that page, an instance of SseEmitter is created and sent back to the client to get data from.
|
1 2 3 4 5 6 7 8 9 10 11 12 13 14 15 16 17 18 19 20 21 22 23 24 25 26 27 28 29 30 31 32 33 34 35 36 37 |
@RestController public class MessageController { private final List<SseEmitter> emitters = new ArrayList<>(); @GetMapping("/kafka-messages") public SseEmitter getKafkaMessages() { SseEmitter emitter = new SseEmitter( 1 * 60 * 1000L ); emitters.add(emitter); emitter.onCompletion(new Runnable() { @Override public void run() { emitters.remove(emitter); } }); emitter.onTimeout(new Runnable() { @Override public void run() { emitters.remove(emitter); } }); return emitter; } public List<SseEmitter> getEmitters() { return emitters; } public SseEmitter getLatestEmitter() { return (emitters.isEmpty()) ? null : emitters.get(emitters.size()-1); } } |
In our controller, we are creating an emitter and adding that to list. When pushing message to client latest emitter from the list is pulled and used.
Also to keep our application safe in memory, we have added some callbacks that remove the emitter from the list once its timed out or the request is marked as complete. (Refer the KafkaListener code as shown earlier)
Server-Sent Events: Client View
We have seen how data is pushed from Server to the client. Now let’s see how its received at the client’s end. The client has to define and configure EventSource. As this may not be supported in all the browser we are using a Jquery-SSE Plugin.
This plugin tries to use the native EventSource object if it supported by the browser. If there is no native support the request is made by ajax requests (polling). You do not need to change the server side nor the client side.
|
1 2 3 4 5 6 7 8 9 10 11 12 13 14 15 16 17 18 |
$( document ).ready(function() { var sse = $.SSE('/kafka-messages', { onMessage: function(e){ console.log(e); $('#kafka-messages tr:last').after('<tr><td>'+e.data+'</td></tr>'); }, onError: function(e){ sse.stop(); console.log("Could not connect..Stopping SSE"); }, onEnd: function(e){ console.log("End"); } }); sse.start(); }); |
Once we include the required javascript file, you can use above code to bind it to the server.
Running the Application
We are all set now and ready to run our application. Once application is and running visit the page at url:http://localhost:8080/messages
To send messages to our topic, we are using inbuilt producer script from Kafka. Check the screen from running application.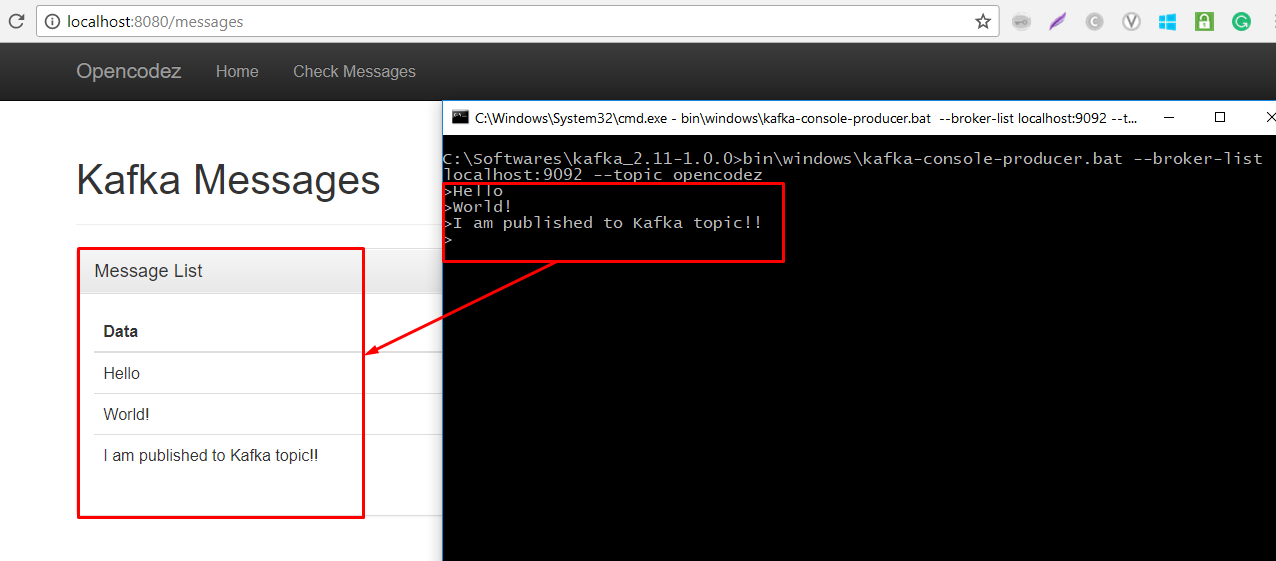
Conclusion
Spring makes it very easy to integrate Kafka with the web application. We have seen how we can develop a Message Driven Application with the help of Spring Boot and Apache Kafka.
Complete source code for this article can be downloaded from our GitHub. Before trying out the code, please make sure that Kafka server is running and the topics are created manually.
Download Code