Simple Way to Configure LDAP Authentication using Spring Boot – Source Code on GitHub
LDAP authentication is one of the widely used approaches in enterprise-grade applications. LDAP is used as a central repository for user information and applications will connect to this repository for user searches and authentication.
Configure LDAP Authentication using Spring Boot:
In this article, we will see how to do LDAP authentication using Spring Boot. Along with Spring Boot, we are using an online free LDAP test server setup for user information. We will use the information provided by them to configure a connection in our project.
Software used in this example
- Spring Boot 1.5.7.RELEASE
- Java 8
- Maven
- Eclipse
Demo Project Structure
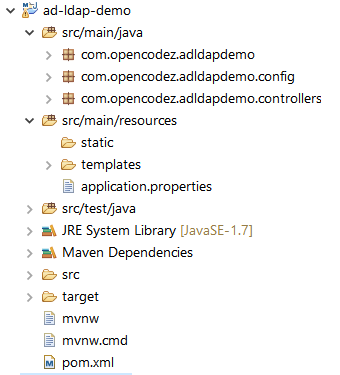
As we are using a web application along with usual spring boot dependency we need to add dependencies for ldap and thymeleaf for template system. The entries in pom will be like
|
1 2 3 4 5 6 7 8 9 10 11 12 |
<dependency> <groupId>org.springframework.ldap</groupId> <artifactId>spring-ldap-core</artifactId> </dependency> <dependency> <groupId>org.springframework.security</groupId> <artifactId>spring-security-ldap</artifactId> </dependency> <dependency> <groupId>org.springframework.boot</groupId> <artifactId>spring-boot-starter-thymeleaf</artifactId> </dependency> |
For LDAP connection we need set few parameters like server url, port, principal user, password, base domain name. This information you can get from your LDAP or Active Directory team. In our case we are using sample online server and they have made this information available for us. We will keep these as properties in our application properties file.
|
1 2 3 4 5 6 7 8 |
ldap.enabled = true ####### LDAP ############## ldap.urls= ldap://ldap.forumsys.com:389/ ldap.base.dn= dc=example,dc=com ldap.username= cn=read-only-admin,dc=example,dc=com ldap.password= password ldap.user.dn.pattern = uid={0} |
If you connect to the sample server from any of your LDAP Browser, you will see the directory structure like below 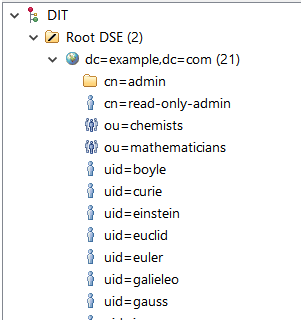
From above image you can check how we came down to base domain name, user pattern etc. Once we have these properties set we will add a security config bean to our project which will configure a Ldap connection using these properties.
|
1 2 3 4 5 6 7 8 9 10 11 12 13 14 15 16 17 18 19 20 21 22 23 24 25 26 27 28 29 30 31 32 33 34 35 36 37 38 39 40 41 42 43 44 45 46 47 48 49 50 51 52 53 54 55 56 57 58 59 60 61 62 63 64 65 66 67 68 69 70 71 |
package com.opencodez.adldapdemo.config; import org.springframework.beans.factory.annotation.Value; import org.springframework.context.annotation.Configuration; import org.springframework.security.config.annotation.authentication.builders.AuthenticationManagerBuilder; import org.springframework.security.config.annotation.web.builders.HttpSecurity; import org.springframework.security.config.annotation.web.configuration.WebSecurityConfigurerAdapter; @Configuration public class SecurityConfig extends WebSecurityConfigurerAdapter { @Value("${ldap.urls}") private String ldapUrls; @Value("${ldap.base.dn}") private String ldapBaseDn; @Value("${ldap.username}") private String ldapSecurityPrincipal; @Value("${ldap.password}") private String ldapPrincipalPassword; @Value("${ldap.user.dn.pattern}") private String ldapUserDnPattern; @Value("${ldap.enabled}") private String ldapEnabled; @Override protected void configure(HttpSecurity http) throws Exception { http .authorizeRequests() .antMatchers("/login**").permitAll() .antMatchers("/profile/**").fullyAuthenticated() .antMatchers("/").permitAll() .and() .formLogin() .loginPage("/login") .failureUrl("/login?error") .permitAll() .and() .logout() .invalidateHttpSession(true) .deleteCookies("JSESSIONID") .permitAll(); } @Override protected void configure(AuthenticationManagerBuilder auth) throws Exception { if(Boolean.parseBoolean(ldapEnabled)) { auth .ldapAuthentication() .contextSource() .url(ldapUrls + ldapBaseDn) .managerDn(ldapSecurityPrincipal) .managerPassword(ldapPrincipalPassword) .and() .userDnPatterns(ldapUserDnPattern); } else { auth .inMemoryAuthentication() .withUser("user").password("password").roles("USER") .and() .withUser("admin").password("admin").roles("ADMIN"); } } } |
From above you can see that we have configured all urls under /profiles as secured. So if you are not authenticated and try to access the url you will be presented with a login form.
Also you can see that we have configured ldap authentication using spring boot based on a condition. If our properties file have a property ldap.enabled set to true then only the ldap configuration is triggered or else it will fall back to basic in-memory authentication.
Regarding html pages, we have simply mapped /login, /profile urls to respective thymeleaf templates
Thats it on configuration front. Now we will run our application and access http://localhost:8999/profile . You will be redirected to login page as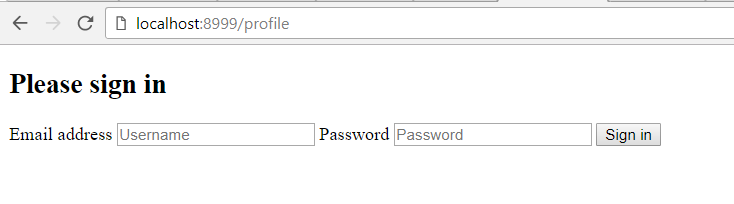
Now try and put any of the users from below. All users have a password as password
- riemann
- gauss
- euler
- euclid
If you enter correct user/password you will be taken to profile page else it will show you login error.
You can download the code from our Github.
Download Code


hi bro, I want to prosesing this, using ldap server, but couldn’t can you help me?
Did you check with postman? Since i tried and found even for wrong password it is returning the login page
how can i get the uid after successfully logged in
what is mean by username here
i am not getting log in page. it showing error
I am using the active directory where uid is not there, how can i connect , what should i put under uid field.
Caused by: org.springframework.ldap.CommunicationException: ldap.forumsys.com:389; nested exception is javax.naming.CommunicationException: ldap.forumsys.com:389 [Root exception is java.net.ConnectException: Connection timed out: connect]
Hi Raj,
Please check if forumsys ldap service is up and running.
Hi Pavan,
Very happy to see this example you provided. I could able to test this in my local.
Can you please help me with the below.
I want my spring boot application to authenticate from LDAP(As shown in your example) and the find the user role(Authorization) from Database. In one line, authentication from LDAP and authorization from Database.
So that I can configure access to pages based on user roles mapped in Database after I login my users from LDAP.
Thanks in advance!
-Surya Manoj|[email protected]
Hi,
I am new to ldap security for springboot. Need some help.
I have my user already present in ldap. So I dont want to store password anywhere in my project code. How to proceed in that case.
Basically, I want to skip ‘ldapPrincipalPassword’ part and on providing user crdentials through login form, i want to let ldap perform the authentication.
Hi, That this user cn=read-only-admin should have any special privilege or any valid username would be fine?
Can you please help how to test this from Postman, it is working fine through the browser, but through post man I always receive the login page although I have added the username and password as Basic Auth.
Your help is much appreciated
Hi, I need to look in to this Amr El-Deeb. I never experimented the login of this code with Postman.
I will try to do that and update you.
I’m using spring-boot-starter-security. So by default its expecting those creds. LDAP is not overriding the spring security feature. How to do this?
Hi Ijoe,
If you check the code for this demo, its also using spring boot starter security.
In properties file you have one property as ldap.enabled. If this is set to true then the application will try to connect to LDAP server. If the said property is not set, it will try to authenticate with in-memory user/password. Check SecurityConfig.java for exact user and password.
Let me know if this works for you.
Can you please help how to test this from Postman, it is working fine through the browser, but through post man I always receive the login page although I have added the username and password as Basic Auth.
Your help is much appreciated
Hi, I am trying to run the your code taken from git hub. But getting error in following:
org.springframework.boot
spring-boot-starter-parent
1.5.7.RELEASE
I am unable to get this parent pom.. Could you please help.
Hi Vandana,
What is the error you are getting? Are you able to build any other maven based project from your machine?
Dear Pavan,
I m facing issue while connected my Ldap server where i have created one user but while i m login it shows error
Hi Pravat,
What is the error you are getting? Are you trying to connect to any local ldap server or the one mentioned in the example?
Thank you for your replay .How to connect the rest api with spring boot and ldap.
Hi Pravat,
Are you suggesting Rest API Security with LDAP? If yes, I need to come up with some running example for that. I will keep you posted.
The login is successful but no token is returned. How can we enable the LDAP token which can be further used to authenticate the same user in subsequent calls post login
Hi Devendra, do you mean subsequent access to the same application, other modules under same application or completely new application. Are you referring to SSO?
Hi Pavan, yes I want that if I make other endpoint calls in the same application. Then, my authentication session persists.
So, for this do I need to use session or cookies to store the authentication info or it should be attached to URL.
Please suggest a way to achieve it.
Error appears:
LDAP: error code 49 – Invalid Credentials
with exactly same setting from given example code
It took me to Index page after successful login.
This is strange. As per the config in the code index page is not protected. Only urls /profile/** are authenticated. Did you change any config in the example?
hi , i need help.
how to create user role in phpldapadmin.
Hi Raghu,
I am not familiar with phpldapadmin. I need to see how that works. If I happen to try it, I will update you.