Send Encrypted Email Using Java Spring Boot – Simple Step By Step Guide With Source Code
Emails are used as communication modes most of the time. Not always people use encrypted email when sending business-sensitive information. Outlook and other email clients have inbuilt support for this and you can do this with a simple click.
Send Encrypted Email Using Java Spring Boot:
But what if you need to send encrypted email via your custom application. In this article, we will see how we can send an encrypted email using Java. We will use the Spring Boot project for this.
Software used
- Java 1.8
- Spring Boot 1.5.8.RELEASE
- Eclipse IDE
- Bouncy Castle Java Library
- Fake SMTP
In this tutorial, we will use PKI to encrypt and sign our emails. For testing purposes, we will prepare a couple of self-signed certificates using Java Keytool and use them in our example.
Encrypted Email Prerequisite
Create Certificate for Signer : We will use our domain name certificate as a signer when we only sign and send an email. The below command gives us a JKS file with a private key and public certificate for our site. We will use this to sign our email.
|
1 2 3 4 5 |
keytool -genkey -alias opencodez -keyalg RSA -validity 1825 -keystore "opencodez.jks" -storetype JKS -dname "CN=www.opencodez.com,OU=Opencodez,O=Opencodez,L=Pune,ST=Maharashtra,C=IN" -ext san=dns:opencodez.com,dns:OPENCODEZ.COM -keypass op3n.cod3z -storepass op3n.cod3z |
Create Certificate for Mail Receipient : When an encrypted email is sent to any email id or recipient we need to have his public key. So the same can be used to encrypt an email for that user. In our tutorial we will use email id “[email protected]” and we will use a self-signed certificate for this email id. The command to prepare the JKS for this is
|
1 2 3 4 |
keytool -genkey -alias solapure -keyalg RSA -validity 1825 -keystore "solapure.jks" -storetype JKS -dname "CN=Pavan Solapure,O=Opencodez" -ext san=email:solapure@opencodez.com -keypass 123456 -storepass 123456 |
As this is a self-signed certificate we need to trust this in our machine. We will install this certificate along with its private key. So when an encrypted email is sent the mail client will be able to access the correct certificate and key. To do that we will convert our JKS to PKCS #12 using below command.
|
1 2 3 4 |
keytool -importkeystore -srckeystore solapure.jks -destkeystore solapure.p12 -srcstoretype JKS -deststoretype PKCS12 -srcstorepass 123456 -deststorepass 123456 -srcalias solapure -destalias solapure -srckeypass 123456 -destkeypass 123456 -noprompt |
Once done, just double click the “solapure.p12” file, you will be prompted to install this certificate. Follow the instructions and install this certificate as a Trusted Authority.
The Project
Now we will go through an actual encrypted email project. We will be extending our existing project from github repository. The most important is that we add bouncy castle dependencies to our pom.xml along with other default spring boot items.
|
1 2 3 4 5 6 7 8 9 10 11 12 13 14 15 16 17 |
<dependency> <groupId>org.bouncycastle</groupId> <artifactId>bcprov-jdk15on</artifactId> <version>1.58</version> </dependency> <dependency> <groupId>org.bouncycastle</groupId> <artifactId>bcmail-jdk15on</artifactId> <version>1.58</version> </dependency> <dependency> <groupId>org.bouncycastle</groupId> <artifactId>bcpkix-jdk15on</artifactId> <version>1.58</version> </dependency> |
Now let’s look into our MailEncryptionUtil.java
Email Signing
|
1 2 3 4 5 6 7 8 9 10 11 12 13 14 15 16 17 18 19 20 21 22 23 24 25 26 27 28 29 30 31 32 33 34 35 36 37 38 39 40 41 42 43 44 |
public static MimeMessage signMessage(MimeMessage message) throws Exception { Security.addProvider(new BouncyCastleProvider()); CertificateDetails certDetails = CertificateUtil.getCertificateDetails(SIGNING_JKS,SECRET_KEY); // Create the SMIMESignedGenerator SMIMECapabilityVector capabilities = new SMIMECapabilityVector(); capabilities.addCapability(SMIMECapability.dES_EDE3_CBC); capabilities.addCapability(SMIMECapability.rC2_CBC, 128); capabilities.addCapability(SMIMECapability.dES_CBC); capabilities.addCapability(SMIMECapability.aES256_CBC); ASN1EncodableVector attributes = new ASN1EncodableVector(); attributes.add(new SMIMECapabilitiesAttribute(capabilities)); IssuerAndSerialNumber issAndSer = new IssuerAndSerialNumber(new X500Name(certDetails.getX509Certificate().getIssuerDN().getName()), certDetails.getX509Certificate().getSerialNumber()); attributes.add(new SMIMEEncryptionKeyPreferenceAttribute(issAndSer)); SMIMESignedGenerator signer = new SMIMESignedGenerator(); signer.addSignerInfoGenerator(new JcaSimpleSignerInfoGeneratorBuilder() .setProvider("BC") .setSignedAttributeGenerator(new AttributeTable(attributes)) .build("SHA1withRSA", certDetails.getPrivateKey(), certDetails.getX509Certificate())); // Add the list of certs to the generator List<X509Certificate> certList = new ArrayList<X509Certificate>(); certList.add(certDetails.getX509Certificate()); JcaCertStore bcerts = new JcaCertStore(certList); signer.addCertificates(bcerts); // Sign the message MimeMultipart mm = signer.generate(message); // Set the content of the signed message message.setContent(mm, mm.getContentType()); message.saveChanges(); return message; } |
The first thing this utility method does is to add Bouncy Castle as one of the Security Provider. Then we read the certificates from JKS we prepared earlier. You can refer more on this utility in our previous article
Then we add some default SMIME capabilities and create a signer object. The signer also needs details about the certificate we read earlier. The signer then can generate the MimeMultipart object which we can send.
To send mail in our example we will do like
|
1 2 3 4 5 6 7 8 9 10 11 12 13 |
public void signAndSend(Email eParams) throws Exception { MimeMessage message = mailSender.createMimeMessage(); MimeMessageHelper helper = new MimeMessageHelper(message); helper.setTo(eParams.getTo().toArray(new String[eParams.getTo().size()])); helper.setReplyTo(eParams.getFrom()); helper.setFrom(eParams.getFrom()); helper.setSubject(eParams.getSubject()); helper.setText(eParams.getMessage(), true); mailSender.send(MailEncryptionUtil.signMessage(message)); } |
Post this, once you receive mail in your mailbox you can verify the signature as below.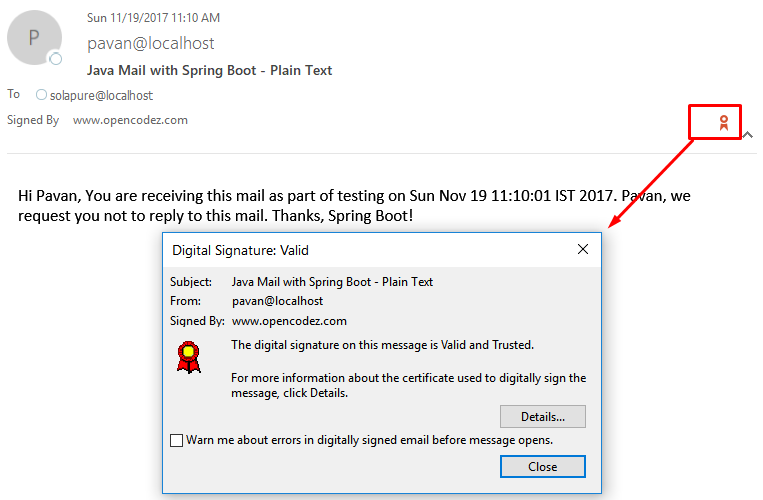
Encrypted Email
For encryption of email, the utility class has separate method as below
|
1 2 3 4 5 6 7 8 9 10 11 12 13 14 15 16 17 18 19 20 |
public static MimeMessage encryptMessage(MimeMessage message) throws Exception { Security.addProvider(new BouncyCastleProvider()); // create the generator for creating an smime/encrypted message SMIMEEnvelopedGenerator gen = new SMIMEEnvelopedGenerator(); X509Certificate recipientCert = getRecipientPublicCertificate(message); gen.addRecipientInfoGenerator(new JceKeyTransRecipientInfoGenerator(recipientCert).setProvider("BC")); MimeBodyPart msg = new MimeBodyPart(); msg.setContent(message.getContent(), message.getContentType()); MimeBodyPart mp = gen.generate(msg, new JceCMSContentEncryptorBuilder(CMSAlgorithm.RC2_CBC).setProvider("BC").build()); message.setContent(mp.getContent(), mp.getContentType()); message.saveChanges(); return message; } |
The first step is similar to signing and we need to let JVM know about our security provider. The method getRecipientPublicCertificate is externalized. In this example, we are reading a fixed certificate for an email but in reality, this has to be dynamic. We need to figure out a way to fetch public certificates based on emails from the public certificate directory.
|
1 2 3 4 5 6 7 8 9 10 11 12 13 14 15 |
private static X509Certificate getRecipientPublicCertificate(MimeMessage message) throws Exception { //for future - add routine to fetch public certificate for email //for now - just print the email and use fixed certificate for(Address addrs: message.getAllRecipients()) { System.out.println(addrs.toString()); } CertificateFactory fact = CertificateFactory.getInstance("X.509"); ClassLoader classLoader = MailEncryptionUtil.class.getClassLoader(); FileInputStream is = new FileInputStream (file); X509Certificate recipientCert = (X509Certificate) fact.generateCertificate(is); return recipientCert; } |
Once encrypted mail is sent, based upon your recipient’s email client he will be asked to allow access to a private key. You will see the screen as below 
If you allow it then only you will be able to open your encrypted mail. The opened email will look like 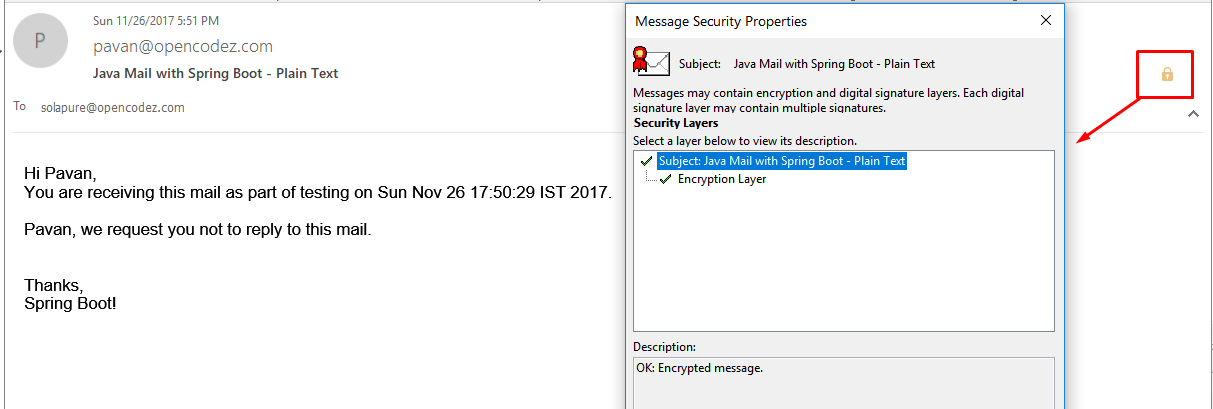
So now we are sure that our email is encrypted and only the actual recipient will be able to open and read it. You can download the code from our Github
Download CodeSummary
The tutorial gives you a working example of email encryption and signing. I hope you like it and find it useful. Please do not hesitate to comment or ask a question.


Hi Pavan
I followed all the steps to send encrypted email. I have imported the certificate in outlook but when I receive encrypted email in outlook, I don’t see the email body.
Can you please help me troubleshooting this?
Regards
Shital
Hi Pavan,
The post is very helpful. Could you help to read the public certificate of the user.
Thanks & Regards,
Arpitha
Thanks Arpitha, I will try and get back to you with details on this.
I got error like SMTP connection is refused
Hi Srini,
Can you check if you are allowed to connect to your SMTP server?
Yeah, I connected to the SMTP server. When I sent mail to the recipient as it is encrypted but to the recipient, it displaying like ‘This message could not be decrypted’. I have created the public key and also .p12 file to decrypt. Hope someone help me.
Clear and easy. Thank you very much!
If I may point out a small improvement: you can get the InputStream from the cert file using classloader’s getResourceAsStream (without using File and FileInputStream)
Keep up the good work!
Thanks Daniele !
Appreciate !
I found this post extremely useful. One gotcha I did encounter is when I sent an email with a body that contains unix style line breaks to a windows machine running outlook. Outlook will see the unix-style line breaks and add a carriage return (\r) before it does the signature validation. What you end up with is a message from the Outlook client saying that the message may have been tampered with. You have two options around this. First, when generating you can make sure all your line endings have \r\n (or if you’re sending an html-based email, you can remove all line endings completely. More ideally though, you’ll want to base64 encode the the content (and add the header:
Content-Transfer-Encoding: base64to your message. Hope that helps someone!Thanks, Chirs. This information is extremely useful and will definitely help.
Hi,
I am not able to send encrypted mail properly. There may be some certificate problem. How can I create certificate so that encrypt can be read in any particular mail id.
Hi Bhupendra,
The steps to create a certificate are available in the article. Please share more details on the error. You can mail me – pavan.solapure[@]gmail.com
Hi,
When I am sending mail to myself, then encryption is working. But when I am sending mail to other person then they are not able to access it. I used the certificate provided by my organisation, which is properly working in my system.
What needs to be done so that others can access the my encrypted mail?
Please suggest.
Hi Bhupendra,
Do you have access to the public certificate of the person you are sending mail? As we have to encrypt the mail with recipients public certificate in order to the recipient to allow and open the encrypted mail.
Check the method
getRecipientPublicCertificatewhere I am reading certificate for one user and returing it.Hi sir,
1 more thing please, how can we get access to the public certificate? I want to send it to any random person, publicly.
Please suggest what should be done ?
Hi Bhupendra,
I am not 100% sure on this but I think one possible solution is to check with your organization LDAP directory. See if you can read the certificate from there based on email address.
Again, this is my suggestion based on some initial research. I need to look into it more and check if it works.
If you happen to implement it successfully, appreciate if you share the approach.
very usefull thanks 🙂
anyway i have project with my college task so could you help me to make tutorial how to encrypte a mail with attachment, use algorythm AES and DSA, please i need your help
thank you for your attention…
Hi Rama,
Right now, I don’t have any code handy related to email attachment. I will see how I can come up with it and update you.
Thanks
Great tutorial.
How to use smime to encrypte a mail with attachment ?
Thank you for your answer.
Thanks, Jason.
I am planning to write on that topic soon. I will keep you posted!