

In this tutorial, we will learn how to create one full-stack xtodox application using Apollo GraphQL, Node and React. We will use xmaterial uix library for building the UI in React.js, xApollox for connecting to the GraphQL server, xexpressx for building the graphql server and MongoDB as the database.
We will create two folders inside the main project folder : xserverx and xclientx. xserverx is for storing the server side code and xclientx is for storing the client side code.
Server setup :
First of all, create one folder called xserverx and open one terminal inside the folder. Next, start one xnpmx project inside the folder using xnpm initx command. Hit enter for each configuration options. After the configuration is completed, it will create one xpackage.jsonx file inside the folder.
We need to install the following dependencies on the server side :
graphql: This package is the JavaScript reference implementation for GraphQL
express-graphql: GraphQL HTTP server middleware to use with Express
express: Express framework
mongoose: It is the MongoDB object modelling tool
nodemon: It will automatically restart the server if any change is detected
Install these dependencies with the following command :
npm i graphql express-graphql express mongoose nodemon
It will install the latest dependencies inside the project folder. Following are the versions that are installed on my machine :
+ graphql@14.3.0
+ express@4.16.4
+ express-graphql@0.8.0
+ mongoose@5.5.7
+ nodemon@1.19.0
If you want to use the same versions, you can change them inside the package.json file.
For implementing the server, we need the following files :
1. Main server file
2. GraphQL Schema file
3. MongoDB model object files
Hosting the database:
You can host a MongoDB database on any website like MongoDB Atlas[https://www.mongodb.com/cloud/atlas], but for this tutorial, we are going to start one Mongo server locally. Make sure that you have MongoDB installed on your system. We will also use Robo3T as the MongoDB management tool.
Create one folder xdbx inside the root project directory and execute the following command to start MongoDB in this directory :
mongod --dbpath ./
It will print the port number where MongoDB is started:
waiting for connections on port 27017
You can try to open xhttp://localhost:27017x on a browser to verify that the MongoDB is actually started on this port. It will print a message like below on the browser:
xIt looks like you are trying to access MongoDB over HTTP on the native driver port.x
Start the server:
Create one folder xsrcx and create one file xserver.jsx in it. All our source code file will go inside this xsrcx folder.
Open the xserver.jsx file and add the below code in it :
const express = require("express");

const expressGraphQL = require("express-graphql");

const mongoose = require("mongoose");

const server = express();

mongoose.connect("mongodb://localhost:27017");

mongoose.connection.once("open", () =x {
  console.log("connected to the MongoDB database");
});

server.listen(4000, () =x {
  console.log("server is listening on 4000");
});
Inside the xpackage.jsonx file, modify the xscriptsx block like below :
"scripts": {
  "dev":"nodemon ./src/server.js"
}
Now, in the root directory, execute the below command to start the server :
npm run dev
If everything goes well, you will see the below message in the terminal:
server is listening on 4000
connected to the MongoDB database
i.e. the server is running on port x4000x and MongoDB is also connected.
Create the Models:
Our application will store a list of tasks and for that we need only one model object class. Create one new folder xmodelsx inside the xsrcx folder and create one new file xtask.jsx inside xsrc/modelsx folder. Add the following code in this file :
const mongoose = require("mongoose");

const Schema = mongoose.Schema;

const taskSchema = new Schema({
  _id: {
    type: mongoose.Schema.Types.ObjectId,

    auto: true
  },

  taskName: String
});

module.exports = mongoose.model("TaskModel", taskSchema);
i.e. our tasks will have one autogenerated x_idx and one xtaskNamex.
Create the Schema:
We need the following query and mutation for our app:
Query:
x Fetch all tasks
x Fetch one single task with its id
Mutation:
x Add one task
x Delete one task
Letxs start with the fetch all tasks query. Create one folder called xschemax inside the xsrcx folder and create one file xschema.jsx in it and add the below code in this file:
const graphql = require("graphql");

const TaskModel = require("../models/task");

const {
  GraphQLObjectType,
  GraphQLList,
  GraphQLString,
  GraphQLSchema,
  GraphQLNonNull
} = graphql;

const Task = new GraphQLObjectType({
  name: "Task",
  fields: () =x ({
    _id: {
      type: GraphQLID
    },
    taskName: {
      type: GraphQLString
    }
  })
});

const Query = new GraphQLObjectType({
  name: "Query",
  fields: {
    tasks: {
      type: new GraphQLList(Task),
      resolve(parent, args) {
        return TaskModel.find({});
      }
    }
  }
});

module.exports = new GraphQLSchema({
  query: Query
});
Here,
x we are using xgraphqlx module and the model class xtaskx
x GraphQLObjectType, GraphQLList, GraphQLString, GraphQLSchema, GraphQLNonNull are used for creating a GraphQL object, list, string, schema and non-null value.
x xTaskx is the type of xtaskx object
x xQueryx is used to hold all different types of queries. Currently, we have only one query xtasksx to fetch the list of tasks from the MongoDB database. Inside the xresolvex function, we are fetching all the tasks.
x Finally, we are exporting one GraphQL schema using the query.
Change the xserver.jsx file as below to use the above schema in the express server :
const express = require("express");

const expressGraphQL = require("express-graphql");

const mongoose = require("mongoose");

const schema = require("./schema/schema");

const server = express();

mongoose.connect("mongodb://localhost:27017");

mongoose.connection.once("open", () =x {
  console.log("connected to the MongoDB database");
});

server.use(
  "/graphql",
  expressGraphQL({
    schema,
    graphiql: true
  })
);

server.listen(4000, () =x {
  console.log("server is listening on 4000");
});
It will start our server with one query xtasksx. Open xlocalhost:4000/graphqlx on a browser window and try to execute the query like below :


As you can see that the server is returning an empty list of tasks.
Add, Delete a task :
We can add the other properties like add, delete, fetch single task similarly in the schema.js file.
The final schema.js file will look like as below :
const graphql = require("graphql");

const TaskModel = require("../models/task");

const {
  GraphQLObjectType,
  GraphQLList,
  GraphQLBoolean,
  GraphQLString,
  GraphQLSchema,
  GraphQLID,
  GraphQLNonNull
} = graphql;

const Task = new GraphQLObjectType({
  name: "Task",
  fields: () =x ({
    _id: {
      type: GraphQLID
    },
    taskName: {
      type: GraphQLString
    }
  })
});

const Query = new GraphQLObjectType({
  name: "Query",
  fields: {
    tasks: {
      type: new GraphQLList(Task),
      resolve(parent, args) {
        return TaskModel.find({});
      }
    },
    task: {
      type: Task,
      args: { taskId: { type: GraphQLID } },
      resolve(parent, args) {
        return TaskModel.findById(args.taskId);
      }
    }
  }
});

const Mutation = new GraphQLObjectType({
  name: "Mutation",
  fields: {
    addTask: {
      type: Task,
      args: {
        taskName: { type: new GraphQLNonNull(GraphQLString) }
      },
      resolve(parent, args) {
        let task = new TaskModel({
          taskName: args.taskName
        });

        return task.save();
      }
    },

    deleteTask: {
      type: GraphQLBoolean,
      args: { taskId: { type: GraphQLID } },
      resolve: async (parent, args) =x {
        const result = await TaskModel.deleteOne({ _id: args.taskId });
        if (result.n === 0) {
          return false;
        } else {
          return true;
        }
      }
    }
  }
});

module.exports = new GraphQLSchema({
  query: Query,
  mutation: Mutation
});
Here, we have defined two queries and two mutations. xtasksx is for retrieving all tasks, xtaskx is for retrieving one single task, xaddTaskx is for adding a task and xdeleteTaskx is for deleting a task.
Restart the server and try the below queries on GraphiQL :
a) Add a task :
mutation {
  addTask(taskName: "Todo task 1") {
    taskName
  }
}
b) Get all tasks :
{
  tasks {
    _id
    taskName
  }
}
c) Get one single task :
{
  task(taskId: "5cd9414231f7c46c4e12a184") {
    taskName

    _id
  }
}
d) Delete one task:
mutation {
  deleteTask(taskId: "5cd9414231f7c46c4e12a184")
}
Client React application:
Our final Application will look like below :
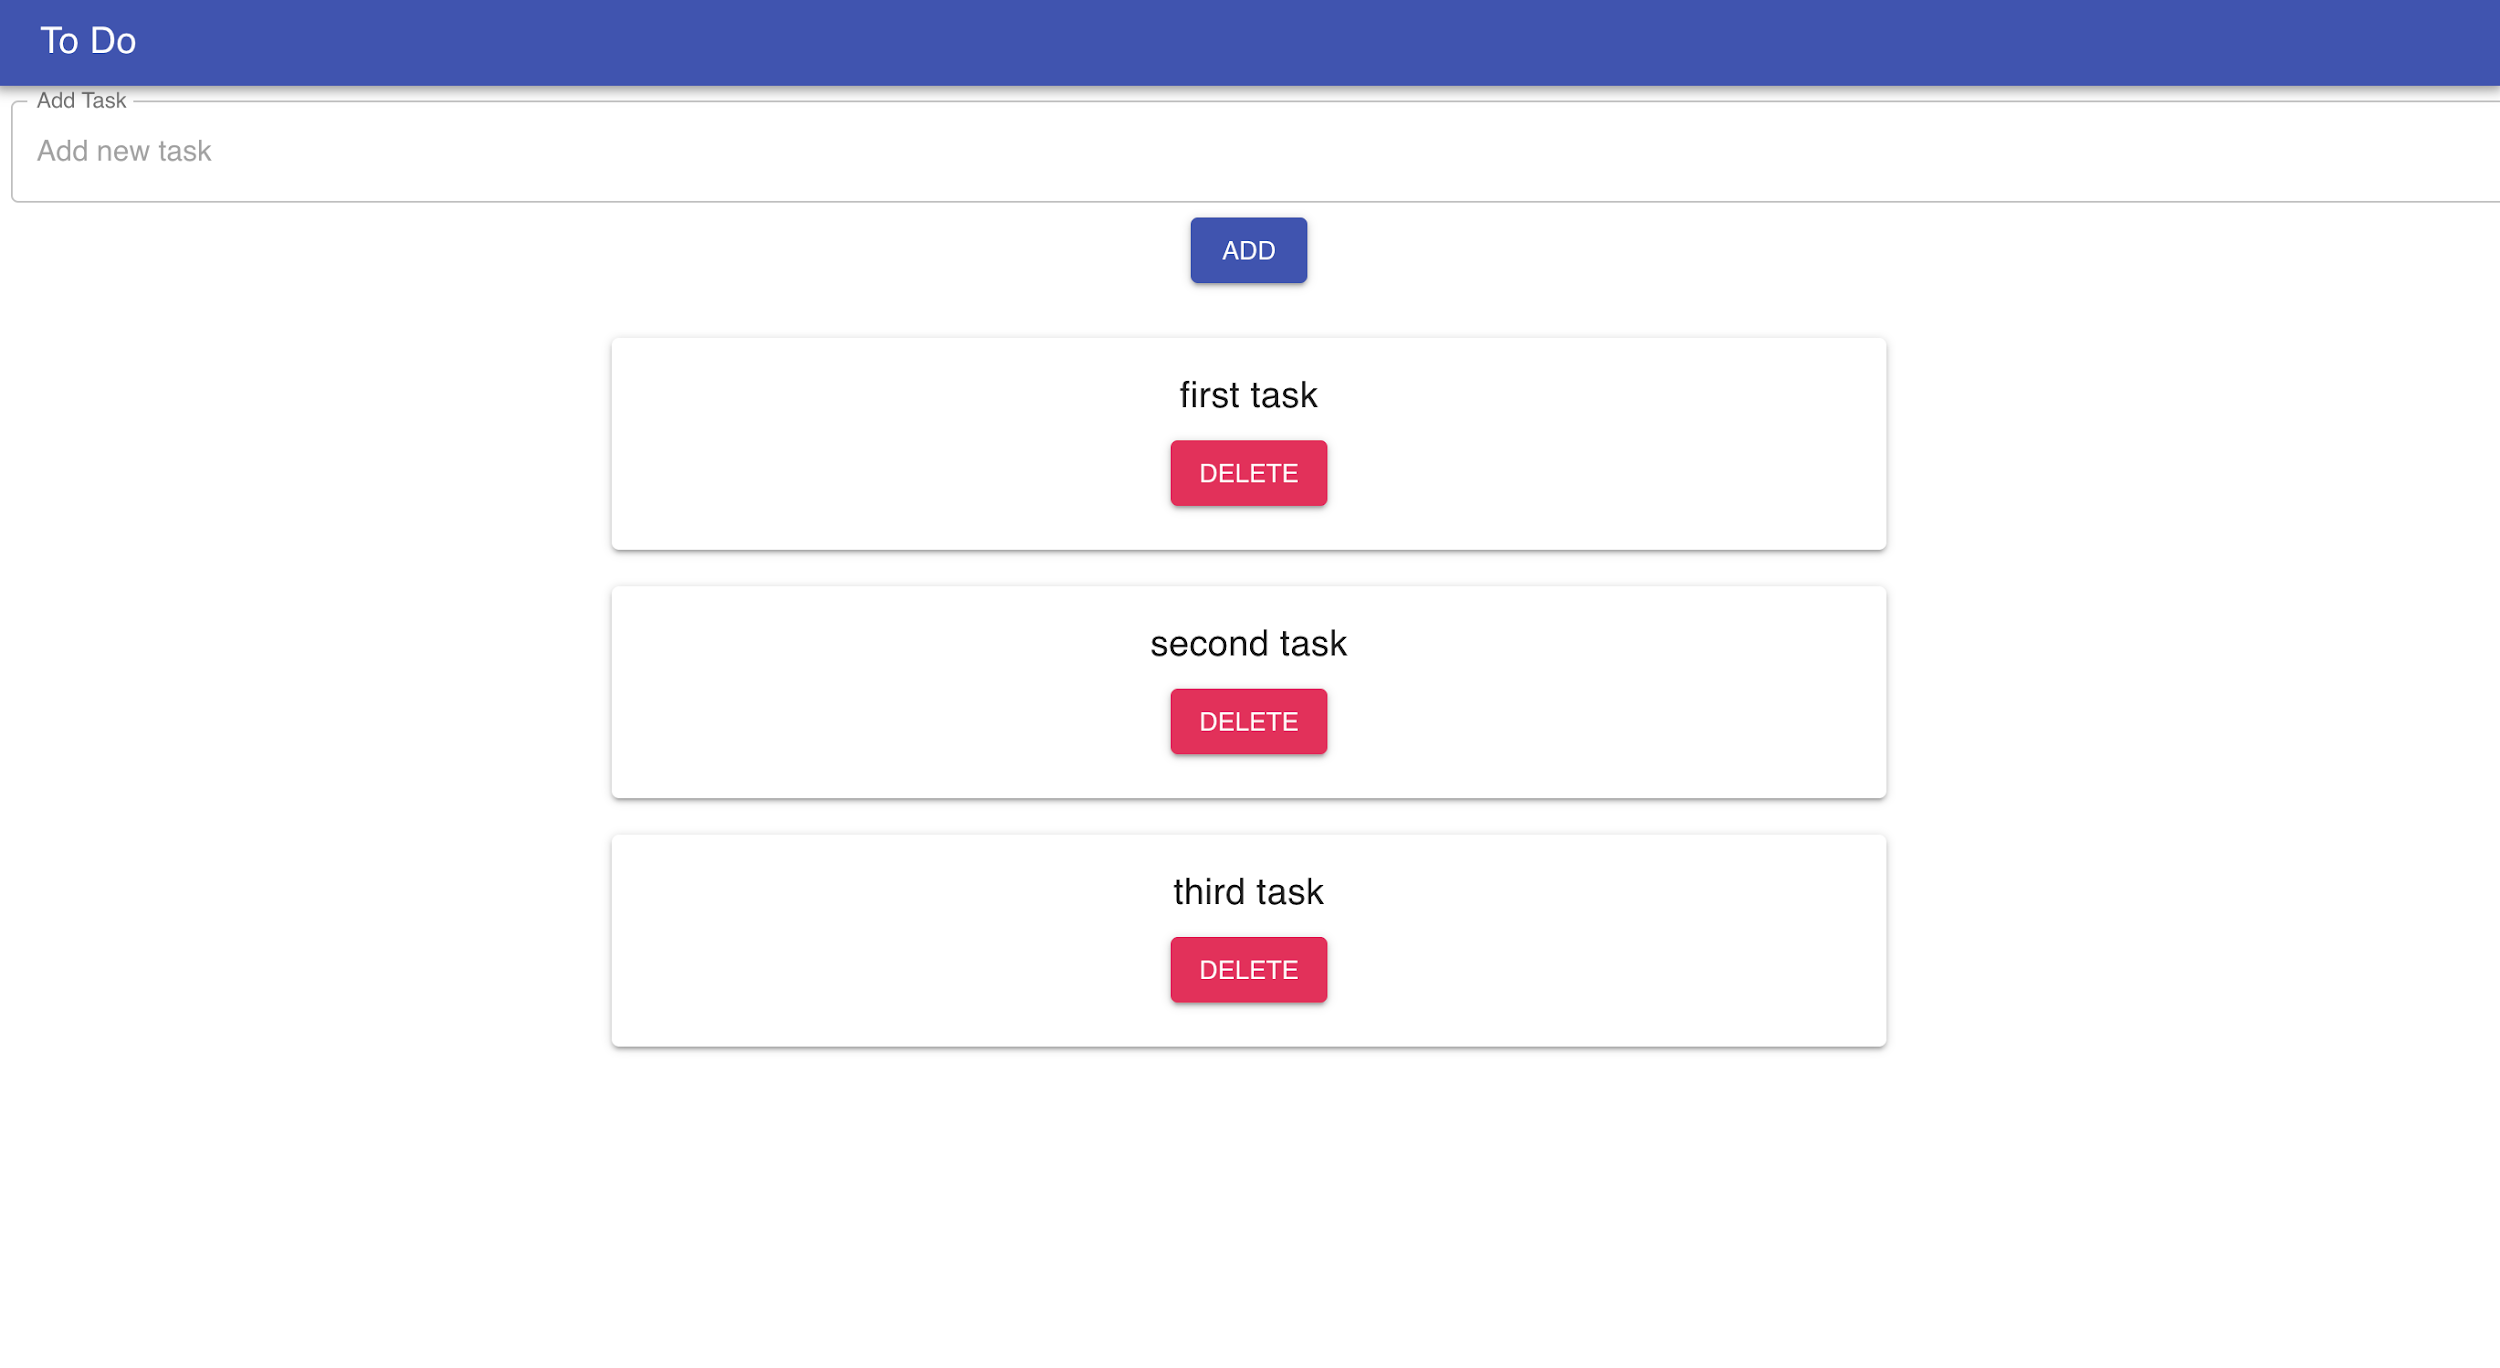

Using the xADDx button, you can add any new task. The task will be saved in MongoDB as explained above. Similarly, with the xDELETEx button, you can delete a specific task.
First of all, move to the root folder and create one new react app xclientx using the xcreate-react-appx cli :
create-react-app client
We are going to use material ui in this application. Following are the dependencies we need to install using xnpm installx command :
"dependencies": {
"@material-ui/core": "^3.9.3",
"@material-ui/icons": "^3.0.2",
"apollo-boost": "^0.3.1",
"graphql": "^14.3.0",
"react": "^16.8.6",
"react-apollo": "^2.5.5",
"react-dom": "^16.8.6",
"react-scripts": "3.0.1"
}
Install these dependencies, move to the xclientx folder and start the app using xnpm startx command. It will run the app on xlocalhostx x3000x port.
We need to add three React components for the application :
AddTaskComponent : Component for adding a new task
TaskComponent : Component for showing all tasks
TaskComponent : Component for each task with the delete button
Also, we need one xqueriesx file to list down all the graphql queries.
Letxs create these files inside the xclient/src/x folder with the following changes :
queries.js
import { gql } from "apollo-boost";

const getTasks = gql`
  {
    tasks {
      _id

      taskName
    }
  }
`;

const addTask = gql`
  mutation($taskName: String!) {
    addTask(taskName: $taskName) {
      taskName
    }
  }
`;

const deleteTask = gql`
  mutation($taskId: ID!) {
    deleteTask(taskId: $taskId)
  }
`;

export { getTasks, addTask, deleteTask };
Here, we have created one query xgetTasksx and two mutations xaddTaskx and xdeleteTaskx. You can see that the queries and mutations are the same as we have used in the xgraphiqlx tool above.
AddTaskComponent.js
import "./App.css";

import TextField from "@material-ui/core/TextField";
import Button from "@material-ui/core/Button";
import React, { Component } from "react";
import CircularProgress from "@material-ui/core/CircularProgress";
import { graphql, compose } from "react-apollo";
import { addTask, getTasks } from "./queries";

class AddTaskComponent extends Component {
  constructor(props) {
    super(props);
    this.state = {
      loading: false,
      text: ""
    };
  }

  addTask() {
    this.props.addTask({
      variables: {
        taskName: this.state.text
      },
      refetchQueries: [{ query: getTasks }]
    });
  }

  render() {
    return (
      xdivx
        xTextField
          id="outlined-full-width"
          label="Add Task"
          style={{ margin: 8 }}
          placeholder="Add new task"
          fullWidth
          onChange={e =x this.setState({ text: e.target.value })}
          margin="normal"
          variant="outlined"
          InputLabelProps={{
            shrink: true
          }}
        /x

        {!this.state.loading ? (
          xButton
            variant="contained"
            color="primary"
            onClick={e =x {
              this.addTask();
            }}
          x
            Add
          x/Buttonx
        ) : (
          xCircularProgress /x
        )}
      x/divx
    );
  }
}

export default compose(graphql(addTask, { name: "addTask" }))(AddTaskComponent);
Here, the xaddTaskx function is used to add a new task.
xthis.props.addTaskx will call the xaddTaskx mutation with xtaskNamex parameter. xthis.state.textx is the text that the user has entered. Once this mutation is completed, it will call the xgetTasksx query to fetch the tasks again.
TaskComponent.js
import "./App.css";

import React, { Component } from "react";
import CircularProgress from "@material-ui/core/CircularProgress";
import { graphql, compose } from "react-apollo";
import Grid from "@material-ui/core/Grid";
import { getTasks, deleteTask } from "./queries";
import TaskListElement from "./TaskListElement";

class TaskComponent extends Component {
  deleteTask = id =x {
    this.props.deleteTask({
      variables: {
        taskId: id
      },
      refetchQueries: [{ query: getTasks }]
    });
  };

  fetchTasks() {
    var data = this.props.getTasks;

    if (data.loading) {
      return xCircularProgress /x;
    } else {
      return data.tasks.map(task =x {
        return (
          xTaskListElement
            key={task._id}
            taskId={task._id}
            taskName={task.taskName}
            deleteTask={this.deleteTask}
          /x
        );
      });
    }
  }

  render() {
    return (
      xdiv style={{ padding: 20 }}x
        xGrid container alignItems="center" direction="column"x
          {this.fetchTasks()}
        x/Gridx
      x/divx
    );
  }
}

export default compose(
  graphql(getTasks, { name: "getTasks" }),

  graphql(deleteTask, { name: "deleteTask" })
)(TaskComponent);
This component is used for listing down all tasks. xfetchTasksx is used to fetch all tasks and xdeleteTaskx is used for deleting a task. Actually xTaskListElementx will call xdeleteTaskx method. xTaskListElementx component is for each task with a xDeletex button.
TaskListElement.js
import React, { Component } from "react";

import Paper from "@material-ui/core/Paper";
import Typography from "@material-ui/core/Typography";
import "./App.css";
import Button from "@material-ui/core/Button";
import Grid from "@material-ui/core/Grid";
import { withStyles } from "@material-ui/core/styles";

const styles = theme =x ({
  button: {
    margin: theme.spacing.unit
  },

  paper: {
    padding: theme.spacing.unit * 2,
    margin: "10px",
    width: "50%"
  }
});

class TaskListElement extends Component {
  render() {
    const { classes } = this.props;

    return (
      xPaper className={classes.paper}x
        xGrid container spacing={16}x
          xGrid item xs={12}x
            xTypography variant="h6"x{this.props.taskName}x/Typographyx

            xGrid itemx
              xButton
                variant="contained"
                color="secondary"
                className={classes.button}
                onClick={e =x {
                  this.props.deleteTask(this.props.taskId);
                }}
              x
                Delete
              x/Buttonx
            x/Gridx
          x/Gridx
        x/Gridx
      x/Paperx
    );
  }
}

export default withStyles(styles)(TaskListElement);
This component is used for showing each task. We are using it inside xTaskComponentx.
For using xApollox in our app, we need to make a little bit change to the xApp.jsx file :
import React from "react";

import AppBar from "@material-ui/core/AppBar";
import Toolbar from "@material-ui/core/Toolbar";
import Typography from "@material-ui/core/Typography";
import "./App.css";
import TaskComponent from "./TaskComponent";
import ApolloClient from "apollo-boost";
import { ApolloProvider } from "react-apollo";
import AddTaskComponent from "./AddTaskComponent";

const client = new ApolloClient({
  uri: "http://localhost:4000/graphql"
});

function App() {
  return (
    xApolloProvider client={client}x
      xdiv className="App"x
        xAppBar position="static"x
          xToolbar variant="dense"x
            xTypography variant="h6" color="inherit"x
              To Do
            x/Typographyx
          x/Toolbarx
        x/AppBarx

        xAddTaskComponent /x

        xTaskComponent /x
      x/divx
    x/ApolloProviderx
  );
}

export default App;
We have created one xApolloClientx to connect to the xgraphqlx server and wrapped the application with xApolloProviderx component.
App.css :
.App {
  text-align: center;
}

.body {
  margin: 15px 35px 35px 35px;
}
Thatxs it. Here we have completed our Apollo GraphQL full stack application. Make sure to run the express server and MongoDB with the application. You can check the database using Robo3T to learn more about how the database is adding data.
Tutorial Index:
- GraphQL Tutorial #1 -Introduction
- GgraphQL Tutorial #2 x Setting Basic Project in GraphQL
- GraphQL Tutorial #3 x GraphQL Components
- GraphQL Tutorial #4 x GraphQL Operations
- GraphQL Tutorial #5 x Introduction to Apollo GraphQL
- GraphQL Tutorial #6 x 51 Most Important GraphQL Interview QxA