

Introduction:
GraphQL is a query language used for APIs. Unlike REST, GraphQL has only one endpoint and client can ask for what is actually required. We can write a GraphQL server in many popular programming languages like JavaScript, Java, R, Python etc. and it is not tied to any specific database architecture.
In this tutorial, we will learn how to create one basic GraphQL server with Node.js using express framework. Our program will show you how to perform CRUD (create, read, update, delete) operations using GraphQL. We will also learn how to test GraphQL queries using a in-browser interface called GraphiQL.
Initial setup :
Create one empty project by using ânpm initâ command. We are going to use the following ânpmâ modules in this project :
express :
This npm module is required for installing the express framework in our project.
graphql :
npm module for GraphQL.js
express-graphql :
npm module for using graphql with express as a middleware.
nodemon :
xnodemonx is used to restart a node server automatically. It continuously monitors the changes in the source files and automatically restarts it if you make any change. It is a useful tool for development.
uniqid :
This module is required to create a unique id. It generates unique id string based on the process, machine name and current time.
Install these modules using the below command :
npm i express graphql express-graphql nodemon uniqid
It will install all these modules in a folder called xnode_modulesx.
your final package.json file will look like below :
{
  "name": "graphql-example",
  "version": "1.0.0",
  "description": "",
  "main": "index.js",
  "scripts": { "dev": "nodemon server.js" },
  "author": "",
  "license": "ISC",
  "dependencies": {
    "express": "^4.16.4",
    "express-graphql": "^0.8.0",
    "graphql": "^14.2.1",
    "nodemon": "^1.18.11",
    "uniqid": "^5.0.3"
  }
}
We have added one new xdevx key inside the xscriptsx block. This is used to run the xnodemon server.jsx command. xnpm run devx will execute this command.
Starting a GraphQL server using express :
Letxs create one simple GraphQL server using the above modules. Using, xexpress-graphqlx module, we can create one express server with GraphQL server easily. Edit the xserver.jsx file as like below :
var express = require("express");
var gqlHTTP = require("express-graphql");
var { buildSchema } = require("graphql");
var schema = buildSchema(` type Query { message(name : String!): String } `);
var root = {
  message: args =x {
    return `Hello ${args.name}!`;
  }
};
var app = express();
app.use(
  "/graphql",
  gqlHTTP({ schema: schema, rootValue: root, graphiql: true })
);
app.listen(4000);
console.log("Running GraphQL on localhost:4000/graphql");
In this program :
x We are using xexpressx, xexpress-graphqlx and xgraphqlx libraries.
x xbuildSchemax is defined in xgraphqlx and it is used to create one schema using GraphQL schema language. In this example,we have one query xmessagex that takes one string as its parameter. We are using one x!x to indicate that this parameter is required. Without this parameter, you canxt execute this query. The return value of the query is a string.
x xrootx is used to provide a resolver function for each endpoint. For xmessagex, it will return one string xHello ${args.name}!x. xargs.namex is the xnamex we are passing in the query.
x Finally, we are starting the xexpressx server on port x4000x.
If you have already started the server using xnpm run devx, xnodemonx will detect the changes and restart the server on port x4000x.
Open xlocalhost:4000/graphqlx on your browser. You will see an interface like below :
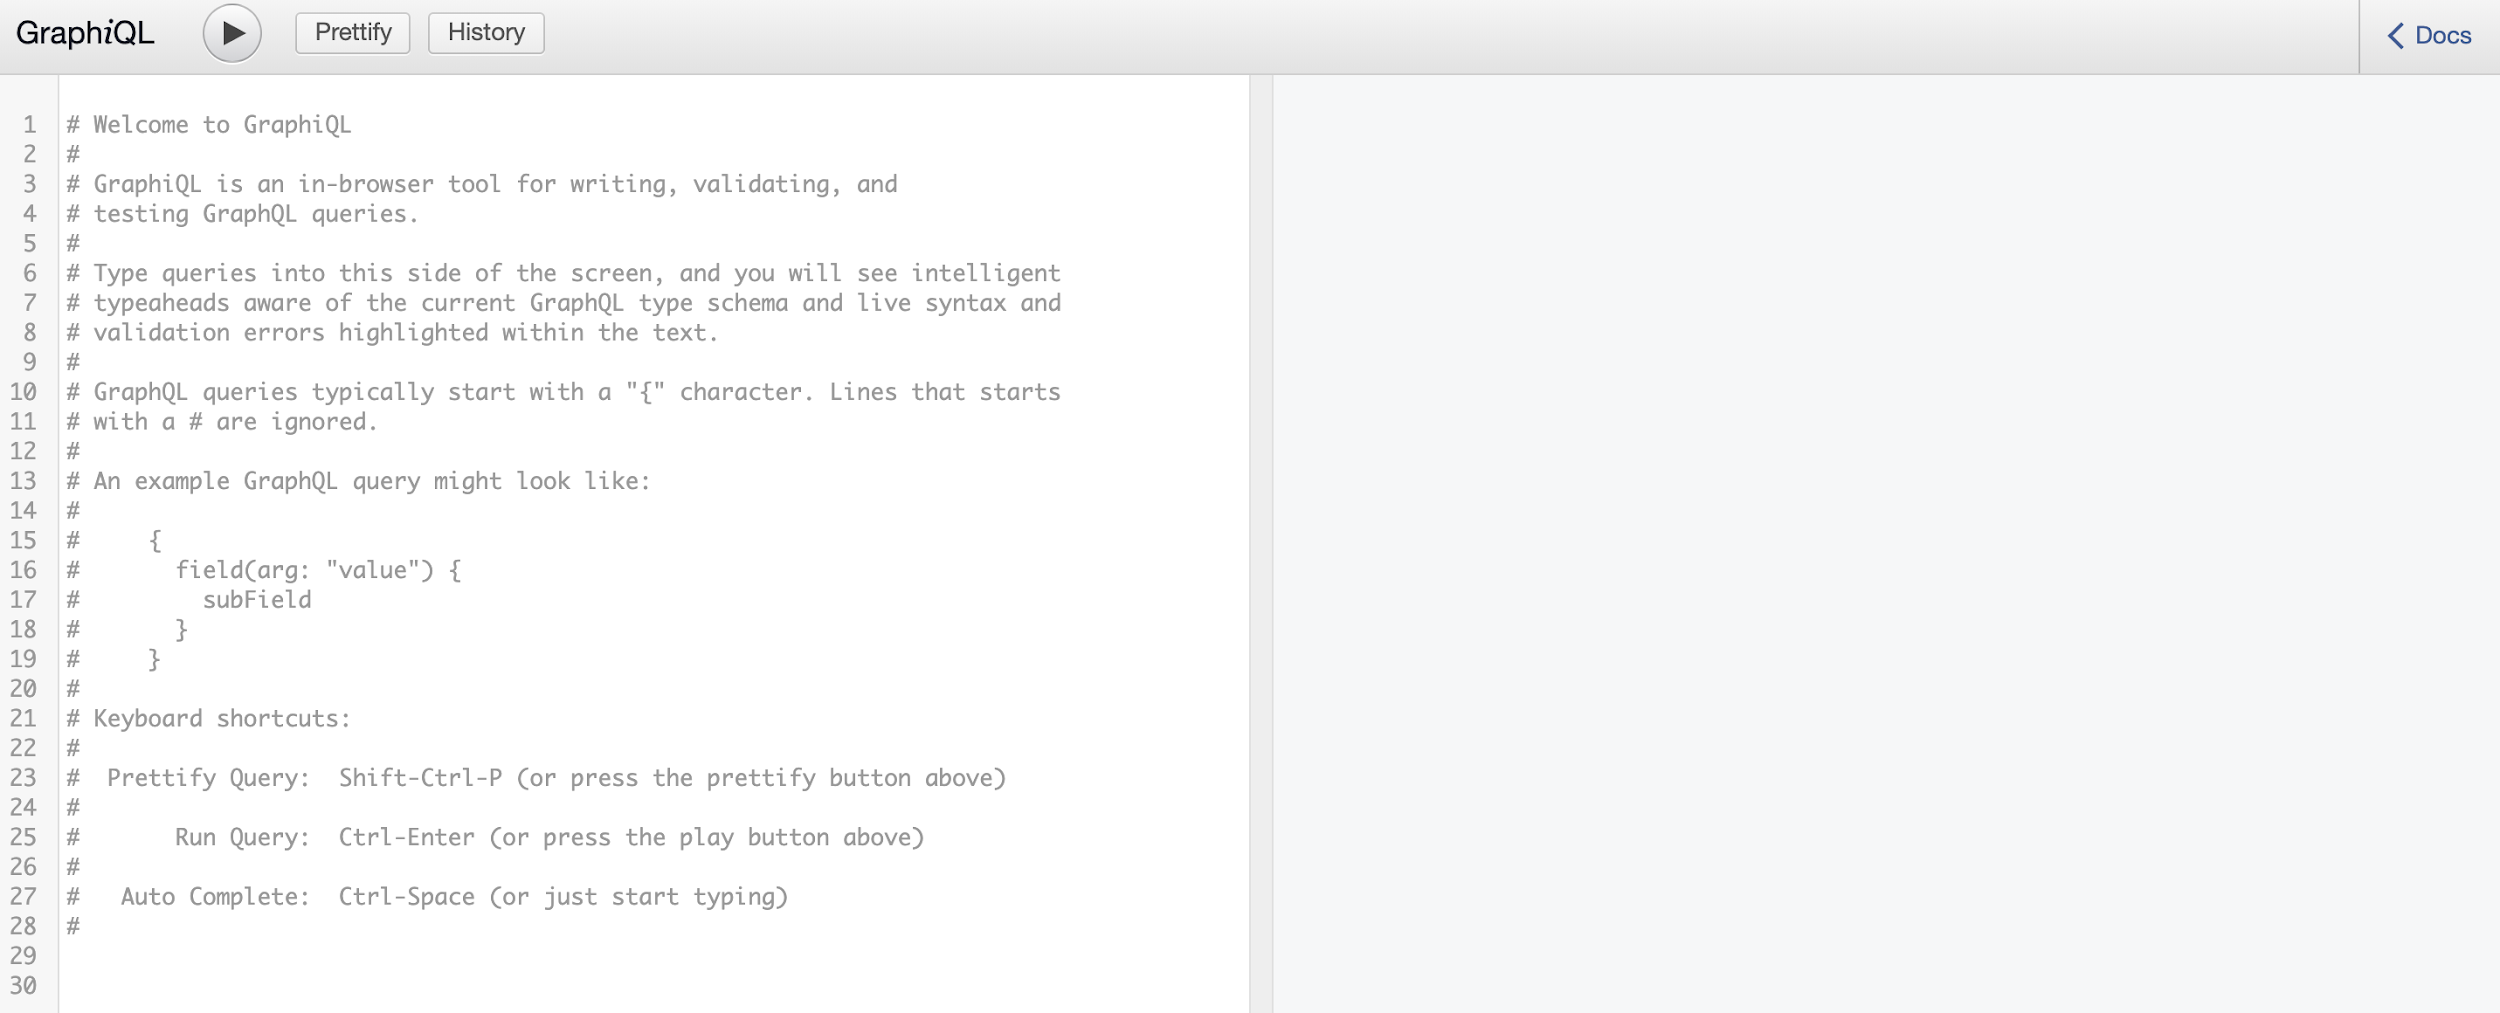

This is xGraphiQLx,an in-browser GraphQL IDE that can be used for testing GraphQL queries.The xgraphiqlx parameter in the above program needs to be set as xtruex for enabling this IDE. xgraphiqlx comes with xexpress-graphqlx but we can also install it separately on other projects using xnpmx or xyarnx.
On the left side of the panel, enter the following query :
{
  message(name: "Bob")
}
Click on the xplayx button and it will print the below output on the right panel :
{
  "data": {
  "message": "Hello Bob!"
  }
}
Try changing the name and it will return different output for each input query.
More queries and mutation :
I hope that you got the basic understanding of GraphQL. Letxs build one user management application with the following functionalities :
x Get the list of all users
x Add a user
x Get a single user
x Delete a user
x Edit user
We are not going to use any database to store this info. We will use one local array to store them. If you restart your server, the data will be deleted.
User object :
Our array will hold user objects and we will perform all operations on these objects. A user object will hold the following parameters :
id : String type
name : String type
gender : String type
age : Int type
Open the xserver.jsx file and change the buildSchema function as like below :
var schema = buildSchema(`
type User{
id: String
name: String
gender: String
age: Int
}
`);
The final xserver.jsx file will look like as below :
var express = require("express");
var gqlHTTP = require("express-graphql");
var { buildSchema } = require("graphql");
var schema = buildSchema(
  `type User{id: Stringname: Stringgender: Stringage: Int}`
);
var root = {};
var app = express();
app.use(
  "/graphql",
  gqlHTTP({ schema: schema, rootValue: root, graphiql: true })
);
app.listen(4000);
console.log("Running GraphQL on localhost:4000/graphql");
The server will run with this code without any queries.
a) Get the list of all users (Query):
We will use one array to hold the list of all users and using one query we will return this array.
Open the xserver.jsx file and add one variable xuserListx to hold the list of all users :
var userList = [];

Add one query like below inside buildSchema :

type Query {

users(gender : String): [User]

}, .....

}
xusersx query will return one array of xUserx objects. Optionally, we can also get the users based on the xgenderx value. xgenderx is optional.
Now, create one function to return all current users :
var getUsers = function(args) {
	if (args.gender) {
		var gender = args.gender;
		return userList.filter(user =x user.gender === gender);
	} else {
		return userList;
	}
};
Here, xargsx is the argument graphql will provide us. We are checking if the xgenderx property is available in xargsx. If it is, we are filtering out the xuserListx based on xgenderx. Else, we are returning the complete list.
Change the xrootx as like below :
var root = {

users: getUsers

};
Thatxs it. Run the below query in the GraphiQL :
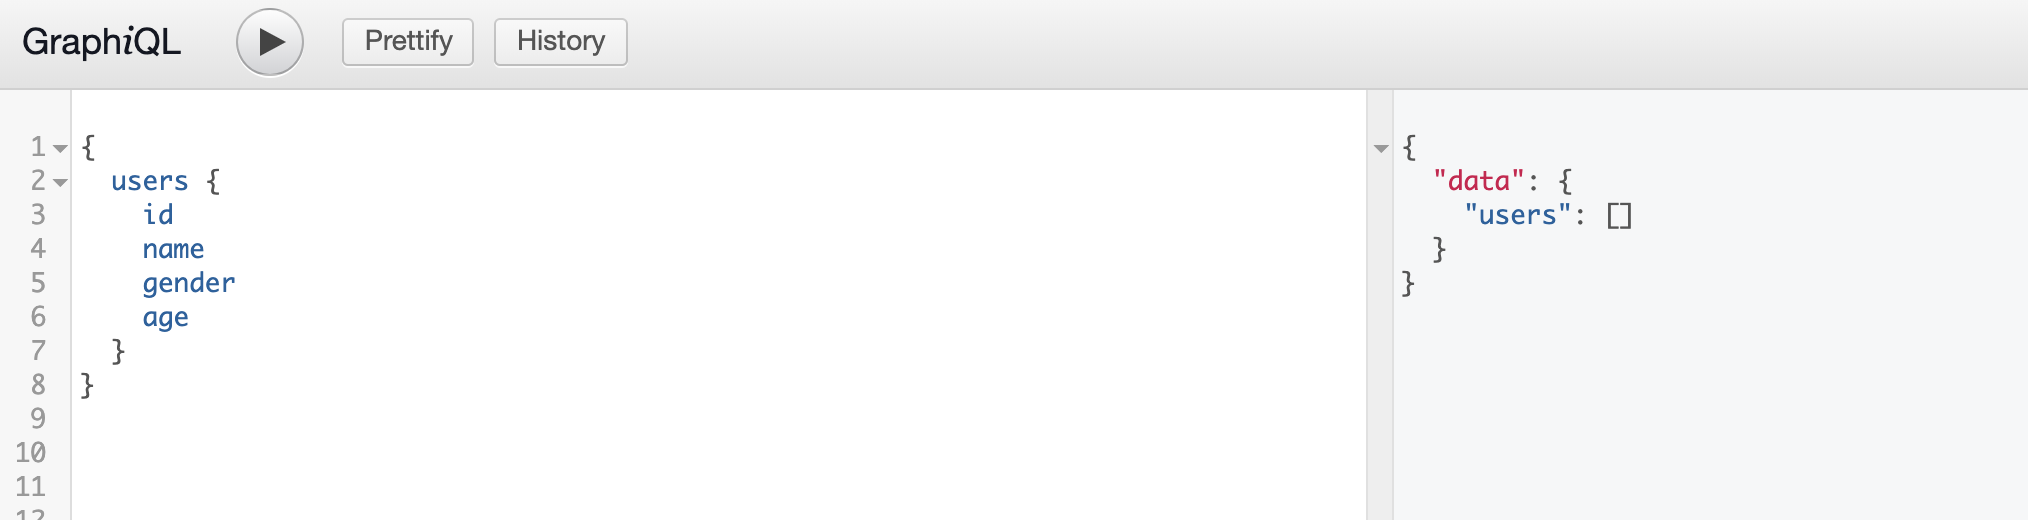

As you can see that we are getting one empty list of xusersx from our server as we donxt have any users available currently.
b) Add a user (Mutation):
For writing data, we can write a query. But as per the documentation, we should use a xmutationx for any kind of data write. Similar to queries, mutation also returns a value.
Just like the above query operation, for adding a user, we need to add one mutation type in âbuildSchemaâ , one function for handling the operation and changes in the root variable.
Add one âmutationâ type inside âbuildSchemaâ :
type Mutation{

add(name: String!,gender : String!, age : Int!): User

},
We will pass the ânameâ, âgenderâ and âageâ of the user and it will return one âUserâ object, i.e. it will return the same object that is added.
Add one function to add one use object to âuserListâ array :
var addUser = args =x {
	userList.push(
		{
			id: uniqid(),
			name: args.name,
			age: args.age,
			gender: args.gender
		}
	);
	return userList[userList.length - 1];
};
This function will create and push one âUserâ object to the âuserListâ. We are using âuniqidâ module to create one unique id for each user object. For using this module, you need to use the below import line :
var uniqid = require("uniqid");
Finally, add the below pairs inside the root variable :
add: addUser
Now, you can add one user using a âmutationâ query like below :
mutation {
  add(name: "Robert", gender: "male", age: 31) {
    id
    name
    age
    gender
  }
}
Execute this query and the output will look like below :
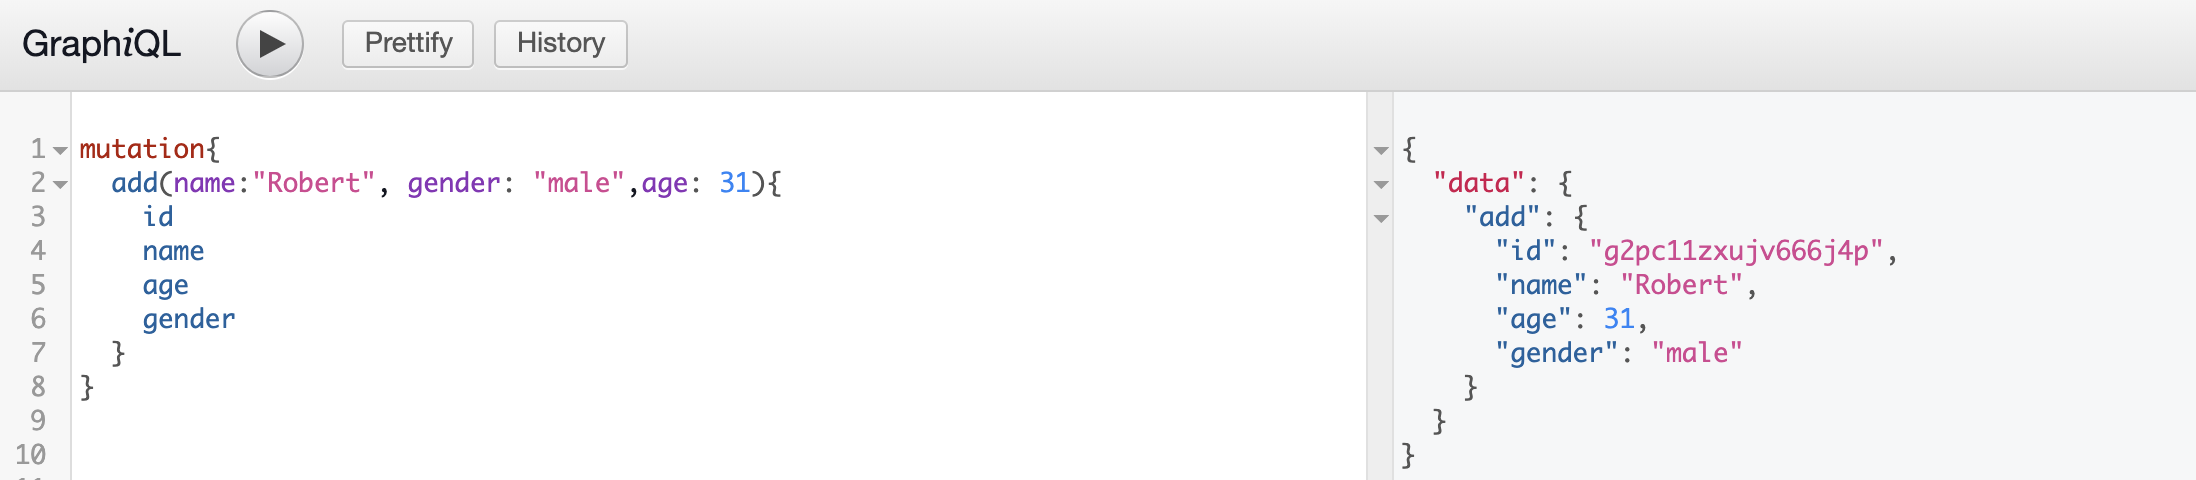

As you can see, the âidâ is assigned automatically to the newly created user. We are printing the âidâ, ânameâ, âageâ and âgenderâ of the new user. But you can also print only the values that are required.
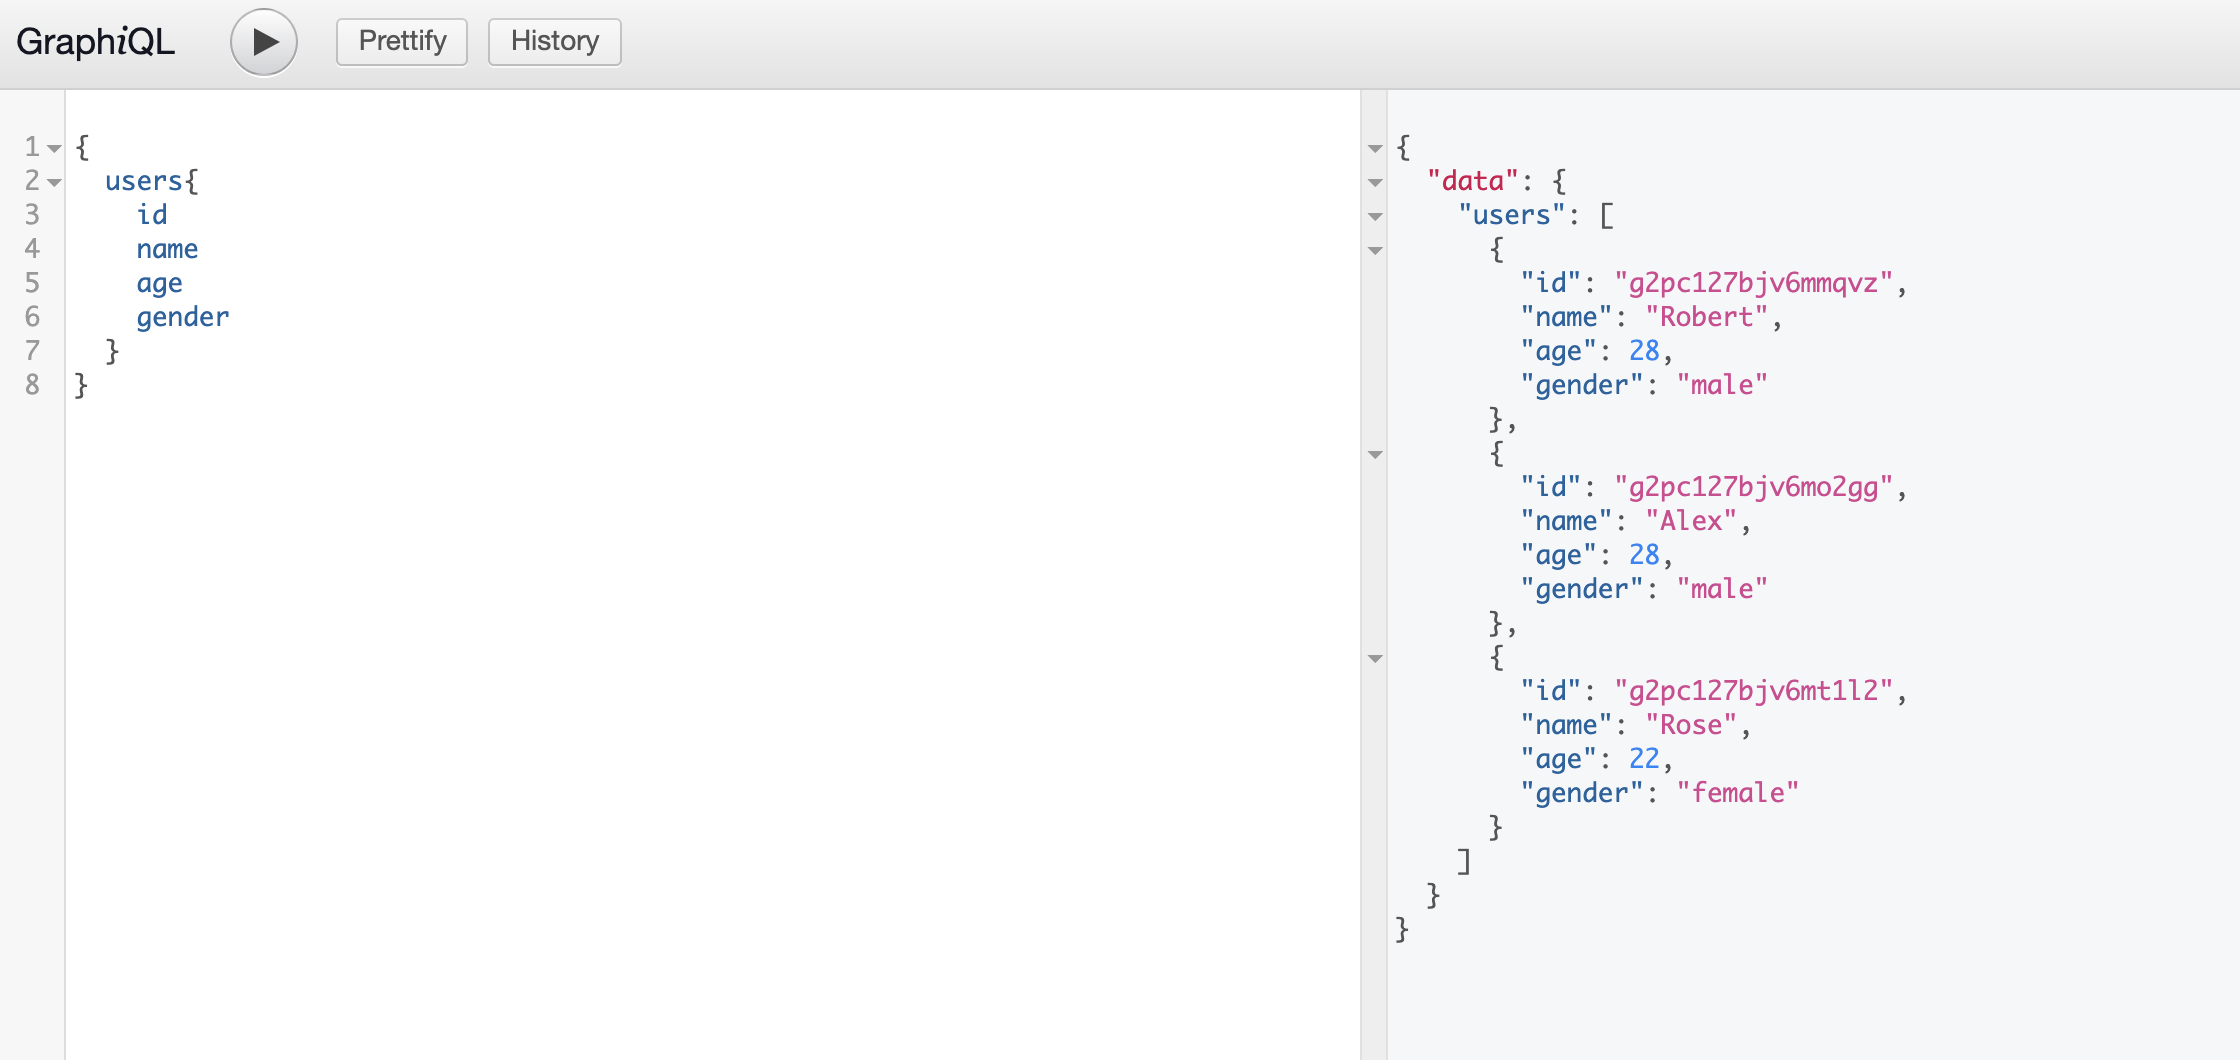
Add a few more users using this mutation and get them using the âusersâ query like below :


I have added three users here. We can also use the âusersâ query to filter out the users based on the gender :


c) Get a single user, delete a user, edit a user :
Similar to the above two examples, we can write query and mutation to complete our application. Getting a single user is of âqueryâ type and âdeleteâ/âeditâ user is of âmutationâ type.
The final server.js file looks like as below :
var express = require("express");
var express_graphql = require("express-graphql");
var { buildSchema } = require("graphql");
var uniqid = require("uniqid");


var schema = buildSchema(`

type Query {
	user(id: String!): User
	users(gender : String): [User]
},

type Mutation{
	add(name: String!,gender : String!, age : Int!): User
	delete(id: String!) : [User]
	edit(id: String!,name: String!) : User
},

type User {
	id: String
	name: String
	gender: String
	age: Int
}

`);

var userList = [];
	var getUser = function(args) {
	return userList.find(user =x {
		return args.id === user.id;
	});
};

var getUsers = function(args) {
	if (args.gender) {
		var gender = args.gender;
		return userList.filter(user =x user.gender === gender);
	} else {
		return userList;
	}
};

var addUser = args =x {

	userList.push({
		id: uniqid(),
		name: args.name,
		age: args.age,
		gender: args.gender
	});

	return userList[userList.length - 1];
};

var editUser = args =x {
	index = userList.findIndex(user =x user.id == args.id);
	userList[index].name = args.name
	return userList[index]
};

var deleteUser = args =x {
	console.log(`delete args ${args.id}`);
	userList = userList.filter(user =x user.id !== args.id);
	return userList;
};

var root = {
	user: getUser,
	users: getUsers,
	add: addUser,
	delete: deleteUser,
	edit: editUser
};

var app = express();

app.use(
	"/graphql",
	express_graphql({
	schema: schema,
	rootValue: root,
	graphiql: true
	})

);

app.listen(4000, () =x

console.log("Express GraphQL Server Now Running On localhost:4000/graphql")

);
Here,
x âuserâ query is to get a specific user. It takes the âidâ of a user and returns that âUserâ object.
x âdeleteâ mutation is to delete a specific user. Using the âidâ, we can delete one user. It returns the new user array.
x âeditâ mutation is for editing a user. We can edit the ânameâ of a user using the âidâ.
x âgetUserâ function is to get a specific user
x âdeleteUserâ function is to delete a user
x âeditUserâ is for editing a user
x the ârootâ variable is also changed as per the above new addition.
x
Example :
Letâs try the above query and mutations with an example. I have added three users using the âaddUserâ mutation.
- Get the list of all users :
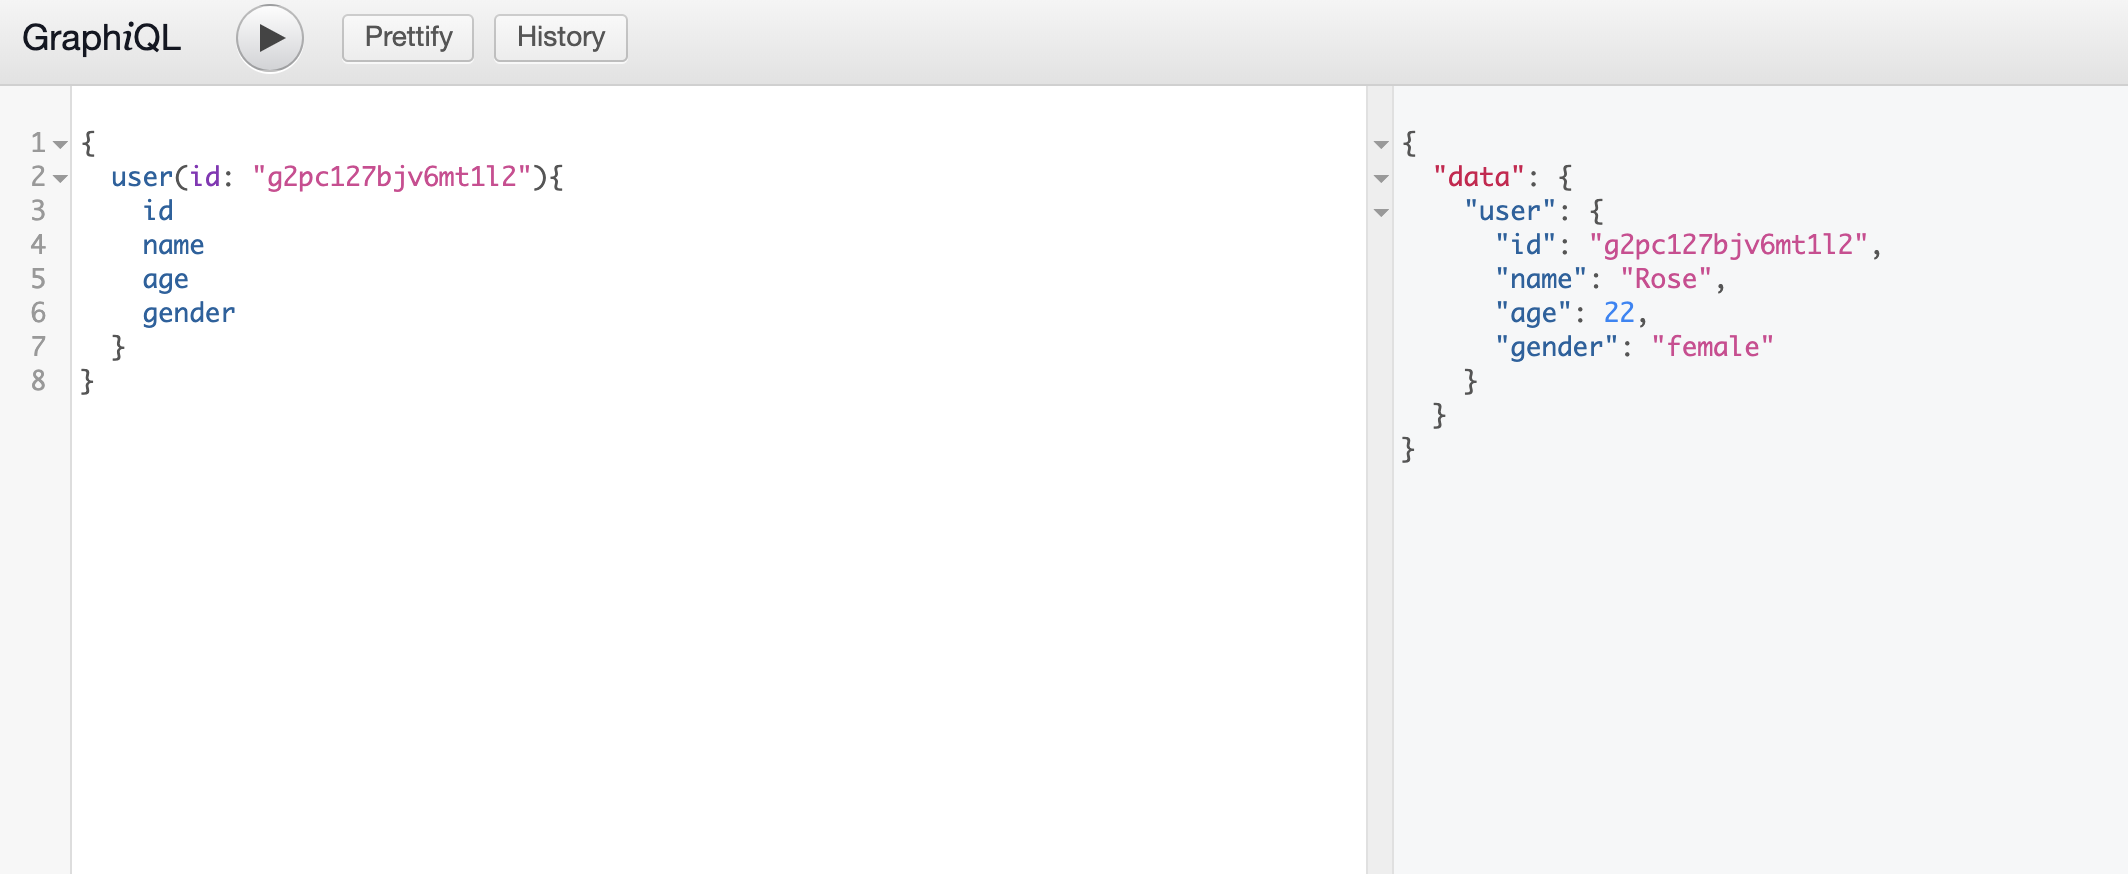
- Get user with id âg2pc127bjv6mt1l2â :
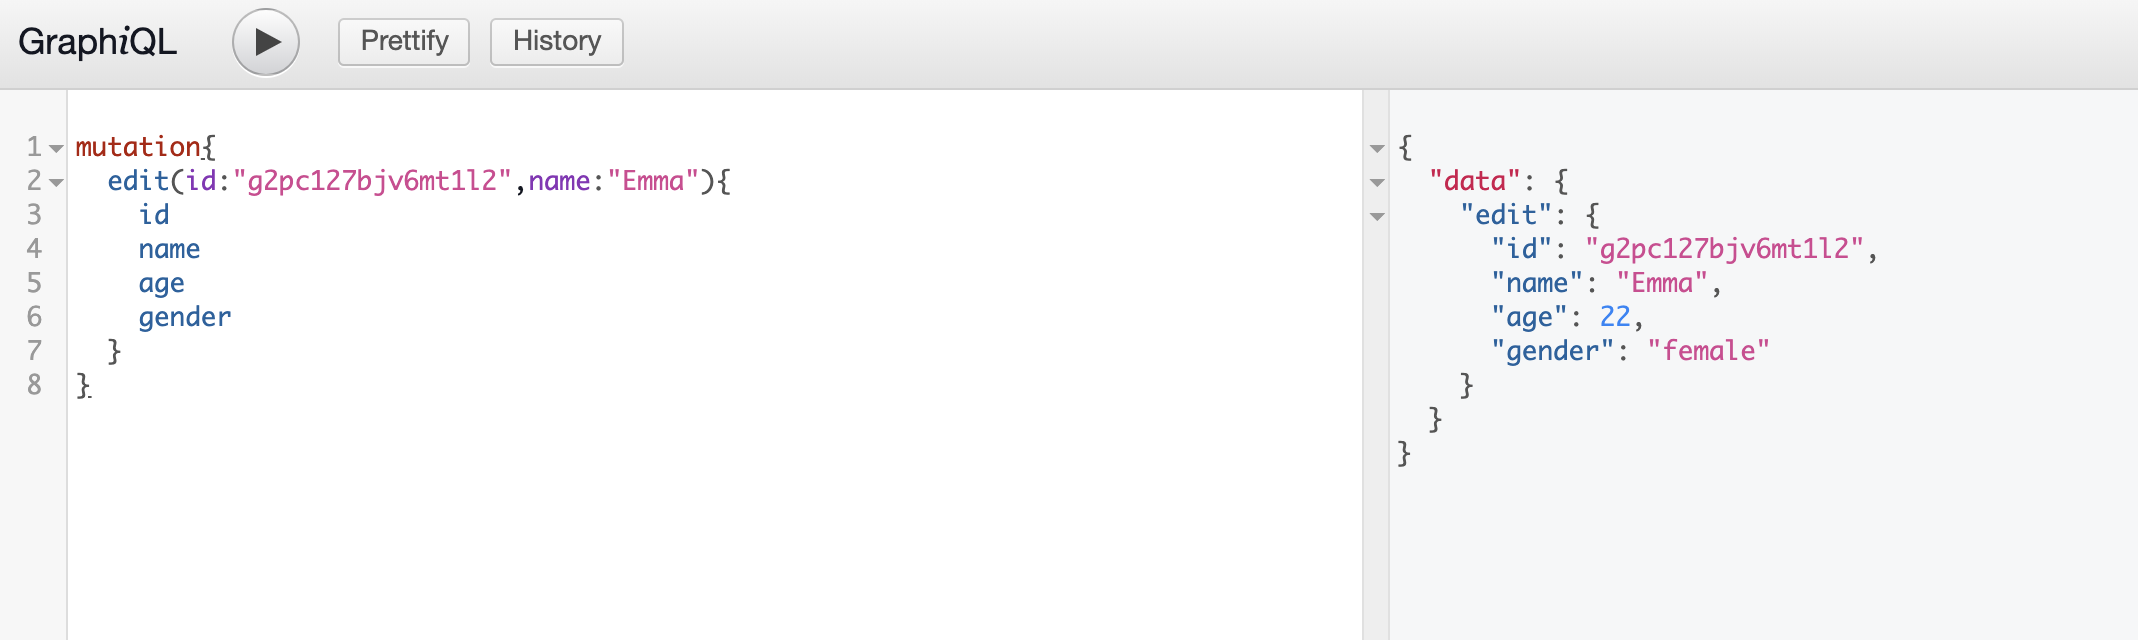
- Edit user name with id âg2pc127bjv6mt1l2â
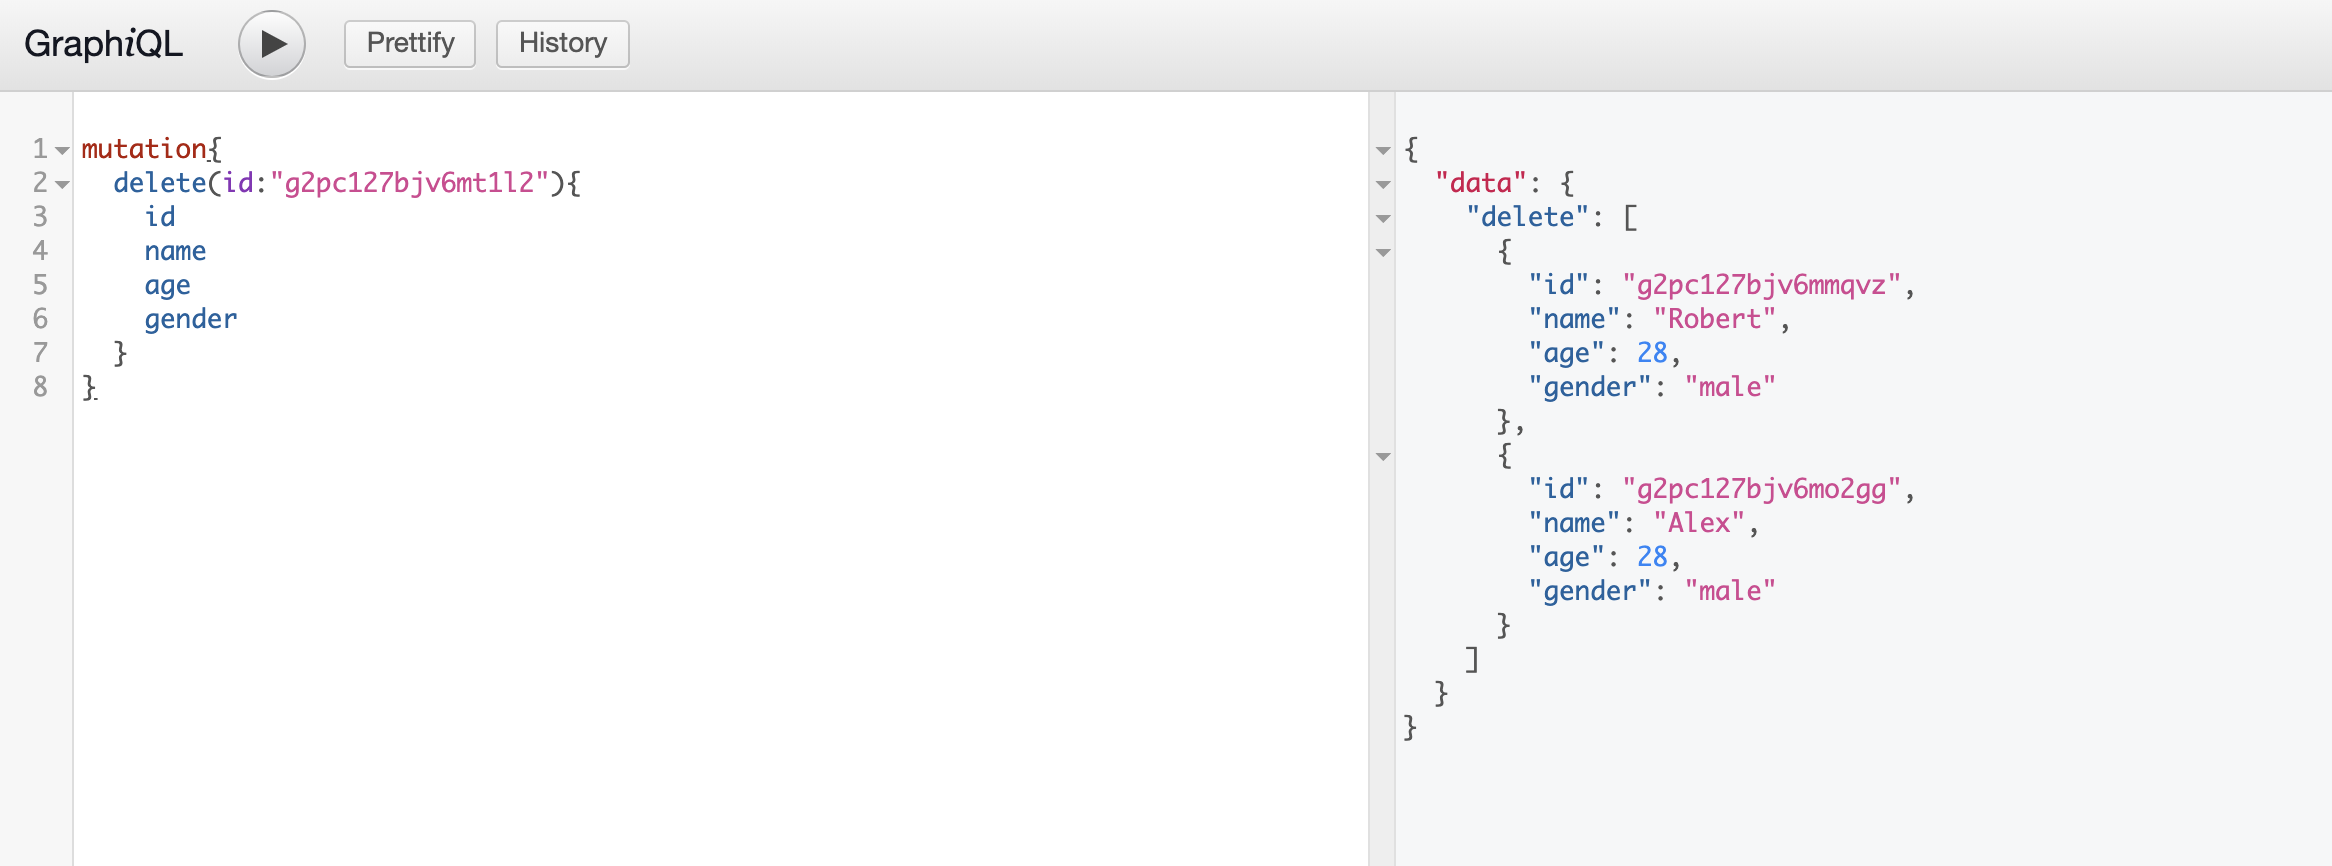
- Delete user with id âg2pc127bjv6mt1l2â


Conclusion :
Starting a GraphQL server is easier than any REST server. âexpress-graphqlâ comes with the âGraphiQLâ browser IDE that makes the query and mutation more easier to debug. Using libraries like âApolloâ, we can easily integrate GraphQL with any other client projects like React, Angular, Android or iOS.
Tutorial Index:
- GraphQL Tutorial #1 -Introduction
- GgraphQL Tutorial #2 x Setting Basic Project in GraphQL
- GraphQL Tutorial #3 x GraphQL Components
- GraphQL Tutorial #4 x GraphQL Operations
- GraphQL Tutorial #5 x Introduction to Apollo GraphQL
- GraphQL Tutorial #6 x 51 Most Important GraphQL Interview QxA