

The popularity of Restful Services is rising that does not mean we have forgotten the Soap Web Services. In this article, we will see how to build Soap web services with Apache CXF and Spring Boot.
Softwares used
- Spring Boot 1.5.10.RELEASE
- cxf-spring-boot-starter-jaxws (3.1.12)
- Java 8
- Maven
- Eclipse
Apache CXFÂ is a popularly used services framework and its available as open source. Apache community has now added support for Spring Boot starter dependency so you donxt have to add each capability separately.
Maven Dependencies
xdependencyx
	xgroupIdxorg.springframework.bootx/groupIdx
	xartifactIdxspring-boot-starter-webx/artifactIdx
x/dependencyx
xdependencyx
	xgroupIdxorg.apache.cxfx/groupIdx
	xartifactIdxcxf-spring-boot-starter-jaxwsx/artifactIdx
	xversionx3.1.12x/versionx
x/dependencyx
This covers all the dependencies you need for creating your web service. But if you need to add any feature e.g. Request Logging, its available out of the box and you need to add that dependency separately.
xdependencyx
	xgroupIdxorg.apache.cxfx/groupIdx
	xartifactIdxcxf-rt-features-loggingx/artifactIdx
	xversionx3.1.12x/versionx
x/dependencyx
Apache CXF Service Configuration
The first thing we have to do is configure CXFServlet and SpringBus. These two provides integration point with Spring.
@Bean
public ServletRegistrationBean dispatcherServlet() {
	return new ServletRegistrationBean(new CXFServlet(), "/services/*");
}

@Bean(name=Bus.DEFAULT_BUS_ID)
public SpringBus springBus() {
	SpringBus springBus = new SpringBus();
	return springBus;
}
With above configuration, all the service endpoints will be available at URLÂ /services/*
Service Definition
We will see service definition using standard XML as well as using Java configuration.
XML Configuration
xjaxws:endpoint
	id="GreetingService"
	implementor="#greetingServiceImpl"
	address="/GreetingService"x
	xjaxws:featuresx
		xbean class="org.apache.cxf.ext.logging.LoggingFeature"xx/beanx
	x/jaxws:featuresx
x/jaxws:endpointx
The above configuration will expose soap endpoint at given address. Also, notice that We have also mentioned logging feature to be enabled. This feature will make sure that soap request along with other request related parameters is logged. This data is logged at two points, one when a request is first received by framework and two, just before a response is sent out.
Letxs see corresponding java classes:
Greeting Service Interface
@WebService(serviceName = "GreetingService")
public interface GreetingService {

	@WebMethod()
	@WebResult(name = "Greeting")
	public Greeting sayHello(@WebParam(name = "GreetingsRequest") String name);

	@WebMethod()
	@WebResult(name = "Greeting")
	public Greeting sayBye(@WebParam(name = "GreetingsRequest") String name);
}
Greeting Service Implementation
@Service
public class GreetingServiceImpl implements GreetingService {

	@Override
	public Greeting sayHello(String name) {
		Greeting greeting = new Greeting();
		greeting.setMessage("Hello " + name + "!!!");
		greeting.setDate(new Date());
		return greeting;
	}

	@Override
	public Greeting sayBye(String name) {
		Greeting greeting = new Greeting();
		greeting.setMessage("Bye " + name + "!!!");
		greeting.setDate(new Date());
		return greeting;
	}
}
Java Configuration
The Java configuration of an endpoint is pretty straightforward. Just define the bean as below:
@Bean
public Endpoint endpoint() {
	EndpointImpl endpoint = new EndpointImpl(springBus(), new InfoServiceImpl());
	endpoint.getFeatures().add(new LoggingFeature());
	endpoint.publish("/InfoService");
	return endpoint;
}
This bean will expose a new endpoint at /InfoService.
InfoService
@WebService(serviceName = "InfoService")
public interface InfoService {
	@WebMethod()
	@WebResult(name = "Greeting")
	public Greeting sayHowAreYou(@WebParam(name = "GreetingsRequest") String name);
}
InfoService Implementation
@Service
public class InfoServiceImpl implements InfoService {

	@Override
	public Greeting sayHowAreYou(String name) {
		Greeting greeting = new Greeting();
		greeting.setMessage("How are you " + name + "!!!");
		greeting.setDate(new Date());
		return greeting;
	}
}
The Model
As you noticed we are sending an object as response. The model for that is as:
@XmlAccessorType(XmlAccessType.FIELD)
@XmlRootElement(name="Greeting")
public class Greeting {
	private String message;
	private Date date;

	//Getters
	//Setters
}
Running the service
To make sure that Spring takes note of our XML web services definitions, we need to import it into the main application. The same you can see below:
@SpringBootApplication
@ImportResource({ "classpath:webservice-definition-beans.xml" })
public class Application {
	public static void main(String[] args) {
		SpringApplication.run(Application.class, args);
	}
}
Now go ahead and run your application. It will start at default port 8080. Once started hit the URL:Â http://localhost:8080/services/Â You will see a screen like:
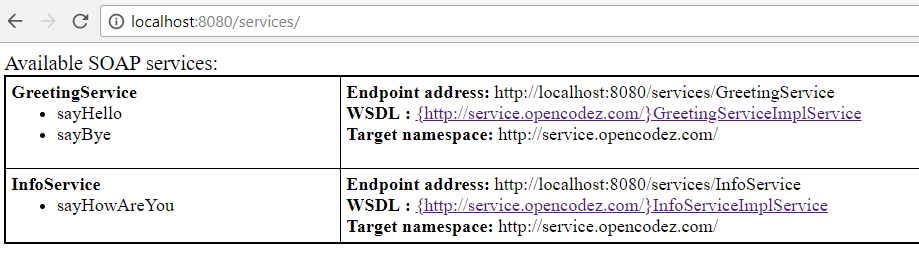
You can even load the WSDL by clicking on the links given in above page.
We can even test this with SoapUI tool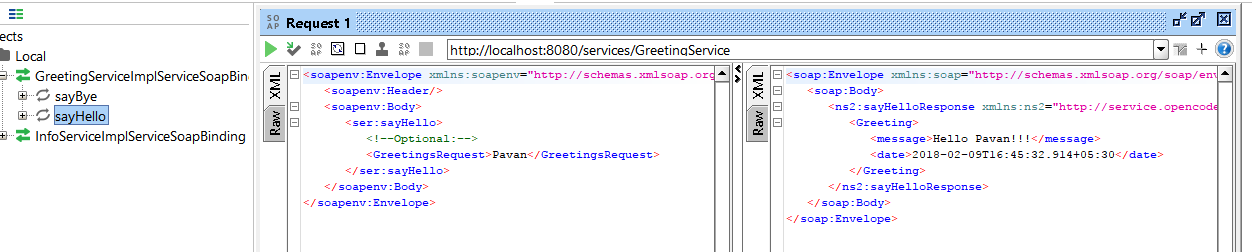
Adding Request Interceptors
Sometimes simply logging the incoming request is not enough. You might have to do some additional processing on the payload. For that Apache CXF has In and Out interceptors at different phases of a request. For illustrations, we will simply capture the incoming request.
Define In Interceptor
@InInterceptors
public class AppInboundInterceptor extends LoggingInInterceptor {

	@Override
	public void handleMessage(Message message) throws Fault {
		processPayLoad(message);
		super.handleMessage(message);
	}

	private void processPayLoad(Message message) {
		System.out.println("*** PROCESSING PAYLOAD AT IN-INTERCEPTOR **");
	}
}
Define Out Interceptor
@OutInterceptors
public class AppOutboundInterceptor extends LoggingOutInterceptor {

	@Override
	public void handleMessage(Message message) throws Fault {
		processPayLoad(message);
		super.handleMessage(message);
	}

	private void processPayLoad(Message message) {
		System.out.println("*** PROCESSING PAYLOAD AT OUT-INTERCEPTOR **");
	}
}
Now how do we attach these to our message? Well, these you can do at two places. one is at Bus level which will be applicable for all the endpoints managed by that Bus. The second option is to attach this interceptor to a particular endpoint.
@Bean(name=Bus.DEFAULT_BUS_ID)
public SpringBus springBus() {
	SpringBus springBus = new SpringBus();
	springBus.getInInterceptors().add(new AppInboundInterceptor());
	springBus.getOutInterceptors().add(new AppOutboundInterceptor());
	return springBus;
}
Thatxs it!! Your custom interceptors are ready to take on any message that comes your way.
Conclusion
In this article, we have seen how easy it is to configure and run soap web service using Apache CXF and Spring Boot.
You can download complete source code from our GitHub repository.
Download Codex