
Every web application needs to be protected. There could be different solutions to choose from depending upon your requirement and feasibility. Some may choose basic form-based authentication or some may go all the way to Oauth2. In this article, we will see how we can implement 2 Way Authentication using SSL.
In 2 Way Authentication or mutual authentication, the Server and Client does a digital handshake, where the Server needs to present a certificate to authenticate itself to the Client and vice-versa. Once this handshake is successful then only further communication is allowed.
We will see step by step how to generate a self-signed certificate and configure that to our application and tomcat server. The image will give you brief idea on what I meant by above.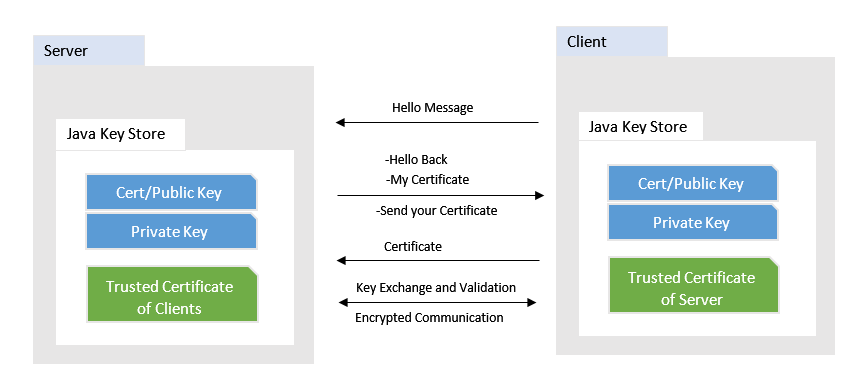
Software used in this sample
- Java 1.8
- Spring Boot 1.5.2.RELEASE
- Tomcat 8.5
We will use Java Key Store utility to generate and store our self signed certificates.
Create Self Signed Certificate for Server and Client
As we are using Keytool, Â please check in your environment this command or utility is available.
Create a JKS file for Server with below command on your shell or command prompt. Please make sure to change the information like company, location, etc as per your need
keytool -genkey -alias MyServer -keyalg RSA -validity 1825 -keystore "MyServer.jks"
-storetype JKS -dname
"CN=myserver.com,OU=My Company Name,O=My Organization,L=My Location,ST=My State,
C=My Country Short Code" -keypass password -storepass password
Now we need a certificate file that can be distributed as a public certificate to clients. Run below command to extract that certificate. It will ask for the password which you have supplied above while creating JKS
keytool -exportcert -alias MyServer -keystore MyServer.jks -file MyServer.cer
Similar steps need to be followed for Client JKS file and Client Public Certificate
keytool -genkey -alias MyClient -keyalg RSA -validity 1825 -keystore MyClient.jks -storetype JKS
-dname "CN=client.com,OU=Client Company,O=Client,L=CLient Location,ST=Client State,C=Client Country Short Code"
-keypass password -storepass password
For Client Certificate
keytool -exportcert -alias MyClient -keystore MyClient.jks -file MyClientPublic.cer
Now we have all the keystores and public certificates. In order for 2 Way Authentication to work, we need to make sure that the Server recognizes the clientxs public certificate and the Client is aware of the Server certificate.
--Add Server certificate to client truststore
keytool -importcert -alias MyServer -keystore MyClient.jks -file MyServer.cer

--Add client certificate to server truststore
keytool -importcert -alias MyClient -keystore MyServer.jks -file MyClientPublic.cer
At this point we have all our JKS and Certificates ready. We will configure these to our Tomcat 8.5
Configure Tomcat for SSL
As we need mutual authenticate we need to configure tomcat to request for a certificate from all the clients who want to communicate. This can be done by adding or updating the existing connector in tomcats server.xml. Please make sure you keep a backup of existing settings and files.
Copy the MyServer.jks to appropriate directory and configure the connector as below
xConnector port="8443"
	clientAuth="true"
	protocol="org.apache.coyote.http11.Http11NioProtocol"
	SSLEnabled="true"
	maxThreads="150"
	scheme="https"
	secure="true"
	keystoreFile="C:\core-jks\MyServer.jks"
	keystorePass="password"
	truststoreFile="C:\core-jks\MyServer.jks"
	truststorePass="password"
	sslProtocol="TLSv1.2" /x
Restart Tomcat so the above changes will come into effect.
Configure Server and Client App for 2 Way Authentication
Server App
For Server application, we will have only a simple Rest Controller, that will be available at /hello resource.
@RestController
public class TestController {
	@RequestMapping("/hello")
	public String hello() {
		return "Hello World!! You are seeing this only because I TRUST YOU!!!";
	}
}
The Server App will be hosted on the tomcat which we configure in above.
Client App
The client app is also a Simple Spring Boot Application, which does a rest call to server resource as hosted above.
@Component
public class HttpClient implements CommandLineRunner {

	@Autowired
	private RestTemplate template;

	@Override
	public void run(String... args) throws Exception {
		ResponseEntityxStringx response = template.getForEntity("https://localhost:8443/ssl-server-0.0.1-SNAPSHOT/hello",
				String.class);
		System.out.println(response.getBody());
	}
}
Apart from this we need to specify the client JKS as system properties. That can be done as below
@SpringBootApplication
public class SslClientApplication {

	static
	{
		System.setProperty("javax.net.debug", "all");
		System.setProperty("jdk.tls.client.protocols", "TLSv1.2");
		System.setProperty("https.protocols", "TLSv1.2");
		System.setProperty("javax.net.ssl.trustStore", "c://core-jks//MyClient.jks");
		System.setProperty("javax.net.ssl.trustStorePassword", "password");
		System.setProperty("javax.net.ssl.keyStore",  "c://core-jks//MyClient.jks");
		System.setProperty("javax.net.ssl.keyStorePassword", "password");

		javax.net.ssl.HttpsURLConnection.setDefaultHostnameVerifier(
				new javax.net.ssl.HostnameVerifier() {

					public boolean verify(String hostname,
							javax.net.ssl.SSLSession sslSession) {
						if (hostname.equals("localhost")) {
							return true;
						}
						return false;
					}
				});
	}

	@Bean
	public RestTemplate template() throws Exception{
		RestTemplate template = new RestTemplate();
		return template;
	}

	public static void main(String[] args) {
		SpringApplication.run(SslClientApplication.class, args);
	}
}
You can see that I have specified all debugging for SSL. So you will see how the server and client do a digital handshake. Â To load the server resource I have added a simple Spring Boot command line runner as.
@Component
public class HttpClient implements CommandLineRunner {

	@Autowired
	private RestTemplate template;

	@Override
	public void run(String... args) throws Exception {
		ResponseEntityxStringx response = template.getForEntity("https://localhost:8443/ssl-server-0.0.1-SNAPSHOT/hello",
				String.class);
		System.out.println(response.getBody());
	}
}
Results
Regarding the results, if you try and load the URL in browser it will fail.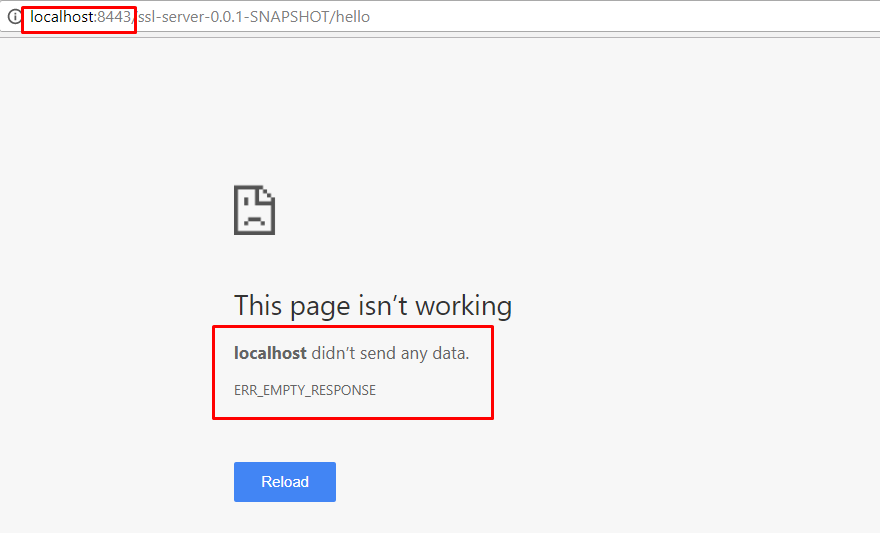
On the other hand, If I run the client where I am passing certificate details, I get the correct response.

You can see that I am getting the correct response. The response is sent only after the digital handshake is successful. The server and client exchange information that will be visible on the console.
Conclusion
You have successfully implemented the 2 Way Authentication using SSL certificates. Please feel free to get back to me if you have any questions. You can download the code from our repository mentioned below.
Download From Git