

Deep Learning is everywhere. All organizations big or small, trying to leverage the technology and invent some cool solutions. In this article, we will do a text classification using Keras which is a Deep Learning Python Library.
Why Keras?
There are many deep learning frameworks available in the market like TensorFlow, Theano. So why do I prefer Keras? Well, the most important reason is its Simplicity. Keras is a top-level API library where you can use any framework as your backend.
By default it recommends TensorFlow. So, in short, you get the power of your favorite deep learning framework and you keep the learning curve to minimal. Keras is easy to learn and easy to use.
Text Classification Using Keras:
Letxs see step by step:
Softwares used
- Python 3.6.5
- Keras 2.1.6 (with TensorFlow backend)
- PyCharm Community Edition
Along with this, I have also installed a few needed python packages like numpy, scipy, scikit-learn, pandas, etc.
Preparing Dataset
For our demonstration purpose, we will use 20 Newsgroups data set. Which is freely available over the internet. The data is categorized into 20 categories and our job will be to predict the categories. Few of the categories are very closely related. As shown below: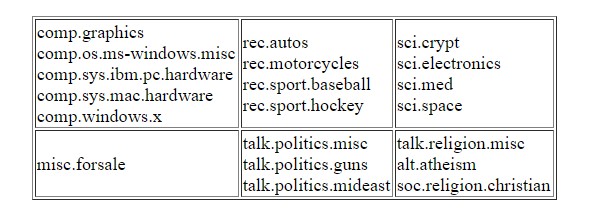
Generally, for deep learning, we split training and test data. We will do that in our code, apart from that we will also keep a couple of files aside so we can feed that unseen data to our model for actual prediction. We have separated data into 2 directories 20news-bydate-train and 20news-bydate-test
Importing Required Packages
import pandas as pd
import numpy as np
import pickle
from keras.preprocessing.text import Tokenizer
from keras.models import Sequential
from keras.layers import Activation, Dense, Dropout
from sklearn.preprocessing import LabelBinarizer
import sklearn.datasets as skds
from pathlib import Path
Loading data from files to Python variables
# For reproducibility
np.random.seed(1237)

# Source file directory
path_train = "C:\\DL\\20news-bydate\\20news-bydate-train"

files_train = skds.load_files(path_train,load_content=False)

label_index = files_train.target
label_names = files_train.target_names
labelled_files = files_train.filenames

data_tags = ["filename","category","news"]
data_list = []

# Read and add data from file to a list
i=0
for f in labelled_files:
    data_list.append((f,label_names[label_index[i]],Path(f).read_text()))
    i += 1

# We have training data available as dictionary filename, category, data
data = pd.DataFrame.from_records(data_list, columns=data_tags)
In our case data is not available as CSV. We have a text data file and the directory in which the file is kept in our label or category. So we will first iterate through the directory structure and create data set that can be further utilized in training our model.
We will use scikit-learn load_files method. This method can give us raw data as well as the labels and label indices. For our example, we will not load data at one go. We will iterate over files and prepare a DataFrame
At the end of the above code, we will have a data frame that has a filename, category, actual data.
Note: The above approach to make data available for training worked, as its volume is not huge. If you need to train on a huge dataset then you have to consider the BatchGenerator approach. In this approach, the data will be fed to your model in small batches.
Split Data for Train and Test
# lets take 80% data as training and remaining 20% for test.
train_size = int(len(data) * .8)

train_posts = data['news'][:train_size]
train_tags = data['category'][:train_size]
train_files_names = data['filename'][:train_size]

test_posts = data['news'][train_size:]
test_tags = data['category'][train_size:]
test_files_names = data['filename'][train_size:]
We will keep 80% of our data for training and the remaining 20% for testing and validations.
Tokenize and Prepare Vocabulary
# 20 news groups
num_labels = 20
vocab_size = 15000
batch_size = 100

# define Tokenizer with Vocab Size
tokenizer = Tokenizer(num_words=vocab_size)
tokenizer.fit_on_texts(train_posts)

x_train = tokenizer.texts_to_matrix(train_posts, mode='tfidf')
x_test = tokenizer.texts_to_matrix(test_posts, mode='tfidf')

encoder = LabelBinarizer()
encoder.fit(train_tags)
y_train = encoder.transform(train_tags)
y_test = encoder.transform(test_tags)
When we classify texts we first pre-process the text using Bag Of Words method. Now the Keras comes with inbuilt Tokenizer which can be used to convert your text into a numeric vector. The text_to_matrix method above does exactly the same.
Pre-processing Output Labels / Classes
As we have converted our text to numeric vectors, we also need to make sure our labels are represented in the numeric format accepted by the neural network model. The prediction is all about assigning the probability to each label. We need to convert our labels to one hot vector
scikit-learn has a LabelBinarizer class which makes it easy to build these one-hot vectors.
encoder = LabelBinarizer()
encoder.fit(train_tags)
y_train = encoder.transform(train_tags)
y_test = encoder.transform(test_tags)
Build Keras Model and Fit
model = Sequential()
model.add(Dense(512, input_shape=(vocab_size,)))
model.add(Activation('relu'))
model.add(Dropout(0.3))
model.add(Dense(512))
model.add(Activation('relu'))
model.add(Dropout(0.3))
model.add(Dense(num_labels))
model.add(Activation('softmax'))
model.summary()

model.compile(loss='categorical_crossentropy',
              optimizer='adam',
              metrics=['accuracy'])

history = model.fit(x_train, y_train,
                    batch_size=batch_size,
                    epochs=30,
                    verbose=1,
                    validation_split=0.1)
Keras Sequential model API lets us easily define our model. It provides easy configuration for the shape of our input data and the type of layers that make up our model. I came up with the above model after some trials with vocab size, epochs, and Dropout layers.
Here is some snippet of fit and test accuracy
 100/8145 [..............................] - ETA: 31s - loss: 1.0746e-04 - acc: 1.0000
 200/8145 [..............................] - ETA: 31s - loss: 0.0186 - acc: 0.9950
 300/8145 [x.............................] - ETA: 35s - loss: 0.0125 - acc: 0.9967
 400/8145 [x.............................] - ETA: 32s - loss: 0.0094 - acc: 0.9975
 500/8145 [x.............................] - ETA: 30s - loss: 0.0153 - acc: 0.9960
 ...
 7900/8145 [============================x.] - ETA: 0s - loss: 0.1256 - acc: 0.9854
8000/8145 [============================x.] - ETA: 0s - loss: 0.1261 - acc: 0.9855
8100/8145 [============================x.] - ETA: 0s - loss: 0.1285 - acc: 0.9854
8145/8145 [==============================] - 29s 4ms/step - loss: 0.1293 - acc: 0.9854 - val_loss: 1.0597 - val_acc: 0.8742

Test accuracy: 0.8767123321648251
Evaluate model
score = model.evaluate(x_test, y_test,
                       batch_size=batch_size, verbose=1)

print('Test accuracy:', score[1])

text_labels = encoder.classes_

for i in range(10):
    prediction = model.predict(np.array([x_test[i]]))
    predicted_label = text_labels[np.argmax(prediction[0])]
    print(test_files_names.iloc[i])
    print('Actual label:' + test_tags.iloc[i])
    print("Predicted label: " + predicted_label)
After the Fit methods train our data set, we will evaluate our model as shown above. Also above we tried to predict a few files from the test set. The text_labels are generated by our LabelBinarizer
Confusion Matrix
The confusion matrix is one of the best ways to visualize the accuracy of your model. Check below the matrix from our training: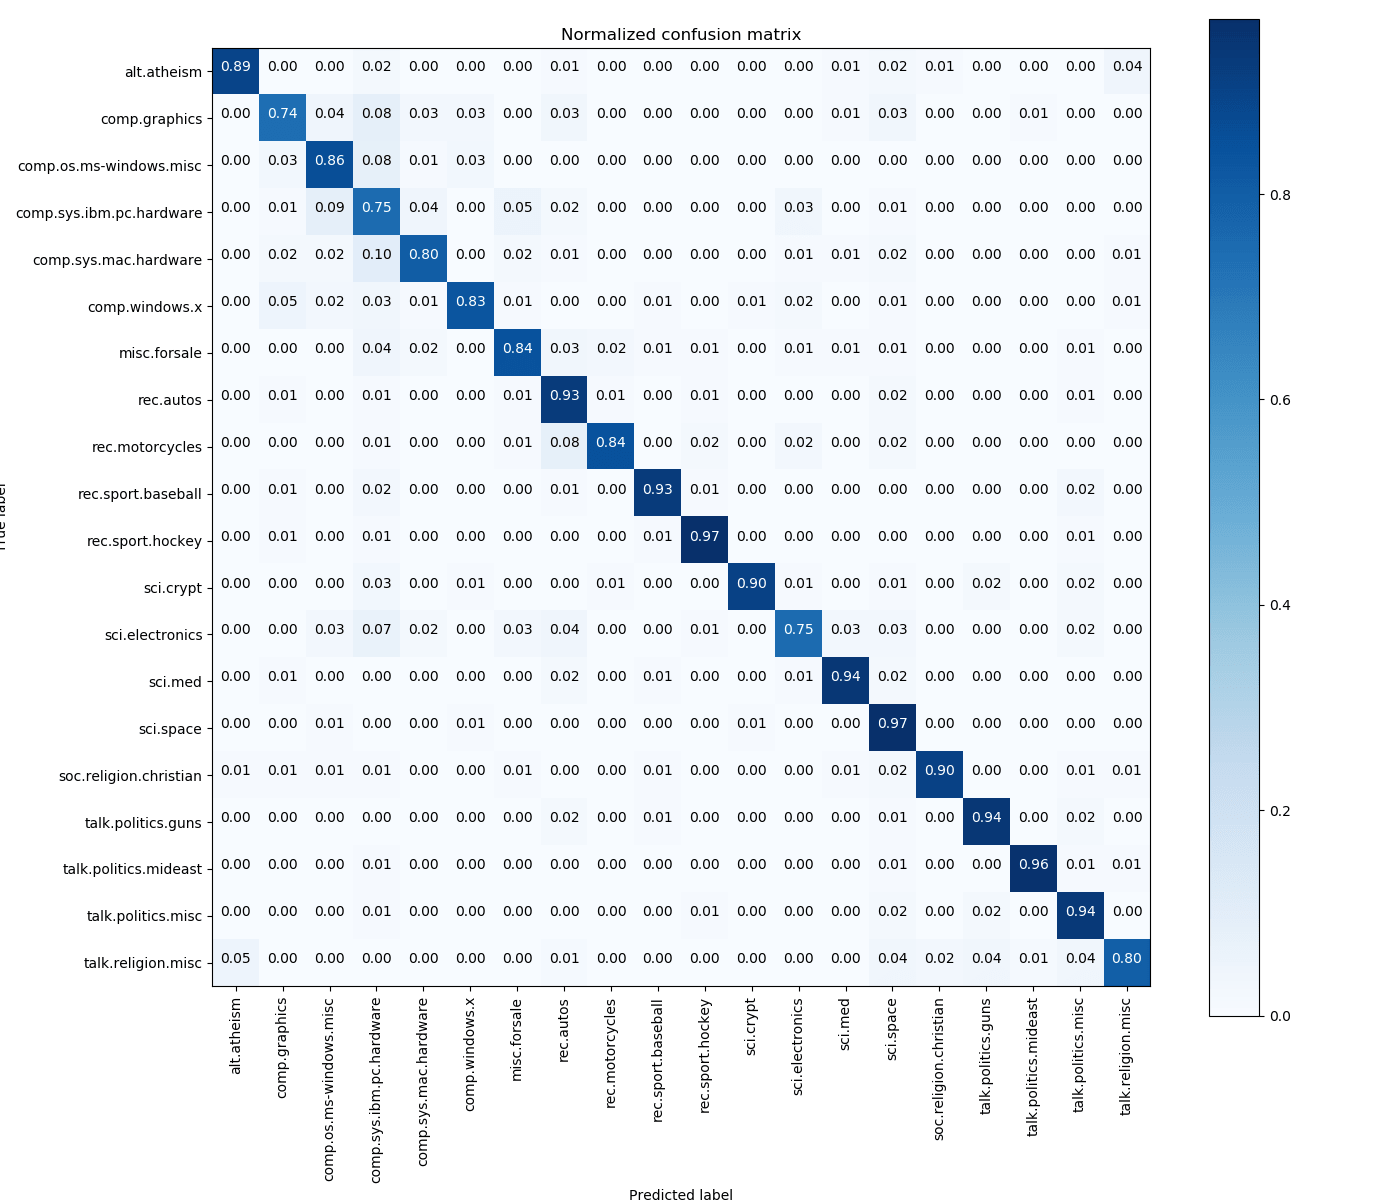
Saving the Model
Usually, the use case for deep learning is like training of data happens in different session and prediction happens using the trained model. The below code saves the model as well as tokenizer. We have to save our tokenizer because it is our vocabulary. The same tokenizer and vocabulary have to be used for accurate prediction.
# creates a HDF5 file 'my_model.h5'
model.model.save('my_model.h5')

# Save Tokenizer i.e. Vocabulary
with open('tokenizer.pickle', 'wb') as handle:
    pickle.dump(tokenizer, handle, protocol=pickle.HIGHEST_PROTOCOL)
Keras doesnxt have any utility method to save Tokenizer along with the model. We have to serialize it separately.
Loading the Keras model
# load our saved model
model = load_model('my_model.h5')

# load tokenizer
tokenizer = Tokenizer()
with open('tokenizer.pickle', 'rb') as handle:
    tokenizer = pickle.load(handle)
The prediction environment also needs to be aware of the labels and that too in the exact order they were encoded. You can get it and store for future reference using
encoder.classes_ #LabelBinarizer
Prediction
As mentioned earlier, we have set aside a couple of files for actual testing. We will read them, tokenize using our loaded tokenizer and predict the probable category
# These are the labels we stored from our training
# The order is very important here.

labels = np.array(['alt.atheism', 'comp.graphics', 'comp.os.ms-windows.misc',
 'comp.sys.ibm.pc.hardware', 'comp.sys.mac.hardware', 'comp.windows.x',
 'misc.forsale', 'rec.autos', 'rec.motorcycles', 'rec.sport.baseball',
 'rec.sport.hockey', 'sci.crypt', 'sci.electronics', 'sci.med', 'sci.space',
 'soc.religion.christian', 'talk.politics.guns', 'talk.politics.mideast',
 'talk.politics.misc', 'talk.religion.misc'])

test_files = ["C:\\DL\\20news-bydate\\20news-bydate-test\\comp.graphics\\38758",
              "C:\\DL\\20news-bydate\\20news-bydate-test\\misc.forsale\\76115",
              "C:\\DL\\20news-bydate\\20news-bydate-test\\soc.religion.christian\\21329"
              ]
x_data = []
for t_f in test_files:
    t_f_data = Path(t_f).read_text()
    x_data.append(t_f_data)

x_data_series = pd.Series(x_data)
x_tokenized = tokenizer.texts_to_matrix(x_data_series, mode='tfidf')

i=0
for x_t in x_tokenized:
    prediction = model.predict(np.array([x_t]))
    predicted_label = labels[np.argmax(prediction[0])]
    print("File -x", test_files[i], "Predicted label: " + predicted_label)
    i += 1
Output
File -x C:\DL\20news-bydate\20news-bydate-test\comp.graphics\38758 Predicted label: comp.graphics
File -x C:\DL\20news-bydate\20news-bydate-test\misc.forsale\76115 Predicted label: misc.forsale
File -x C:\DL\20news-bydate\20news-bydate-test\soc.religion.christian\21329 Predicted label: soc.religion.christian
As we know the directory name is the true label for the file, the prediction above is accurate.
Conclusion
In this article, weâve built a simple yet powerful neural network by using the Keras Python library. We have also seen how easy it is to load the saved model and do the prediction for completely unseen data.
The complete source code is available to download from our GitHub repo.
Download Code